
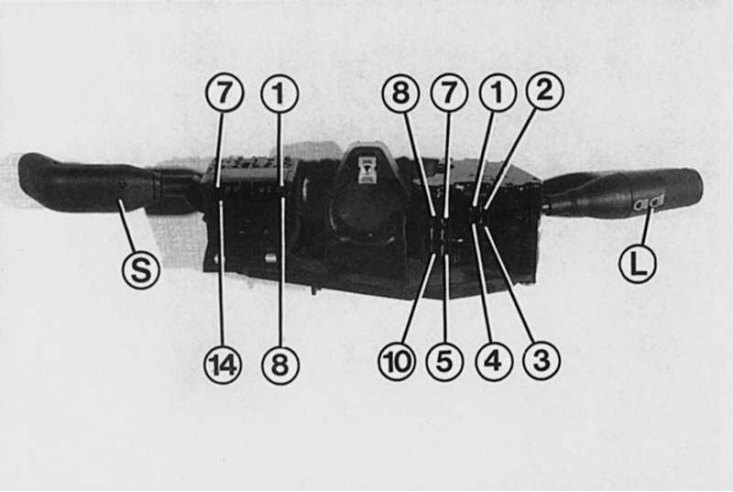
Wiper switch pin assignment: 1 - «+» - windshield wiper; 2 - high speed; 3 - low speed; 4 - free; 5 - interval in front (slowly); 6 - interval in front; 7 - end position of the windshield wiper; 8 - rear window wiper; 9 - end position of the rear window wiper; 10 - «+» - rear window washer; 11 - windshield washer pump; 12 - rear window washer pump; 13 - on-board computer; 14 - control lamp of the injection system.
Pin assignment in the light switch and direction indicator: 1 - low beam; 2 - dimensions; 3- «+» - continuous load current; 4 - high beam headlights; 5 - direction indicators on the right; 6 - light relay; 7 - direction indicators on the left; 8 - «+» - continuous load current; 9 - rear fog lamp; 10 - «+» - horn siren.
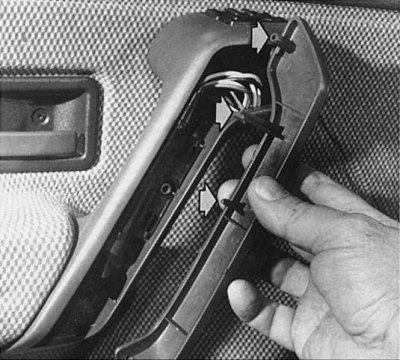
To get to the power window pushbuttons, you need to remove the interior door handle trim. The switch can then be easily pushed up out of the socket. When installing the door handle lining, first put it on from below only, and then insert the guides (shown by arrows) and press on it.
Depending on the equipment variant, the Renault 19 is equipped with a certain number of different switch types in order to use different current consumers. We distinguish between multifunction lever switches to the left and right of the steering column, pushbutton switches (hazard warning light system, heated rear window, rear fog light, fog lights, central locking, power windows, etc.) and a rotary switch for the interior fan.
Pushbutton switches
- The pushbutton switches are on the right hand side of the Renault 19, next to the steering wheel, below the radio. If the Renault 19 is equipped with push-button switches for the central lock and power windows, then they are additionally duplicated on the inner door handles.
- When the switch is pressed, its moving part lowers and closes the electrical circuit.
Removing pushbutton switches
1. Using a thin screwdriver, squeeze the pressure springs located at the ends of the switch and do not completely remove the push-button switch from its socket. When doing this, be careful not to scratch the surface around the switch with a loose screwdriver (put a rag).
2. Carefully remove the switch from its socket and disconnect the connectors located on it.
Installing additional switches
If, for example, fog lights are additionally installed, we definitely recommend installing an original switch with the appropriate connector.
1. Remove the plug from the unoccupied slot.
2. Install the plug on the wire in accordance with the diagram.
3. Put the wire with the plug on the switch connector.
4. Insert the switch into a free slot and check if it works.
Rotary switch
The only rotary switch in the Renault 19 is set to control the interior fan. All maintenance and repair work on the fan and its switch can be found in the chapter «Heating and ventilation».
Lever switches
Although they are the most commonly used, the Renault 19 usually has no problems with them. Both combination switches are a single switch assembly. The switch housing can only be opened by experienced motorists in the event of a malfunction. To establish a malfunction in the lever switches, it is enough to disassemble the upper and lower trim of the steering rack.
Removing the lever switches
1. Disassemble the upper and lower trim of the steering rack (4 screws TORX T20).
2. Remove the steering wheel.
3. Unscrew the fastening screw located in the center of the switch block.
4. Disconnect all connectors.
5. Remove the switch block.
6. When installing, which is in order, reverse assembly, before installing the steering rack trim, check the operation of the switches.