



Attention! This subsection describes the removal of the gearbox as a separate unit, separating it from the engine installed on the vehicle.
Removal procedure:
- place the car on a lift or overpass;
- remove the protective cover of the power unit;
- disconnect the negative battery cable;
- disconnect the contact connectors from the ECU and the fuel supply switch upon impact, move the wires away from the work area and secure them;
- remove the air filter air intake pipe;
- remove the battery tray;
- disconnect the clutch cable from the gearbox and move it to the side;
- unscrew the two bolts and remove the crankshaft position sensor located at the top in the flywheel area;
- disconnect the ground busbars from the gearbox housing;

Fig. 4.15. Do not completely unscrew the upper bolt securing the gearbox to the engine
- unscrew the bolts securing the gearbox to the engine block, but leave the top bolt tightened by hand until the gearbox is removed (Fig. 4.15);

Fig. 4.16. Lower front nut for fastening the gearbox to the engine
- unscrew and remove the front lower nut securing the gearbox to the engine, remembering the installation of the wiring bracket (Fig. 4.16);
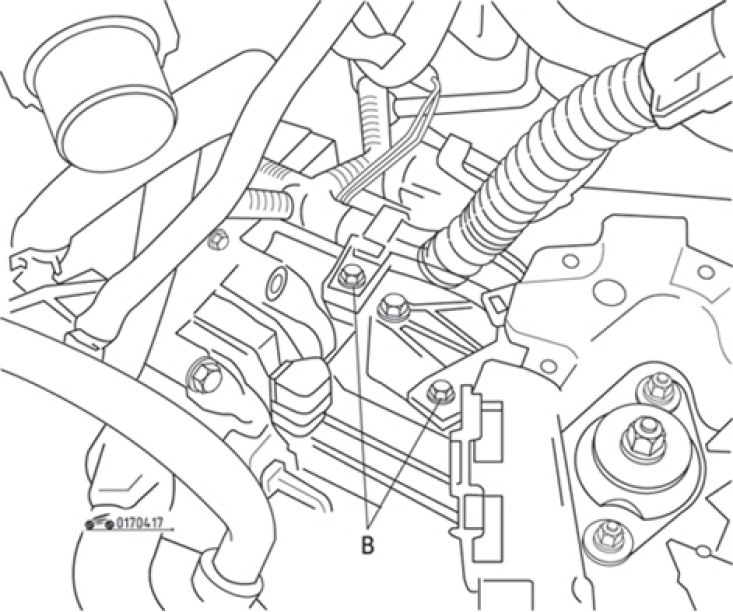
Fig. 4.17. Gearbox mounting bolts (B)
- unscrew the two mounting bolts (Fig. 4.17);
- remove the front wheels;
- remove the right front wheel drive shaft (see subsection "Front wheel drivewith");
- remove the left front wheel drive shaft together with the wheel hub (see subsection "Front wheel drive");
- remove the starter (see section "Electrical equipment");
- disconnect the connectors of the reverse light switch and the speedometer sensor, remove the speedometer sensor;
- remove the intake pipe of the exhaust system;
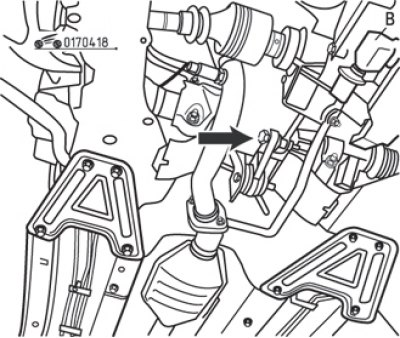
Fig. 4.18. Bolt (B) of the gear shift rod (under the cover) and the rear gearbox support mounting bolt (arrow)
- remove the gear shift drive rod assembly by unscrewing bolt B (Fig. 4.18) and the three heat shield mounting bolts to gain access to the gear shift lever support;
- remove the torque rod mounting bolt;
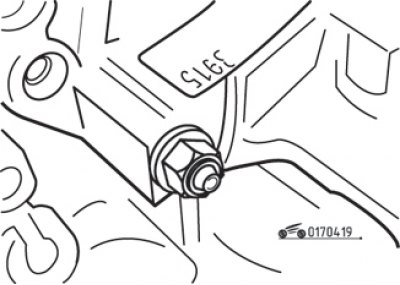
Fig. 4.19. Fastening the rear support of the gearbox
- remove the rear gearbox support (Fig. 4.19);
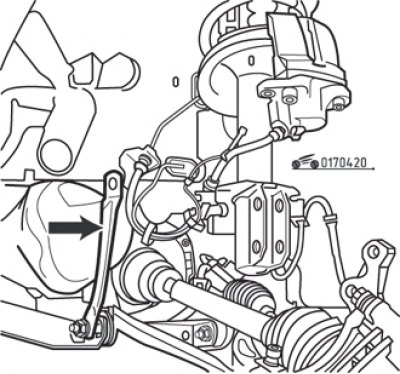
Fig. 4.20. Tie (arrow) between the subframe and the body
- remove the tie between the subframe and the body (Fig. 4.20) on the left side;
- remove the clamp between the engine and the gearbox;
- remove the steering gear mounting bolts to the subframe as described in the section "Steering";
- to facilitate removal of the steering gear, if necessary, place a shim between the rear wall of the engine and the firewall to tilt the engine forward;
- disconnect the steering gear and remove it;
- use a lifting device to lift the power unit;

Fig. 4.21. Three bolts (arrows) securing the support to the gearbox housing
- unscrew the three bolts securing the support to the gearbox housing (Fig. 4.21);
- lower the power unit as much as possible without damaging the coolant hoses;
- support the subframe with a trolley jack, placing a piece of board on the jack head, unscrew the four mounting bolts and lower the subframe to the floor;

Fig. 4.22. Unscrew the remaining fastening of the gearbox to the engine
- place a trolley jack under the gearbox, unscrew the remaining upper mount of the gearbox to the engine (Fig. 4.22) and, together with an assistant, remove the gearbox from under the car.