
Warning! To avoid serious injury, do not use homemade devices, wire, etc. when disassembling the shock absorber. Use only special tools for spring compression.
Disassembly order:
- clean the removed rack from dirt and clamp it in a vise;
- remove the upper rubber support from the rack;
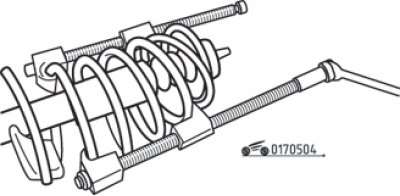
Pic. 5.4. Compression of a spring of a forward suspension bracket by means of adaptation
- install a compression tool on the spring and, tightening the nuts evenly, compress the spring so that the lower coil moves away from the support cup (pic. 5.4);
- unscrew the rack rod nut;
- remove the top washer, bearing and top spring cup;
- carefully remove the spring together with the compression tool;
- remove the bumper and boot from the shock absorber rod.
Examination:
- inspect the shock absorber for leaks, rod corrosion, dents on the body. The force when moving the rod must be uniform throughout its entire course. In the presence of defects, shock absorbers are replaced on both sides of the suspension;
- check the ease of movement of the upper thrust bearing of the rack;
- If in doubt about the suitability of the spring, carefully loosen the compression tool nuts and inspect the spring. Cracks, chips and deformations are not allowed. In the presence of the indicated damage, the springs on both sides of the suspension are replaced.
Assembly order:
- apply grease to the outer coils of the spring;
- install the anther and bump stop on the shock absorber rod;
- Install the compressed spring and upper support cup. Both ends of the spring must be installed in the thrust recesses of the cups;
- install the thrust bearing and the upper washer on the rod;
- tighten the stem nut;
- Loosening the nuts evenly, remove the compression tool from the spring;
- make sure that the ends of the springs are correctly positioned on the support cups.