
English Русский
Български
Беларускі
Український
Српски
Hrvatski
Română
Polski
Slovenský
Magyar
Bookmark Contacts Articles Sitemap
Company vehicles Peugeot Company vehicles Opel Company vehicles Skoda Company vehicles Land Rover Company vehicles Mitsubishi Company vehicles Volkswagen Company vehicles Honda
RenaultBook.ru


Duster   Fluence   Kangoo   Laguna   Logan   Megane   Sandero   Scenic   Symbol   Clio   Other
Megane 1 (1995-2002) Megan 2 (2002-2009, petrol)

Removal, inspection and installation of the release bearing (Renault Megane 1)

  • Main
  • Megane
  • Megane 1 (1995-2002)
  • Transmission
  • Clutch
  • Removal, inspection and installation of the release bearing
0
Contents: Removal 🠛 Inspection 🠛 Installation 🠛

Removal


1. To access the bearing, remove the power unit from the engine compartment, move it to a workbench and separate the transmission from the engine as described in Chapter Engine repair.
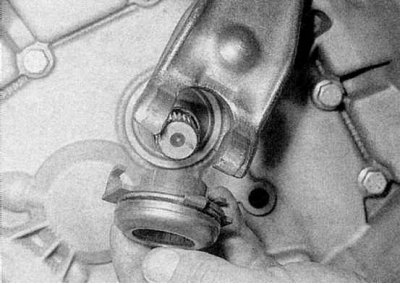
1. To access the bearing, remove the power unit from the engine compartment, move it to a workbench…


2. Tilt the clutch release fork and remove the bearing assembly from the guide sleeve (refer to the accompanying illustration).

3. Push the fork into the clutch housing to separate it from the pivot pin. If necessary, remove the rubber protective boots from the clutch housing opening and from the pivot pin.

Inspection


1. Inspect the release mechanism and replace any worn or damaged components. Carefully check all working and contact surfaces.

2. Check that the bearing rotates smoothly and easily, without noise or jolts, and that its running surface is smooth and level, without cracks, pitting or worn areas. If there is any doubt about the condition of the bearing, replace it.

Installation


Installation


Original version on our portal www.RENAULTBOOK.ru


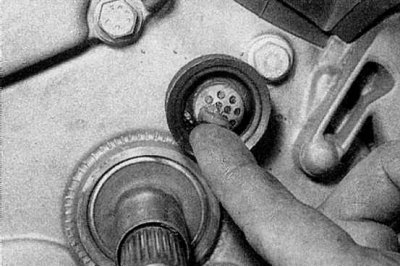
1. Before installation, apply molybdenum grease (Renault recommends Molykote BR2) on the contact surfaces of the release bearing, clutch release fork, pivot pin and guide sleeve (refer to the accompanying illustration).

Caution: Do not apply too much grease, as excess grease may come into contact with the friction disc linings.


2. Install the rubber boots into the opening of the clutch housing and into the groove on the stud, then place the release fork onto the stud.

3. Install the bearing assembly onto the guide sleeve, aligning the ends of the release fork with the tabs on the bearing.

4. Install the transmission onto the engine. Check the operation of the release mechanism, then install the power unit into the engine compartment (refer to Chapter Engine repair).
This article is available on: russian, bulgarian, belarusian, ukrainian, serbian, croatian, romanian, polish, slovak, hungarian
Article has been reviewed by editor: Fedoseev Denis
Share with friends:
Previous
Megane 1: Clutch
 

Removal, inspection and installation of the clutch basket
Checking the stroke, removing and installing the clutch pedal
Removal and installation the clutch cable
Clutch — Description and Specifications
 
Other articles on other Renault models

➽ Clutch release bearing Renault Duster 1 (2009-2017)
➽ Clutch release disc and bearing Renault Fluence 1 (2009-2020, petrol)
➽ Replacing the bearing and clutch release fork Renault Logan 1 (2004-2012, petrol)
➽ Replacing the bearing and clutch release fork Renault Sandero 1 (2007-2012, petrol)
➽ Clutch release bearing — removal and installation Renault Scenic 1 (1996-2003)
Link to this article in different formats
Reviews and comments of visitors
No comments yet


Add two numbers 48 + 32


Megan 2 (2002-2009, petrol) 
  • User manual
  • Introduction to manual
  • Controls and instruments
  • Salon equipment
  • Operation and driving
  • Maintenance and care
  • Power unit
  • Engine repair
  • Fuel system
  • Injection system
  • Intake and exhaust system
  • Starting and charging system
  • Cooling system
  • Decreased toxicity
  • Transmission
  • Clutch
  • Mechanical gearbox
  • Automatic gearbox
  • Wheel drive mechanism
  • Chassis, running gear
  • Suspension and wheels
  • Steering
  • Brake system
  • Body and interior
  • Exterior (external elements)
  • Interior (internal elements)
  • Doors, locks and windows
  • Heating and air conditioning
  • Electrical equipment
  • Equipment and devices
  • Headlights and lighting
  • Electrical circuits
Megane 1 (1995-2002) 
  • General information
  • User manual
  • Maintenance
  • Power unit
  • Petrol engines 1.4/1.6 l
  • Petrol engines 2.0 l
  • Diesel engines 1.9 l
  • Overhaul of engines
  • Cooling system
  • Fuel system (petrol)
  • Fuel system (diesel)
  • Decreased toxicity
  • Charge and launch systems
  • Ignition system (petrol)
  • Preheat system (diesel)
  • Transmission
  • Clutch
  • Mechanical gearbox
  • Automatic gearbox
  • Drive shafts
  • Chassis, running gear
  • Brake system
  • Car suspension
  • Steering
  • Body and interior
  • Exterior (external elements)
  • Interior (internal elements)
  • Doors, locks and windows
  • Electrical equipment
  • Equipment and devices
  • Electrical circuits
RenaultBook.ru © 2018–2026 | Mobile version | News and articles | Sitemap: EN BG BY UA RS HR RO PL SK HU | Administration | Site search | Bookmark
Duster 1 (2009-2017) | Fluence 1 (2009-2020, petrol) | Kangoo 1 (1997-2007) | Laguna 2 (2001-2007) | Logan 1 (2004-2012, petrol) | Logan 2 (2012-2020) | Megane 1 (1995-2002) | Megan 2 (2002-2009, petrol) | Sandero 1 (2007-2012, petrol) | Scenic 1 (1996-2003) | Symbol 1 (1999-2008, petrol) | Symbol 2 (2008-2013, petrol) | Renault 19 (1988-1996) | Espace I and II (1984-1996) | Espace III (1996-2002) | Clio 1 (1990-1998) |
We want your visit to be comfortable 😌 and use cookies 🍪 to do so.