
English Русский
Български
Беларускі
Український
Српски
Hrvatski
Română
Polski
Slovenský
Magyar
Bookmark Contacts Articles Sitemap
Company vehicles Peugeot Company vehicles Opel Company vehicles Skoda Company vehicles Land Rover Company vehicles Mitsubishi Company vehicles Volkswagen Company vehicles Honda
RenaultBook.ru


Duster   Fluence   Kangoo   Laguna   Logan   Megane   Sandero   Scenic   Symbol   Clio   Other
Logan 1 (2004-2012, petrol) Logan 2 (2012-2020)

Turbocharger oil line (K9K diesel engine only) (Renault Logan 2)

  • Main
  • Logan
  • Logan 2 (2012-2020)
  • Power unit
  • Lubrication system
  • Turbocharger oil line (K9K diesel engine only)
0
Contents: Removal and installation the…🠛 Removal and installation the…🠛
Attention:
  • Use leak-resistant nitrile gloves for work.
  • Ensure that no foreign objects enter the turbine or compressor during installation. Metal objects entering the oil or air circuits of the turbocharger may cause damage to it.
  • Make sure the oil return line is not clogged with scale. Make sure the oil line is tight. If leaks are detected, replace the oil line.


Removal and installation the turbocharger pressure oil line


Removal the turbocharger pressure oil line


1. Disconnect the negative battery terminal.

2. Remove the front engine cover.

3. Disconnect the oil vapor vent pipe from the air filter outlet duct (1).
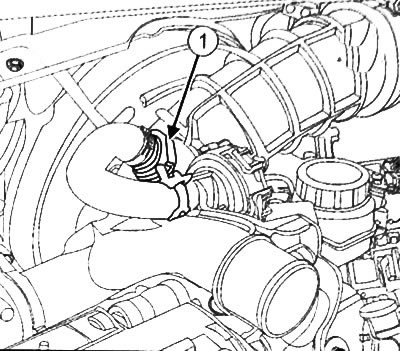
3. Disconnect the oil vapor vent pipe from the air filter outlet duct (1).


4. Disconnect the air flow sensor wires from the air filter outlet duct (2).
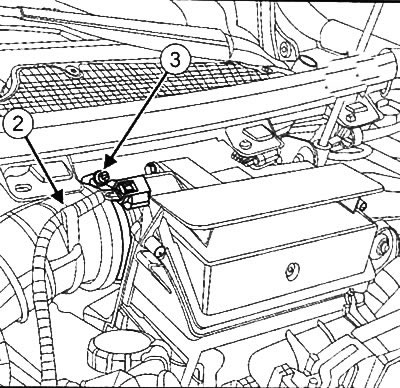
4. Disconnect the air flow sensor wires from the air filter outlet duct (2).


5. Unclip the air outlet duct clamp (3) from the air filter unit.


6. Disconnect the air outlet duct from the air filter unit.

7. Unclip the clamp (4) of the air filter outlet pipe from the turbocharger.

8. Disconnect the air filter outlet pipe from the turbocharger.

9. Remove the air filter outlet pipe from the air filter unit.

10. Unscrew the hollow bolt (7) of the turbocharger pressure oil line.
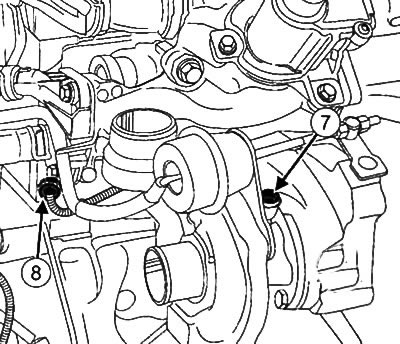
10. Unscrew the hollow bolt (7) of the turbocharger pressure oil line.


11. Loosen the nut (8) of the turbocharger pressure oil line on the cylinder head using the keys from the high-pressure line removal kit (diameter 14, 17, 19).

12. Remove the turbocharger pressure oil line.

13. Use a cloth to remove any leaked oil from the engine.

Installing the turbocharger oil pressure line


Caution: Be sure to replace the turbocharger pressure oil line and the hollow oil line bolt with new ones after each removal.


1. Install a new turbocharger oil pressure line.

2. Loosen the turbocharger oil pressure line nut onto the cylinder head.

3. Install the new hollow oil pressure line bolt onto the turbocharger.

4. Tighten the high pressure oil line nut on the cylinder head to 35 Nm using the wrenches from the high pressure line removal kit (diameter 14, 17, 19).


5. Tighten the turbocharger oil pressure line hollow bolt to 14 Nm.

6. Install the air outlet duct onto the air filter unit.

7. Connect the air filter outlet duct to the turbocharger.

8. Tighten the air outlet duct clamp on the turbocharger to 5.5 Nm.

9. Connect the air outlet duct to the air filter unit.

10. Tighten the air outlet duct clamp on the air filter unit to 5.5 N·m.

11. Connect the MAF sensor wiring to the air filter outlet duct.

12. Connect the fuel vapor vent pipe to the air filter outlet duct.

13. Install the engine cover.

14. Connect the negative battery terminal.

15. Disconnect the crankshaft position sensor connector to prevent the engine from starting.

16. Connect the independent starter.

17. Crank the starter until the oil pressure warning light on the instrument panel goes out (you need to wait a few seconds).

18. Turn off the ignition.

19. Disconnect the independent starter.

20. Connect the crankshaft position sensor connector.

21. Start the engine at idle speed, then press the accelerator pedal several times.

22. Turn off the ignition.

23. Make sure the turbocharger is working properly.

24. Make sure there are no oil leaks from the turbocharger.

25. Using a diagnostic tool, check for stored fault codes in the control unit memory. If any fault codes are found, delete them.

Removal and installation the turbocharger return oil line


Removal the turbocharger return oil line


1. Place the vehicle on a two-post lift.

2. Disconnect the negative battery terminal.

3. Loosen the mounting bolts and remove the engine protective pan.


4. Remove the catalytic converter.

5. Loosen the bolts (1) of the turbocharger return oil line.
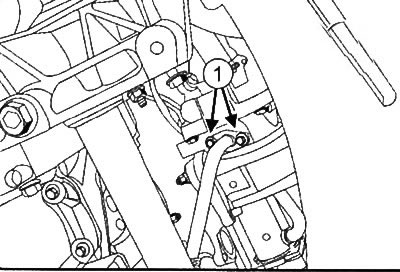
5. Loosen the bolts (1) of the turbocharger return oil line.


6. Rotate the turbocharger return oil line to facilitate removal.
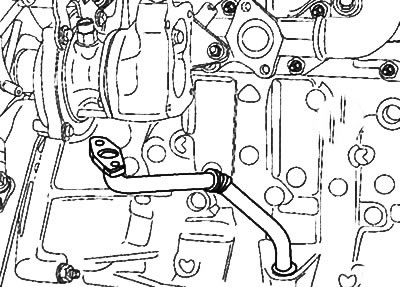
6. Rotate the turbocharger return oil line to facilitate removal.


7. Remove the return oil line from the cylinder block.

8. Remove the turbocharger return oil line seals.

Installing a turbocharger return oil line


Caution: Always replace turbocharger seals with new ones.


1. Install a new turbocharger oil return line with new seals.

2. Lubricate the turbocharger oil return line O-ring with clean engine oil. Tighten the turbocharger oil return line bolts to 12 N·m.

3. Install the catalytic converter.

4. Install the engine protective pan.

5. Connect the negative battery terminal.
This article is available on: russian, bulgarian, belarusian, ukrainian, serbian, croatian, romanian, polish, slovak, hungarian
Article has been reviewed by editor: Petrovsky Roman
Share with friends:
Previous
Logan 2: Lubrication system
Next

Engine oil pressure sensor
Engine oil pump
Engine oil pan
Checking engine oil pressure
Engine K9K (1.5 l)
Special tools and accessories for the cooling system
Other articles on other Renault models

➽ Turbocharger Heat Shield and Oil Line (H4J Engine) Renault Fluence 1 (2009-2020, petrol)
➽ Diesel engine preheating system Renault Duster 1 (2009-2017)
➽ Technical characteristics of the diesel engine F8Q Renault Kangoo 1 (1997-2007)
➽ Diagnostics and troubleshooting of diesel engine F9Q Renault Laguna 2 (2001-2007)
➽ 1.9 litre diesel engine specifications Renault Megane 1 (1995-2002)
Link to this article in different formats
Reviews and comments of visitors
No comments yet


Add two numbers 35 + 27


Logan 2 (2012-2020) 
  • General information
  • Faults en route
  • Daily checks
  • Governing bodies
  • Maintenance
  • Power unit
  • Petrol engines 1.2 l
  • Petrol engines 1.6 l
  • Diesel engines 1.5 l
  • Cooling system
  • Lubrication system
  • Power and control system
  • Intake and exhaust system
  • Engine electrical equipment
  • Transmission
  • Clutch
  • Car gearbox
  • Drive shafts
  • Chassis, running gear
  • Suspension and wheels
  • Brake system
  • Steering
  • Body and interior
  • Exterior (external elements)
  • Interior (internal elements)
  • Safety system
  • Heating and air conditioning
  • Electrical equipment
  • Equipment and devices
  • Wiring diagrams (sedan)
  • Wiring diagrams (wagon)
Logan 1 (2004-2012, petrol) 
  • General information
  • Vehicle device
  • User manual
  • Faults en route
  • Daily maintenance
  • First maintenance
  • Second maintenance
  • Driver tips
  • Power unit
  • Engine repair
  • Lubrication system
  • Cooling system
  • Power and exhaust system
  • Transmission
  • Clutch
  • Car gearbox
  • Drive shafts
  • Chassis, running gear
  • Front suspension
  • Rear suspension
  • Steering
  • Brake system
  • Wheels and tires
  • Body and interior
  • Exterior (external elements)
  • Interior (internal elements)
  • Doors, locks and windows
  • Body Care
  • Electrical equipment
  • Equipment and devices
  • Headlights and lighting
  • Power devices
  • Electrical circuits
RenaultBook.ru © 2018–2026 | Mobile version | News and articles | Sitemap: EN BG BY UA RS HR RO PL SK HU | Administration | Site search | Bookmark
Duster 1 (2009-2017) | Fluence 1 (2009-2020, petrol) | Kangoo 1 (1997-2007) | Laguna 2 (2001-2007) | Logan 1 (2004-2012, petrol) | Logan 2 (2012-2020) | Megane 1 (1995-2002) | Megan 2 (2002-2009, petrol) | Sandero 1 (2007-2012, petrol) | Scenic 1 (1996-2003) | Symbol 1 (1999-2008, petrol) | Symbol 2 (2008-2013, petrol) | Renault 19 (1988-1996) | Espace I and II (1984-1996) | Espace III (1996-2002) | Clio 1 (1990-1998) |
We want your visit to be comfortable 😌 and use cookies 🍪 to do so.