English Русский
Български
Беларускі
Український
Српски
Hrvatski
Română
Polski
Slovenský
Magyar
Bookmark Contacts Articles Sitemap
Company vehicles Peugeot Company vehicles Opel Company vehicles Skoda Company vehicles Land Rover Company vehicles Mitsubishi Company vehicles Volkswagen Company vehicles Honda
RenaultBook.ru


Duster   Fluence   Kangoo   Laguna   Logan   Megane   Sandero   Scenic   Symbol   Clio   Other
Logan 1 (2004-2012, petrol) Logan 2 (2012-2020)

Checking the level and adding coolant (Renault Logan 1)

  • Main
  • Logan
  • Logan 1 (2004-2012, petrol)
  • General information
  • Daily maintenance
  • Checking the level and adding coolant
0
You will need: coolant, funnel, clean cloth.

Recommendations. The manufacturer recommends using a coolant (antifreeze) based on ethylene glycol. Check with the dealer - seller of the car the brand of liquid poured into your car.
Do not mix liquids of different colors, different manufacturers. If you need to add coolant, but you do not know the brand of liquid poured into the system, replace all the liquid in the cooling system.
Use only products from proven manufacturers. Remember that using low-quality coolant leads to expensive engine repairs!
Before starting work, place the vehicle on a level surface.


Caution! Check the coolant level only when the engine is cold.
Coolant is toxic, so take precautions when handling it.
Do not pour liquid into the tank above the "MAX" mark, as its volume will increase when the engine is running.
When starting the engine, the expansion tank cap must be closed.


Constantly monitor the coolant level. A sharp decrease or increase should be a signal for an immediate check of the engine cooling system.

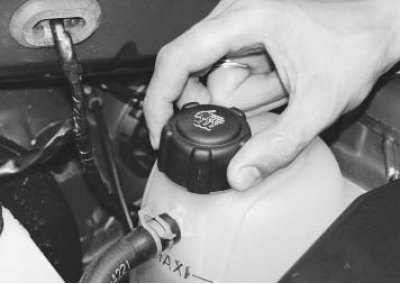
If the freshly poured antifreeze suddenly and unexpectedly quickly changed color to brown, it means you were sold a fake, to which they "forgot" to add corrosion inhibitors. Replace the liquid as quickly as possible before it has time to corrode the cooling system.
If the freshly poured antifreeze suddenly and unexpectedly quickly changed color to brown, it means…


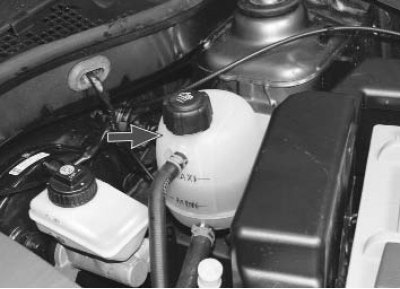
The expansion tank is installed in the engine compartment on the left side.


The expansion tank is installed in the engine compartment on the left side.


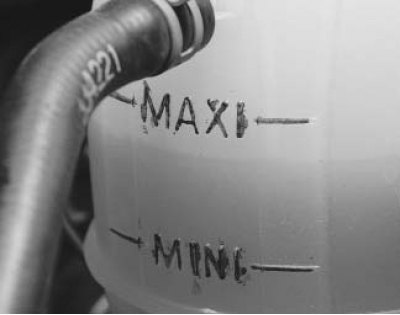
1. The coolant level must be between the "MAX" and "MIN" marks on the wall of the expansion tank.
1. The coolant level must be between the «MAX» and «MIN» marks on the wall of the expansion tank.


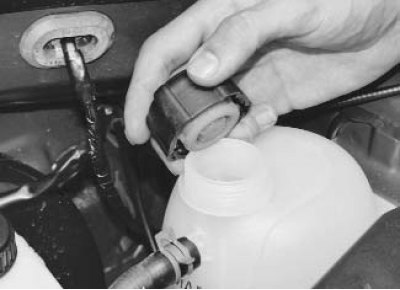
2. To add fluid, unscrew the expansion tank cap...
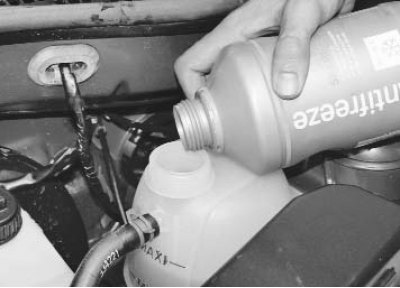
2. To add fluid, unscrew the expansion tank cap...


3. ...and add coolant to the required level.

3. ...and add coolant to the required level.


4. Screw on the expansion tank cap.

Caution! Tighten the expansion tank cap tightly. The expansion tank is under pressure when the engine is running, so coolant may leak from under a poorly tightened cap or the cap may be torn off.
This article is available on: russian, bulgarian, belarusian, ukrainian, serbian, croatian, romanian, polish, slovak, hungarian
Article has been reviewed by editor: Podkrepilov Maxim
Share with friends:
Previous
Logan 1: Daily maintenance
Next

Checking the level and adding oil to the lubrication system
Checking the wheels
Safety rules for maintenance
Vehicle maintenance regulations
Checking the level and adding brake fluid to the master cylinder…
Checking the level and adding working fluid to the power steering…
Checking the level and adding fluid to the washer reservoir
Checking external lighting fixtures
Other articles on other Renault models

➽ Checking the level and adding coolant Renault Sandero 1 (2007-2012, petrol)
➽ Coolant — Checking the Level Renault Scenic 1 (1996-2003)
➽ Checking the coolant level (400 km) Renault Symbol 1 (1999-2008, petrol)
➽ Checking the coolant level Renault 19 (1988-1996)
➽ Checking the engine oil level Renault Kangoo 1 (1997-2007)
Link to this article in different formats
Reviews and comments of visitors
No comments yet


Add two numbers 48 + 11


Logan 2 (2012-2020) 
  • General information
  • Faults en route
  • Daily checks
  • Governing bodies
  • Maintenance
  • Power unit
  • Petrol engines 1.2 l
  • Petrol engines 1.6 l
  • Diesel engines 1.5 l
  • Cooling system
  • Lubrication system
  • Power and control system
  • Intake and exhaust system
  • Engine electrical equipment
  • Transmission
  • Clutch
  • Car gearbox
  • Drive shafts
  • Chassis, running gear
  • Suspension and wheels
  • Brake system
  • Steering
  • Body and interior
  • Exterior (external elements)
  • Interior (internal elements)
  • Safety system
  • Heating and air conditioning
  • Electrical equipment
  • Equipment and devices
  • Wiring diagrams (sedan)
  • Wiring diagrams (wagon)
Logan 1 (2004-2012, petrol) 
  • General information
  • Vehicle device
  • User manual
  • Faults en route
  • Daily maintenance
  • First maintenance
  • Second maintenance
  • Driver tips
  • Power unit
  • Engine repair
  • Lubrication system
  • Cooling system
  • Power and exhaust system
  • Transmission
  • Clutch
  • Car gearbox
  • Drive shafts
  • Chassis, running gear
  • Front suspension
  • Rear suspension
  • Steering
  • Brake system
  • Wheels and tires
  • Body and interior
  • Exterior (external elements)
  • Interior (internal elements)
  • Doors, locks and windows
  • Body Care
  • Electrical equipment
  • Equipment and devices
  • Headlights and lighting
  • Power devices
  • Electrical circuits
RenaultBook.ru © 2018–2026 | Mobile version | News and articles | Sitemap: EN BG BY UA RS HR RO PL SK HU | Administration | Site search | Bookmark
Duster 1 (2009-2017) | Fluence 1 (2009-2020, petrol) | Kangoo 1 (1997-2007) | Laguna 2 (2001-2007) | Logan 1 (2004-2012, petrol) | Logan 2 (2012-2020) | Megane 1 (1995-2002) | Megan 2 (2002-2009, petrol) | Sandero 1 (2007-2012, petrol) | Scenic 1 (1996-2003) | Symbol 1 (1999-2008, petrol) | Symbol 2 (2008-2013, petrol) | Renault 19 (1988-1996) | Espace I and II (1984-1996) | Espace III (1996-2002) | Clio 1 (1990-1998) |
We want your visit to be comfortable 😌 and use cookies 🍪 to do so.