
English Русский
Български
Беларускі
Український
Српски
Hrvatski
Română
Polski
Slovenský
Magyar
Bookmark Contacts Articles Sitemap
Company vehicles Peugeot Company vehicles Opel Company vehicles Skoda Company vehicles Land Rover Company vehicles Mitsubishi Company vehicles Volkswagen Company vehicles Honda
RenaultBook.ru


Duster   Fluence   Kangoo   Laguna   Logan   Megane   Sandero   Scenic   Symbol   Clio   Other
Logan 1 (2004-2012, petrol) Logan 2 (2012-2020)

Removal and installation the heating and air conditioning control unit (Renault Logan 1)

  • Main
  • Logan
  • Logan 1 (2004-2012, petrol)
  • Body and interior
  • Interior (internal elements)
  • Removal and installation the heating and air conditioning control unit
0
You will need: TORX T20 key, flat-blade screwdriver.

1. Disconnect the wire from the negative terminal of the battery.

2. Remove the central instrument panel trim (see "Removing and installing the instrument panel").
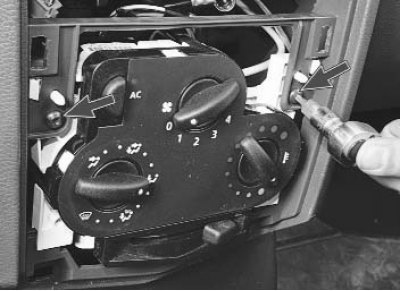
2. Remove the central instrument panel trim (see «Removing and installing the instrument panel»).


3. Remove the two screws securing the heating and air conditioning control unit to the instrument panel.

4. Pull the control unit out of the socket in the instrument panel and disconnect the wiring harness connector from it.
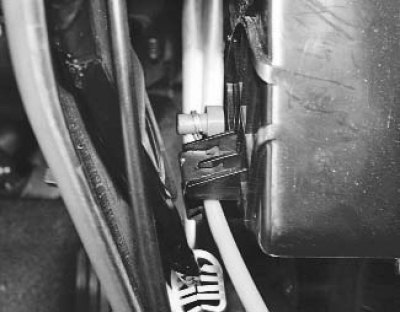
4. Pull the control unit out of the socket in the instrument panel and disconnect the wiring…


(Original version on our portal: www.renaultbook.ru)

5. Under the instrument panel, remove the cable sheaths from the holders on the heater body and disconnect the air flow distribution flap drive cable from the levers (on the left of the heater, with a green casing)...
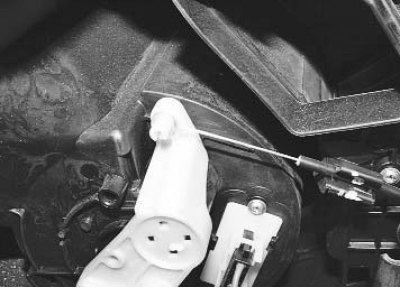


5. Under the instrument panel, remove the cable sheaths from the holders on the heater body and…


6. ...recirculation flap drive cable (on the left of the heater, with a black casing)...

6. ...recirculation flap drive cable (on the left of the heater, with a black casing)...
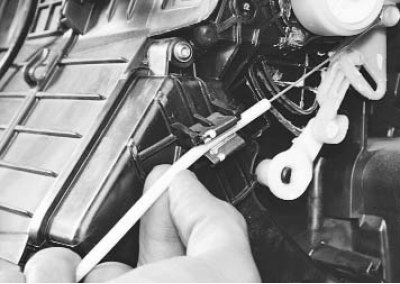

7. ...cable for the air temperature control flap drive supplied to the passenger compartment (on the right side of the heater, with a white casing) and remove the air conditioning and heating system control unit.

Note: Remember the location of the cables by the color of their sheaths so that when reinstalling them you do not mix up the heater levers for connecting them.


8. Install the air conditioning and heating system control unit and all removed parts in the reverse order of removal.
This article is available on: russian, bulgarian, belarusian, ukrainian, serbian, croatian, romanian, polish, slovak, hungarian
Article has been reviewed by editor: Podkrepilov Maxim
Share with friends:
Previous
Logan 1: Interior (internal elements)
Next

Removal and installation the heater radiator
Features of the heater and air conditioner
Removal and installation the instrument panel
Removal and installation the interior rearview mirror
Removal and installation of the electronic control unit of the…
Replacing handrails
Replacing sun visors
Removal and installation of interior trim
Removal and installation trunk trim
Other articles on other Renault models

➽ Removal and installation of the control unit of the heating, air… Renault Sandero 1 (2007-2012, petrol)
➽ Heating and air conditioning control panel Renault Megan 2 (2002-2009, petrol)
➽ Control of heating, ventilation and air conditioning systems Renault Espace III (1996-2002)
➽ Heating system control unit — removal and installation Renault Clio 1 (1990-1998)
➽ Heating, ventilation and air conditioning controls Renault Duster 1 (2009-2017)
Link to this article in different formats
Reviews and comments of visitors
No comments yet


Add two numbers 10 + 14


Logan 2 (2012-2020) 
  • General information
  • Faults en route
  • Daily checks
  • Governing bodies
  • Maintenance
  • Power unit
  • Petrol engines 1.2 l
  • Petrol engines 1.6 l
  • Diesel engines 1.5 l
  • Cooling system
  • Lubrication system
  • Power and control system
  • Intake and exhaust system
  • Engine electrical equipment
  • Transmission
  • Clutch
  • Car gearbox
  • Drive shafts
  • Chassis, running gear
  • Suspension and wheels
  • Brake system
  • Steering
  • Body and interior
  • Exterior (external elements)
  • Interior (internal elements)
  • Safety system
  • Heating and air conditioning
  • Electrical equipment
  • Equipment and devices
  • Wiring diagrams (sedan)
  • Wiring diagrams (wagon)
Logan 1 (2004-2012, petrol) 
  • General information
  • Vehicle device
  • User manual
  • Faults en route
  • Daily maintenance
  • First maintenance
  • Second maintenance
  • Driver tips
  • Power unit
  • Engine repair
  • Lubrication system
  • Cooling system
  • Power and exhaust system
  • Transmission
  • Clutch
  • Car gearbox
  • Drive shafts
  • Chassis, running gear
  • Front suspension
  • Rear suspension
  • Steering
  • Brake system
  • Wheels and tires
  • Body and interior
  • Exterior (external elements)
  • Interior (internal elements)
  • Doors, locks and windows
  • Body Care
  • Electrical equipment
  • Equipment and devices
  • Headlights and lighting
  • Power devices
  • Electrical circuits
RenaultBook.ru © 2018–2026 | Mobile version | News and articles | Sitemap: EN BG BY UA RS HR RO PL SK HU | Administration | Site search | Bookmark
Duster 1 (2009-2017) | Fluence 1 (2009-2020, petrol) | Kangoo 1 (1997-2007) | Laguna 2 (2001-2007) | Logan 1 (2004-2012, petrol) | Logan 2 (2012-2020) | Megane 1 (1995-2002) | Megan 2 (2002-2009, petrol) | Sandero 1 (2007-2012, petrol) | Scenic 1 (1996-2003) | Symbol 1 (1999-2008, petrol) | Symbol 2 (2008-2013, petrol) | Renault 19 (1988-1996) | Espace I and II (1984-1996) | Espace III (1996-2002) | Clio 1 (1990-1998) |
We want your visit to be comfortable 😌 and use cookies 🍪 to do so.