
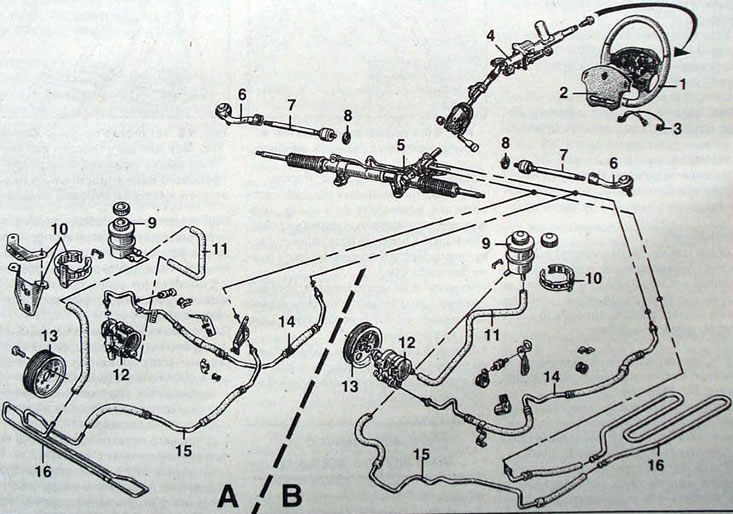
Pic. 9.1. Steering: A - cars with diesel engines; B - cars with gasoline engines; 1 - steering wheel; 2 - cover/airbag; 3 - connectors; 4 - steering column; 5 - steering gear; 6 - tie rod end; 7 - steering rod; 8 - tie rod mounting ring; 9 - nutrient tank; 10 - bracket for the nutrient tank; 11 - supply pipeline; 12 - power steering pump; 13 - power steering pump pulley; 14 - pressure pipeline; 15 - return pipeline; 16 - heat exchanger
The steering column is supplied as a spare part only as an assembly.
Attention. When removing the steering wheel, you must disable the airbag and seat belt pretensioner. Failure to comply with these requirements may lead to malfunction of these devices and to their spontaneous operation.
Removal
- Raise the front of the car and set the front wheels to drive straight ahead.
- Disconnect the cable from the negative terminal of the battery.
- On the back of the steering wheel, remove the two screws, lift up the airbag, disconnect the electrical connector, and remove the driver's airbag from the center of the steering wheel. Place the pillow in a safe place with the bag facing up.
- Disconnect the connectors from the horn switch and cruise control system.
- Remove the steering wheel mounting nut. Using chalk, a marker or paint, apply alignment marks to the steering wheel and the end of the steering shaft. The marks are necessary to reinstall the steering wheel to its original position.
- Use a puller to remove the steering wheel from the shaft. Do not knock on the shaft or steering wheel when attempting to remove the steering wheel.
- Use adhesive tape to secure the position of the airbag spiral wire, otherwise it may be misaligned and broken when installing the steering wheel.
- Remove the radio remote control.
- Remove the upper and lower steering column housings (pic. 9.2).
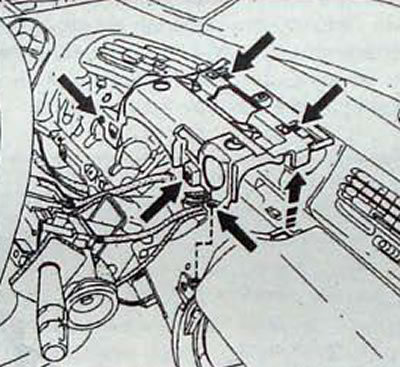
Pic. 9.2. Location of the screws securing the steering column casings and the left lower console
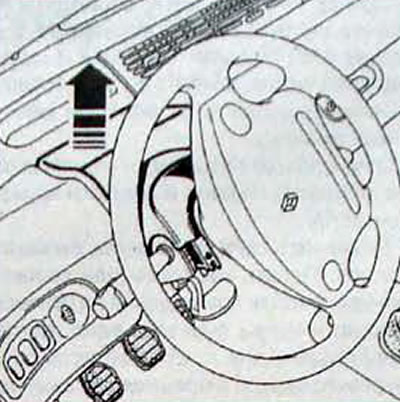
Pic. 9.3. Removing the upper steering column cover

Pic. 9.4. Location of the nut and bolt securing the steering shaft universal joint to the steering gear
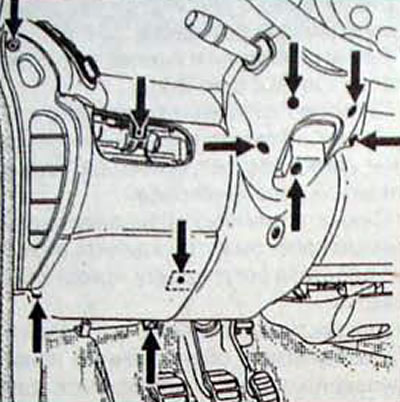
Pic. 9.5. Location of the steering column mounting screws and bolts
Pic. 9.6. Installation of fixture Dir. 1408 to adjust the position of the steering shaft universal joint fork relative to the steering gear drive gear
- Remove the left lower console.
- Remove the fabric cover or display frame of the automatic transmission selector lever.
- Remove the lower trim under the steering wheel and disconnect the connector from the rheostat for adjusting the brightness of the backlight.
- To access the steering column mountings, remove the steering column trim panel and disconnect the automatic transmission selector display.
- Disconnect the connectors from the ignition switch, windshield washer/wiper switch, and turn signal/headlight switch.
- To access the steering column seal, remove the mat.
- Be careful to remove the cuff as it has two working edges - one for sound insulation and one for the partition.
- On vehicles with an automatic transmission, remove the clamp and disconnect the shift lock cable.
- Set the wheels to move in a straight line and from the passenger compartment, unscrew the nut and bolt connecting the steering shaft universal joint fork.
- Unscrew the screws and bolt securing the steering column to the body and remove the steering column assembly with switches.
Installation
- Install the steering column.
- Screw in the bolt and nut connecting the steering shaft universal joint fork.
Note. Since the lower part of the steering column can move, it is necessary to adjust the position of the steering shaft universal joint yoke relative to the steering gear drive gear.
- Inside the car, install the Dir device on the lower part of the steering column. 1408 (pic. 9.6).
- Screw in the steering shaft universal joint fork connection bolt and tighten the bolt nut to the required torque.
- Remove fixture Dir. 1408.
- The steering is in the mid-point position if it is locked by an anti-theft device with the wheels in a straight line position.
- Check that the slip ring is blocked with adhesive tape. Otherwise, center the slip ring.
- Remove the adhesive tape.
- In accordance with the previously marked marks, install the steering wheel and secure it with the nut, tightening it to the required torque.
- Install the airbag:
- Connect the connector to the airbag, install it in the center of the steering wheel and secure it with two screws. Operate the airbag and seat belt pretensioner.
- Reinstall the steering column collar, using a putty knife or string to install the outer edge of the collar.
- Further installation is carried out in the reverse order of removal.
- Tighten the steering column mounting nuts to a torque of 15 Nm.