English Русский
Български
Беларускі
Український
Српски
Hrvatski
Română
Polski
Slovenský
Magyar
Bookmark Contacts Articles Sitemap
Company vehicles Peugeot Company vehicles Opel Company vehicles Skoda Company vehicles Land Rover Company vehicles Mitsubishi Company vehicles Volkswagen Company vehicles Honda
RenaultBook.ru


Duster   Fluence   Kangoo   Laguna   Logan   Megane   Sandero   Scenic   Symbol   Clio   Other
Renault 19 (1988-1996) Espace I and II (1984-1996) Espace III (1996-2002)

Ignition distributor — removal and installation (Renault Espace I)

  • Main
  • Renault
  • Espace I and II (1984-1996)
  • Power unit
  • Ignition system
  • Ignition distributor — removal and installation
0
Contents: 4-cylinder carburetor engine 🠛 4-cylinder engine with fuel injection 🠛 V6 Engine 🠛

4-cylinder carburetor engine


1. The distributor installed on the engine must be reinstalled in its original position after removal. To do this, mark all the parts in a way that is understandable to you and, without turning the engine, install the ignition distributor so that the leash engages in the same position.

2. The ignition distributor is installed on the side of the engine. Remove the distributor as follows:

3. Disconnect the battery.

4. Disconnect the high-tension wire from the distributor cap, or remove the distributor cap spring clips by pressing them away from the cap.

5. Remove the cable from the distributor side.

6. Turn the engine until the piston of the first cylinder is at TDC and mark the position of the tip of the runner on the outside of the distributor cap. To turn, jack up the front wheel, engage fifth gear and rotate the wheel until the dead center is reached.

7. Remove the pressure rail nut at the bottom of the distributor and remove the distributor from the cylinder block.

8. If the distributor does not require repair, install it in the reverse order.

9. Removal or installation of the distributor after engine repair occurs as follows:

10. Set the piston of the first cylinder to TDC, i.e. both valves should be closed, or crank the engine until the ignition timing indicator signals that this position has been reached (see chapter 8.2).

11. Position the tip of the runner straight against the mark on the distributor cap.


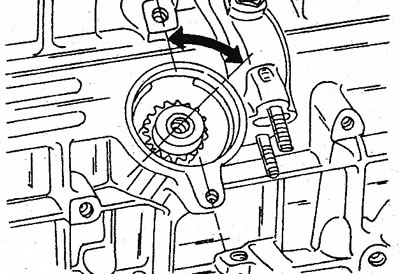
12. Check the position of the oil pump drive gear. The groove of the distributor driver should be at a certain angle relative to the center line of both distributor screw holes, (see illustration 2.12).

2.12 The groove on the drive shaft before installing the distributor must be as shown in the figure

2.12 The groove on the drive shaft before installing the distributor must be as shown in the figure


13. Install the distributor in this position and make sure that the tip of the runner is against the mark. Otherwise, check the TDC position again. Secure the distributor.

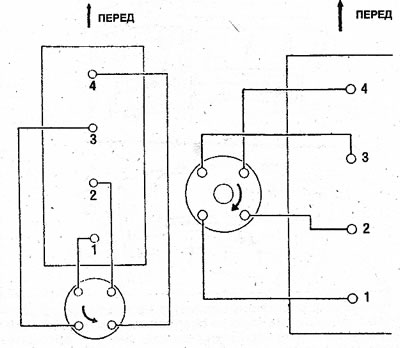
14. Reconnect all cables. The illustration on the right shows the wiring diagram for a carburetor engine.

2.14 Wiring diagram. Left for fuel injection engine, right for carburetor engine FRONT

2.14 Wiring diagram. Left for fuel injection engine, right for carburetor engine FRONT


15. Finally, check the ignition timing.


4-cylinder engine with fuel injection


16. The sole function of the fuel injected engine distributor is to distribute voltage to the spark plugs in the firing order.

17. As shown in Illustration 2.14, the distributor is mounted on the rear of the engine. The distributor rotor and the cover separating the breaker from the distributor can be replaced. Connect the cables to the spark plugs as shown in Illustration 2.14 on the left. The ignition timing is determined electronically and cannot be adjusted.

V6 Engine


18. The shape of the ignition distributor differs from the well-known one, since it is an ignition distributor with an igniting spark. Under the cover (closed with a spring clamp), there is a cover separating the breaker from the ignition distributor (fastened with 3 bolts) and the distributor runner (fastened with 3 bolts) (see illustration). The insulating block is installed with a sealing ring.
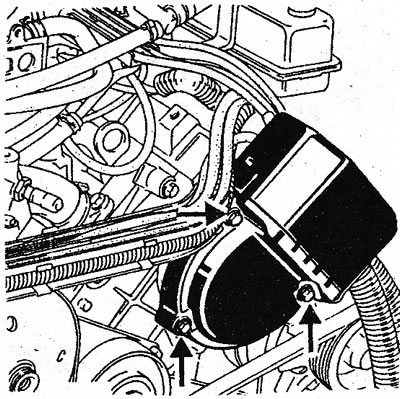
2.18 Ignition distributor installed on a V6 engine. Arrows show the fastening elements of the cover…

2.18 Ignition distributor installed on a V6 engine. Arrows show the fastening elements of the cover separating the breaker from the ignition distributor


The distributor rotor must be installed carefully. No adjustments are allowed.

The distributor contains contacts and brushes that can wear out, i.e. malfunctions in the ignition system can occur due to a violation of the resistance in the ignition distributor rotor. To eliminate the malfunction, contact a car repair shop.
This article is available on: russian, bulgarian, belarusian, ukrainian, serbian, croatian, romanian, polish, slovak, hungarian
Article has been reviewed by editor: Fedoseev Denis
Share with friends:
Previous
Espace I and II: Ignition system
Next

General description of the ignition system
Ignition system specification
Ignition adjustment
Spark plugs
Other articles on other Renault models

➽ Ignition key positions Renault Duster 1 (2009-2017)
➽ Starting the engine on a Fluens car with an ignition switch Renault Fluence 1 (2009-2020, petrol)
➽ Ignition switch Renault Kangoo 1 (1997-2007)
➽ Turn on the ignition and start the engine Renault Laguna 2 (2001-2007)
➽ Checking the ignition system Renault Logan 1 (2004-2012, petrol)
Link to this article in different formats
Reviews and comments of visitors
No comments yet


Add two numbers 32 + 10


Renault 19 (1988-1996) 
  • General information
  • Maintenance
  • Power unit
  • Engine repair
  • Exhaust system
  • Cooling system
  • Supply system
  • Single-point injection
  • Multi-point injection
  • Diesel injection system
  • Transmission
  • Clutch
  • Car gearbox
  • Chassis, running gear
  • Car suspension
  • Steering
  • Brake system
  • Wheels and tires
  • Body and interior
  • Exterior (external elements)
  • Interior (internal elements)
  • Heating and ventilation
  • Electrical equipment
  • Equipment and devices
  • Headlights and lighting
  • Ignition system
  • Power devices
  • Electrical circuits
Espace I and II (1984-1996) 
  • General information
  • Introduction to the guide
  • Troubleshooting
  • Power unit
  • Engine repair
  • Cooling system
  • Carburetor fuel system
  • Injection fuel system
  • Diesel fuel system
  • Ignition system
  • Transmission
  • Clutch
  • Car gearbox
  • Drive shafts
  • Chassis, running gear
  • Brake system
  • Steering
  • Front suspension
  • Rear suspension
  • Body and interior
  • Exterior (external elements)
  • Interior (internal elements)
  • Doors, locks and windows
  • Electrical equipment
  • Equipment and devices
  • Electrical circuits
Espace III (1996-2002) 
  • General information
  • Introduction to the manual
  • User manual
  • Power unit
  • Petrol engines F3R
  • Petrol engines Z7X
  • Diesel engines G8T
  • Diesel engines G9T
  • Transmission
  • Clutch
  • Mechanical gearbox
  • Automatic gearbox
  • Drive shafts
  • Chassis, running gear
  • Steering
  • Front suspension
  • Rear suspension
  • Brake system
  • Body and interior
  • Exterior (external elements)
  • Interior (internal elements)
  • Doors, locks and windows
  • Heating and ventilation
  • Electrical equipment
  • Equipment and instruments
  • Power devices
  • Electrical circuits
RenaultBook.ru © 2018–2026 | Mobile version | News and articles | Sitemap: EN BG BY UA RS HR RO PL SK HU | Administration | Site search | Bookmark
Duster 1 (2009-2017) | Fluence 1 (2009-2020, petrol) | Kangoo 1 (1997-2007) | Laguna 2 (2001-2007) | Logan 1 (2004-2012, petrol) | Logan 2 (2012-2020) | Megane 1 (1995-2002) | Megan 2 (2002-2009, petrol) | Sandero 1 (2007-2012, petrol) | Scenic 1 (1996-2003) | Symbol 1 (1999-2008, petrol) | Symbol 2 (2008-2013, petrol) | Renault 19 (1988-1996) | Espace I and II (1984-1996) | Espace III (1996-2002) | Clio 1 (1990-1998) |
We want your visit to be comfortable 😌 and use cookies 🍪 to do so.