
English Русский
Български
Беларускі
Український
Српски
Hrvatski
Română
Polski
Slovenský
Magyar
Bookmark Contacts Articles Sitemap
Company vehicles Peugeot Company vehicles Opel Company vehicles Skoda Company vehicles Land Rover Company vehicles Mitsubishi Company vehicles Volkswagen Company vehicles Honda
RenaultBook.ru


Duster   Fluence   Kangoo   Laguna   Logan   Megane   Sandero   Scenic   Symbol   Clio   Other
Renault 19 (1988-1996) Espace I and II (1984-1996) Espace III (1996-2002)

Removal and repairing the starter (Renault 19)

  • Main
  • Renault
  • Renault 19 (1988-1996)
  • Electrical equipment
  • Power devices
  • Removal and repairing the starter
0
Contents: Removal the magnetic switch 🠛 Replacing starter brushes 🠛 Starter repair 🠛
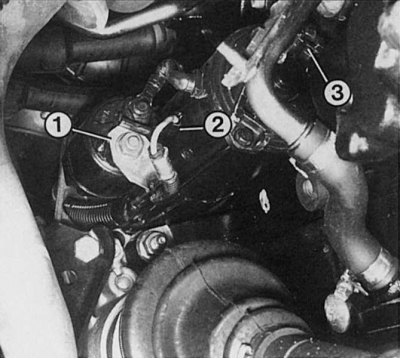
Since a powerful diesel starter must develop significant torque, it is additionally equipped with a mount (3) in the cover on the collector side.

The starter can only be checked for proper operation when removed. The starter must also be removed to replace the brushes or to check the magnetic switch. Before you disconnect the electrical connections shown in the figure (1 - main electrical wire; 2 - magnetic switch wire), disconnect the wires from the battery ground, otherwise dangerous sparking may occur when disconnecting the above cables.
1. Disconnect the ground wire from the battery terminal. Raise the front of the car and secure it.


1. Disconnect the ground wire from the battery terminal. Raise the front of the car and secure it.

2. Label the main electrical wire and disconnect it from the starter.

3. Disconnect the wire (mark) from the magnetic switch.

4. Unscrew the starter wire holders.

5. Engine type "C": if present, remove the thermal protection plate.

6. Unscrew the starter mount (3 bolts), while marking the location of the centering sleeve.

7. If installed, remove the rear starter support.


8. Remove the starter from the engine and remove it from under the vehicle from the engine compartment.

9. Engine type "F": remove the air filter housing.

10. Unscrew the 3 starter mounting bolts. At the same time, mark the location of the centering sleeve.

11. Remove the starter cover (if installed).

12. Remove the rear starter support.

13. Remove the starter from the bottom of the engine compartment.

14. 16-valve engine: remove the exhaust thermal protection (2 bolts).

15. Unscrew the 3 starter mounting bolts. At the same time, mark the location of the centering sleeve.

16. Remove the right front wheel.

17. Remove the muffler exhaust manifold reinforcement from the engine body (2 bolts).

18. Remove the rear starter support (3 bolts) and remove the starter from the engine.

19. Remove the starter from the engine compartment on the right side above the steering linkage rod.

Removal the magnetic switch


A damaged magnetic starter switch cannot be disassembled; it must be replaced entirely.

1. Remove the starter and clamp it in a vice with protective jaws.

2. Depending on the starter type, loosen 2 and, respectively, 3 bolts in the flange of the starter magnetic switch.

3. Disconnect the electrical connection to the starter and unhook the magnetic switch rod from the starter fork.

4. Remove the magnetic switch from the starter.

5. When assembling, lubricate the magnetic switch rod eye with high-temperature grease (for example Liqui Moly 320) and attach it to the starting fork.

6. Make sure the return spring is positioned correctly, then install the magnetic switch housing back into place and tighten it with bolts.


Replacing starter brushes


If the starter refuses to work, then perhaps the brushes are just jammed (if they are not worn down to the minimum size). To replace it, you will need a powerful soldering iron of at least 150 W. If you do not have one, you will need to contact a car electrician at a car repair shop, removing and installing the starter yourself. There, your starter will also be checked for mechanical and electrical faults.

1. Remove the starter.

2. Depending on the type of starter, removing the collector shield (expansion bolt) is carried out in different ways.

3. After removing the collector shield, disconnect the carbon brush wire from the holder.

4. Remove the carbon brushes with pressure springs from the holder guides.

5. If necessary, clean the brushes and guides with a rag soaked in gasoline.

6. Check the carbon pads for wear. If they are worn down to their minimum length of 7 mm or less, they must be replaced as a set.

7. Depending on the type of starter, new brushes (four in any case) must be either screwed or soldered to the wire of the old brushes. To do this, cut the wire of the old brush in the middle between the connection point and the carbon brush.

8. Strip the free end of the copper wire and make sure that the new connection is well soldered and that no thickening is formed on the wire during soldering and it does not harden, press the new brush as tightly as possible to the soldering place.

9. Before assembly, check that the carbon brushes are not jammed in their guides on the brush holders.


Starter repair


If the removed starter shows strong signs of wear, for example, a strongly retracted collector, signs of burning, or the anchor plates cling to the housing, then this means that the anchor bearings are badly damaged, or the stator winding in the housing has become unusable.

A starter that is worn out in this way should not be repaired on your own - it is best to leave this to specialists (Bosch) or buy a new one.
This article is available on: russian, bulgarian, belarusian, ukrainian, serbian, croatian, romanian, polish, slovak, hungarian
Article has been reviewed by editor: Trofimova Anastasia
Share with friends:
Previous
19: Power devices
Next

Starter — design description
Troubleshooting Battery and Generator
Charging indicator light
Driving with a faulty alternator
Broken V-belt
Troubleshooting the starter
Other articles on other Renault models

➽ Starter — removal and installation (K9K engine) Renault Duster 1 (2009-2017)
➽ General information and precautions when repairing the cooling… Renault Fluence 1 (2009-2020, petrol)
➽ Starter — General Information Renault Kangoo 1 (1997-2007)
➽ General information and precautions when repairing the cooling… Renault Laguna 2 (2001-2007)
➽ Features of the starter design Renault Logan 1 (2004-2012, petrol)
Link to this article in different formats
Reviews and comments of visitors
No comments yet


Add two numbers 16 + 23


Renault 19 (1988-1996) 
  • General information
  • Maintenance
  • Power unit
  • Engine repair
  • Exhaust system
  • Cooling system
  • Supply system
  • Single-point injection
  • Multi-point injection
  • Diesel injection system
  • Transmission
  • Clutch
  • Car gearbox
  • Chassis, running gear
  • Car suspension
  • Steering
  • Brake system
  • Wheels and tires
  • Body and interior
  • Exterior (external elements)
  • Interior (internal elements)
  • Heating and ventilation
  • Electrical equipment
  • Equipment and devices
  • Headlights and lighting
  • Ignition system
  • Power devices
  • Electrical circuits
Espace I and II (1984-1996) 
  • General information
  • Introduction to the guide
  • Troubleshooting
  • Power unit
  • Engine repair
  • Cooling system
  • Carburetor fuel system
  • Injection fuel system
  • Diesel fuel system
  • Ignition system
  • Transmission
  • Clutch
  • Car gearbox
  • Drive shafts
  • Chassis, running gear
  • Brake system
  • Steering
  • Front suspension
  • Rear suspension
  • Body and interior
  • Exterior (external elements)
  • Interior (internal elements)
  • Doors, locks and windows
  • Electrical equipment
  • Equipment and devices
  • Electrical circuits
Espace III (1996-2002) 
  • General information
  • Introduction to the manual
  • User manual
  • Power unit
  • Petrol engines F3R
  • Petrol engines Z7X
  • Diesel engines G8T
  • Diesel engines G9T
  • Transmission
  • Clutch
  • Mechanical gearbox
  • Automatic gearbox
  • Drive shafts
  • Chassis, running gear
  • Steering
  • Front suspension
  • Rear suspension
  • Brake system
  • Body and interior
  • Exterior (external elements)
  • Interior (internal elements)
  • Doors, locks and windows
  • Heating and ventilation
  • Electrical equipment
  • Equipment and instruments
  • Power devices
  • Electrical circuits
RenaultBook.ru © 2018–2026 | Mobile version | News and articles | Sitemap: EN BG BY UA RS HR RO PL SK HU | Administration | Site search | Bookmark
Duster 1 (2009-2017) | Fluence 1 (2009-2020, petrol) | Kangoo 1 (1997-2007) | Laguna 2 (2001-2007) | Logan 1 (2004-2012, petrol) | Logan 2 (2012-2020) | Megane 1 (1995-2002) | Megan 2 (2002-2009, petrol) | Sandero 1 (2007-2012, petrol) | Scenic 1 (1996-2003) | Symbol 1 (1999-2008, petrol) | Symbol 2 (2008-2013, petrol) | Renault 19 (1988-1996) | Espace I and II (1984-1996) | Espace III (1996-2002) | Clio 1 (1990-1998) |
We want your visit to be comfortable 😌 and use cookies 🍪 to do so.