



Warning: If the timing belt breaks while the engine is running, serious damage may occur. Replace the belt with the one specified in Specifications in Section 1 periodically, or more often if you have any doubts about its condition.
Removal
1. Disconnect both cables from the battery (always start with the negative).
2. Remove the hood as described in Section 11.
3. Apply the handbrake, then jack up the front right side of the car and support it on axle stands. Remove the wheel.
4. Remove the plastic cover from inside the right wheel arch to gain access to the crankshaft pulley.
5. Carefully place the jack under the pan (placing a large wooden block between them), to support the engine.
6. Remove the plastic cover from the top of the right upper engine bracket. Mark the position of the bracket, then remove the nut and bolts and remove the bracket from the top of the drive cover.
7. Unscrew the drive cover bracket from the right end of the cylinder head.
8. To improve access, mark the position of the lower engine mount bracket, then unbolt it from the body.
9. Remove the alternator drive belt as described in Section 1.
10. Turn the crankshaft clockwise until the TDC mark on the camshaft sprocket aligns with the TDC mark on the end of the valve cover (see illustration).
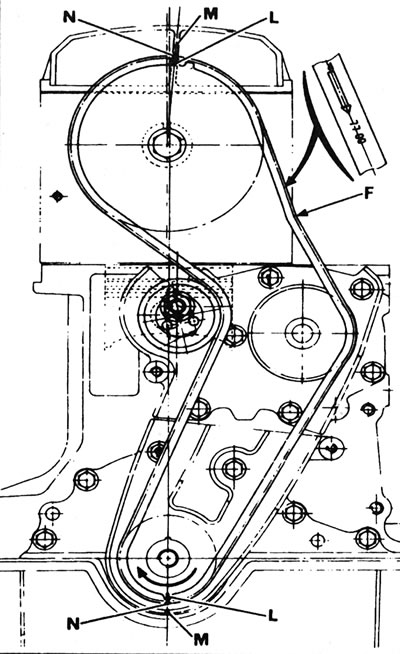
5.10. Toothed drive belt and timing marks: F - Belt tension check point; L - Timing marks on the camshaft and crankshaft sprockets; M - Fixed installation marks; N - Mounting strips on the belt.
Through the hole in the clutch housing, make sure that the TDC marks are aligned.
11. Unscrew the crankshaft pulley bolt (see illustration).

5.11. Unscrew the crankshaft pulley bolt.
Unscrew the engine speed (flywheel) sensor from the top of the transmission/automatic transmission and have an assistant insert a screwdriver into the flywheel ring gear teeth through the inspection hole in the top of the clutch housing.
12. Remove the pulley from the crankshaft. If this fails, use a puller.
13. Make sure that the timing mark at the base of the crankshaft sprocket is aligned with the mark on the front oil seal cover (see illustration).

5.13. Installation marks (marked with an arrow) on the crankshaft sprocket and front oil seal cover.
14. Unscrew and remove the timing belt covers.
15. Loosen the nut securing the timing belt tensioner mechanism. Move the mechanism outward to relieve belt tension, then re-tighten the nut.
16. Note the direction of rotation of the belt. Then remove the belt from the camshaft, water pump and crankshaft sprockets.
17. Clean the sprockets and tension mechanism and wipe them dry.
Inspection
18. Inspect the timing belt for cracks, abrasions or wear at the base of the teeth. Replace the belt if there is any doubt about its condition, or if it is contaminated with oil or grease. Replace all leaking seals. Also inspect the sprockets and tensioner mechanism as described in next Chapter.
Installation
19. Install the new belt on the crankshaft sprocket so that one of the alignment strips on it aligns with the marks on the sprocket and the front oil seal cover. The other strip must be aligned with the marks on the camshaft sprocket. Next, place the belt on the crankshaft, water pump and camshaft sprockets, and then place it on the tensioner wheel (see illustrations).

5.19a. Install the toothed drive belt onto the camshaft sprocket...

5.19b....and the tension mechanism wheel.

5.19s. The timing strip on the belt is aligned with the mark on the camshaft sprocket (marked with an arrow).
20. Once the belt is fully seated on the sprockets, loosen the tensioner nut, tighten the belt, and then retighten the nut. The tensioning mechanism is not spring-loaded, so it must be turned manually; to do this, you can use a screwdriver as a lever, inserting it between the bolts in the holes in the tensioner hub, and hold the camshaft sprocket with a special tool, shown in Illustration 6.2.

6.2 Renault camshaft sprocket locking tool.
Make sure the alignment marks remain properly aligned.
21. Now it is necessary to check the belt tension by the amount of its deviation. To do this, first make a mark on the front engine mounting bracket flush with the timing belt, midway between the camshaft and water pump sprockets. Now apply a force of 30 N to the timing belt and measure its deflection, which should be within 6±0.5 mm. Renault technicians use a special tool for this, but this operation can also be accomplished with a spring balance and a steel ruler. Apply force with a steelyard and read the deviations on a steel ruler (see illustrations).
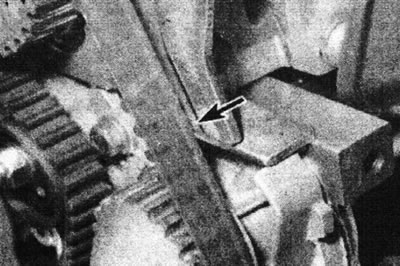
5.21a. Timing belt deviation mark (marked with an arrow) on the front engine mounting eye.
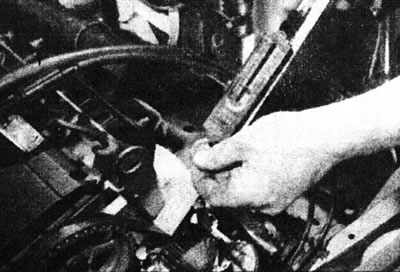
5.21b. Check the tension of the toothed drive belt using a spring balance and a steel ruler.
22. If the adjustment is incorrect, the tensioner hub must be reinstalled. Tighten the tensioner nut securely.
23. Temporarily install the crankshaft pulley and its bolt. Rotate the crankshaft two full revolutions in the normal direction, then recheck the timing belt tension and ensure that the timing marks remain correctly aligned. Remove the pulley.
24. Install the timing belt covers and tighten the bolts.
25. Install the crankshaft pulley, then install the bolt and tighten it to the torque specified in the Specifications, holding the crankshaft using the method described in step 11.
Original publication on the portal www.renaultbook.ru
26. Install and tension the alternator drive belt as described in Section 1.
27. Install the lower engine mount bracket and tighten the bolts to the specified tightening torque Specifications.
28. Install the drive cover bracket and tighten the bolts.
29. Install the upper engine bracket. (If necessary, check the bracket adjustment, see Chapter 14). Tighten the bolts and nuts to the torque specified in the Specifications. Remove the jack or winch.
30. Where applicable, place the plastic cover on the top of the engine mount bracket and secure it with a screw.
31. Install the plastic protection inside the right wheel arch.
32. Install the wheel and lower the car to the ground.
33. Install the hood as described in Section 11.
34. Connect the positive and negative cables to the battery.