
The drive is supplied filled with liquid with the master and slave cylinders bled, and during installation the sequence of operations must be followed to prevent incorrect operation of the drive
Removal
- Disconnect the cable from the negative terminal of the battery.
- On the left side of the car, remove the wheel and fender liner.
- Remove the clutch slave cylinder
- Remove the air filter and use the tool (1, fig. 5.11). supplied with the hydraulic clutch actuator, disconnect the quick-release fitting on the tube between the master and slave cylinders.
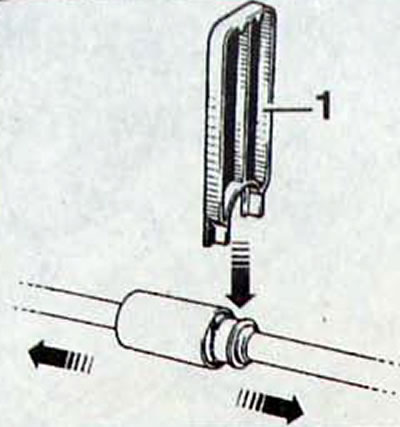
Pic. 5.11. Using the fixture (1) for disconnecting sections of the hydraulic clutch drive
- Remove the brake booster
- Remove the clutch master cylinder.
- Disconnect the clutch master cylinder rod from the clutch pedal.
- The clutch master cylinder is bayonet style, so to remove it, rotate the master cylinder body 1/8 turn counterclockwise.
Installation
- There is an arrow on the master cylinder body that must be positioned opposite the marking on the mounting plate.
- Install the master cylinder perpendicular to the mounting plate.
- Install and secure the master cylinder to the bracket by turning it 1/8 turn clockwise. Attach the piston pusher to the clutch pedal pin.
- Install the slave cylinder to the transmission.
- Connect the quick connect fitting.
- Press the clutch pedal and let it go up. Make sure the pedal is in its highest position.
- Repeat this operation.
- The clutch drive is brought into working position.