
Attention! Be careful not to spill clutch fluid on painted surfaces. If this happens, immediately wash off the liquid with water.
Note. Do not mix different brands of clutch fluids.
Do not reuse drained clutch fluid.
Any hydraulic system works normally if air is removed from it.
When bleeding, add only clean fluid recommended by the manufacturer. Never reuse fluid leaked from the hydraulic clutch release.
If fluids of different brands are accidentally mixed in the hydraulic system, remove the fluid from it, flush it with clean fluid of the required brand and install new o-rings.
In case of constant leakage of fluid from the hydraulic drive or air entering it, determine the cause and location of the leak, and repair the damage.
Poorly performed hydraulic priming can cause incorrect diagnostic results and unnecessary replacement of parts.
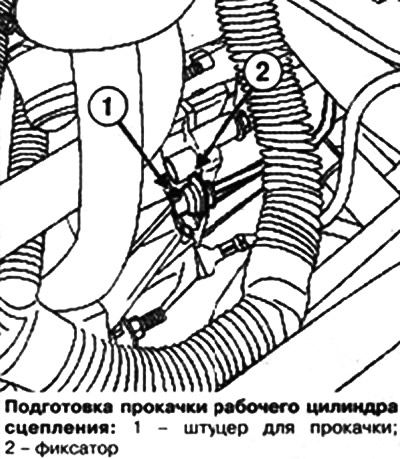
During any work on the clutch hydraulic drive, be sure to bleed the air from the sections of the hydraulic circuit:
- between the tank and the fitting for removing air;
- between the air bleeder and the clutch slave cylinder;
- with increased pedal free play.
Place the car on a two post lift.
Remove the engine undertray.
Disconnect the brake fluid level sensor connector from the reservoir.
Remove the brake fluid reservoir cap.
Bleeding the circuit between the tank and the bleed valve
Install and lock the clutch pedal in the up position.
Fill the reservoir with certified brake fluid.
Attach installation (Ms. 554-07) to the hydraulic reservoir.
Remove the plug from the bleed valve.
Place a transparent tube over the clutch slave cylinder bleeder tube, dropping the end into an empty container below the bleeder tube.
Click on the latch.
Attention! Do not pull on the latch. In case of any erroneous action, the pipeline must be replaced.
Open the bleed valve by pulling out the hydraulic clutch line one click.
Turn on the installation pump (Ms. 554-07).
Wait until there are no air bubbles in the brake fluid flowing into the container.
Attention! Make sure the fluid level is above the hydraulic line fitting during bleeding.
Fixing the hydraulic clutch pipeline should be accompanied by a characteristic click.
Turn the clutch off and on about ten times.
Bleeding air from the circuit between the bleeder valve and the clutch slave cylinder
Attach an empty syringe with a usable volume of 60 cm3 towards the end of the transparent tube.
Click on the latch.
Pull off the clutch hydraulic line one click.
Turn on the installation pump (Ms. 554-07) and let the liquid fill the syringe
Slowly and completely expel the fluid from the syringe into the hydraulic clutch (repeat the operation three times).
Close the air vent. by inserting the hydraulic clutch line as soon as the fluid flows out without bubbles.
Remove the syringe and clear tubing from the bleed valve.
Put the plug on the bleed valve.
Turn the clutch off and on about ten times.
Add liquid 8 tank to the maximum level mark.
Check clutch operation. Repeat if necessary.