
English Русский
Български
Беларускі
Український
Српски
Hrvatski
Română
Polski
Slovenský
Magyar
Bookmark Contacts Articles Sitemap
Company vehicles Peugeot Company vehicles Opel Company vehicles Skoda Company vehicles Land Rover Company vehicles Mitsubishi Company vehicles Volkswagen Company vehicles Honda
RenaultBook.ru


Duster   Fluence   Kangoo   Laguna   Logan   Megane   Sandero   Scenic   Symbol   Clio   Other
Renault 19 (1988-1996) Espace I and II (1984-1996) Espace III (1996-2002)

New design clutch master cylinder (Renault Espace III)

  • Main
  • Renault
  • Espace III (1996-2002)
  • Transmission
  • Clutch
  • New design clutch master cylinder
0
Contents: Removal 🠛 Installation 🠛
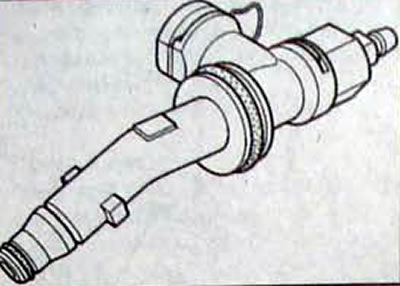
Fig. 5.15. Clutch slave cylinder

Fig. 5.15. Clutch slave cylinder


Clutch parts of the old and new designs are not interchangeable.

Removal


  • Disconnect the cable from the negative battery terminal.
  • Place the car on a lift.

In the engine compartment


  • Drain the working fluid from the clutch hydraulic drive by unscrewing the air bleed valve on the slave cylinder. Putting a transparent tube on it to collect the fluid. Before unscrewing the air bleed valve, carefully study the safety precautions
  • Disconnect the clutch master cylinder feed line from the reservoir and tie the line so that it can be easily routed along the original route during installation.

In the car's interior


  • By pressing the clutch pedal by hand, remove the working fluid from the hydraulic drive
  • Remove the steering column covers.
  • Disconnect the master cylinder piston rod ball head from the clutch pedal.
  • Remove the left front wheel, the left front wheel arch mudguard and, if necessary, the engine sump guard.
  • From below, cut the plastic tie on the wiring harness under the brake booster.
  • Release the high pressure line of the clutch master cylinder from the clamps installed on the body (the bracket is installed closer to the rear of the shelf under the battery).
  • Working from inside the cabin, disconnect the master cylinder from the plate by turning it 1/8 turn counterclockwise.
  • To make the job easier, move the mat and sound insulation around the socket.
  • While holding the master cylinder, remove it from the engine compartment.
  • Disconnect the feed line from the master cylinder, taking measures to collect the working fluid.


Installation


  • To install the clutch master cylinder, mark the position of the fitting on the supply line.
  • Insert the cylinder into the socket, while the nipple (1, Fig. 5.16) with the supply line connected must be turned approximately 45° to the left side of the vehicle.
  • From inside the vehicle, turn the master cylinder clockwise to lock it in place with the nipple facing up.
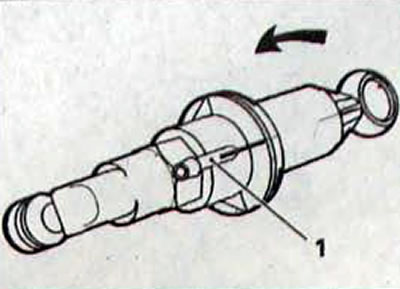
Fig. 5.16. Location of the nipple (1) on the clutch master cylinder

Fig. 5.16. Location of the nipple (1) on the clutch master cylinder

  • When the master cylinder is fixed, the marks on the master cylinder body and on the front shield opposite the nipple (1) with a slight deviation to the right side should be aligned.
  • Press the cylinder against the front shield from the engine compartment side, while an assistant in the passenger compartment should turn the cylinder.
  • You can simplify the installation of the master cylinder on the front shield by fixing the ball head of the cylinder rod to the pedal, while applying a little grease to the ball head.
  • Further installation is carried out in the reverse order of removal.
  • Bleed the hydraulic drive through the air bleed valve installed on the connecting pipe of the clutch slave cylinder. If the nipple is damaged, the clutch slave cylinder must be replaced, which requires removing and installing the gearbox.

Caution: When screwing or unscrewing the air bleed valve, to avoid damaging the working cylinder and the nipple, lock the nipple with a 19 mm open-end wrench.
This article is available on: russian, bulgarian, belarusian, ukrainian, serbian, croatian, romanian, polish, slovak, hungarian
Article has been reviewed by editor: Trofimova Anastasia
Share with friends:
Previous
Espace III: Clutch
 

New design clutch slave cylinder
Replacing the hydraulic clutch release drive
Replacing the dual mass flywheel
Clutch cable
Bearing and clutch release fork
 
Other articles on other Renault models

➽ Clutch master cylinder Renault Duster 1 (2009-2017)
➽ Clutch master cylinder Renault Fluence 1 (2009-2020, petrol)
➽ Clutch master cylinder Renault Logan 2 (2012-2020)
➽ Master brake cylinder Renault Kangoo 1 (1997-2007)
➽ Removal and installation the master brake cylinder Renault Laguna 2 (2001-2007)
Link to this article in different formats
Reviews and comments of visitors
No comments yet


Add two numbers 47 + 49


Renault 19 (1988-1996) 
  • General information
  • Maintenance
  • Power unit
  • Engine repair
  • Exhaust system
  • Cooling system
  • Supply system
  • Single-point injection
  • Multi-point injection
  • Diesel injection system
  • Transmission
  • Clutch
  • Car gearbox
  • Chassis, running gear
  • Car suspension
  • Steering
  • Brake system
  • Wheels and tires
  • Body and interior
  • Exterior (external elements)
  • Interior (internal elements)
  • Heating and ventilation
  • Electrical equipment
  • Equipment and devices
  • Headlights and lighting
  • Ignition system
  • Power devices
  • Electrical circuits
Espace I and II (1984-1996) 
  • General information
  • Introduction to the guide
  • Troubleshooting
  • Power unit
  • Engine repair
  • Cooling system
  • Carburetor fuel system
  • Injection fuel system
  • Diesel fuel system
  • Ignition system
  • Transmission
  • Clutch
  • Car gearbox
  • Drive shafts
  • Chassis, running gear
  • Brake system
  • Steering
  • Front suspension
  • Rear suspension
  • Body and interior
  • Exterior (external elements)
  • Interior (internal elements)
  • Doors, locks and windows
  • Electrical equipment
  • Equipment and devices
  • Electrical circuits
Espace III (1996-2002) 
  • General information
  • Introduction to the manual
  • User manual
  • Power unit
  • Petrol engines F3R
  • Petrol engines Z7X
  • Diesel engines G8T
  • Diesel engines G9T
  • Transmission
  • Clutch
  • Mechanical gearbox
  • Automatic gearbox
  • Drive shafts
  • Chassis, running gear
  • Steering
  • Front suspension
  • Rear suspension
  • Brake system
  • Body and interior
  • Exterior (external elements)
  • Interior (internal elements)
  • Doors, locks and windows
  • Heating and ventilation
  • Electrical equipment
  • Equipment and instruments
  • Power devices
  • Electrical circuits
RenaultBook.ru © 2018–2026 | Mobile version | News and articles | Sitemap: EN BG BY UA RS HR RO PL SK HU | Administration | Site search | Bookmark
Duster 1 (2009-2017) | Fluence 1 (2009-2020, petrol) | Kangoo 1 (1997-2007) | Laguna 2 (2001-2007) | Logan 1 (2004-2012, petrol) | Logan 2 (2012-2020) | Megane 1 (1995-2002) | Megan 2 (2002-2009, petrol) | Sandero 1 (2007-2012, petrol) | Scenic 1 (1996-2003) | Symbol 1 (1999-2008, petrol) | Symbol 2 (2008-2013, petrol) | Renault 19 (1988-1996) | Espace I and II (1984-1996) | Espace III (1996-2002) | Clio 1 (1990-1998) |
We want your visit to be comfortable 😌 and use cookies 🍪 to do so.