



Contents: Removal 🠛 Installation 🠛
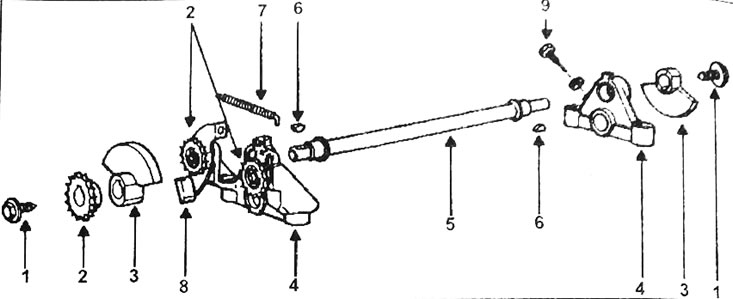
Fig. 2.4. Balance shaft:1 - bolt; 2 - stars; 3 - balancers; 4 - support; 5 - balancing shaft; 6 - keys; 7 - chain tensioning mechanism; 8 - chain tensioner; 9 - rocker arm axle mounting bolt
Removal
- Disconnect the cable from the negative battery terminal.
- Remove the cylinder head cover.
- Remove the plug on the timing case housing located opposite the camshaft sprocket mounting bolt
- Turn the engine crankshaft until the timing mark on the balance shaft sprocket aligns with the mark on the camshaft sprocket.
- Loosen the automatic chain tensioner as much as possible and use the Mot 1209 tool to lock it in this position
- Remove the balance shaft sprocket mounting bolt.
- Remove the balance shaft sprocket together with the chain.
- If the balance shaft drive chain and side sprockets need to be replaced, cover the channels under the camshaft sprocket with a clean rag to prevent parts from falling out.
- Remove the snap rings and sprockets.
- Check the condition of the chain drive sprocket bearings.
(Source is located on the website: www.renaultbook.ru)
Installation
- Install the two side sprockets and secure them with snap rings
- Install the balance shaft sprocket together with the chain, ensuring that the mark on the balance shaft sprocket is aligned with the mark on the camshaft sprocket (see fig 2.5).
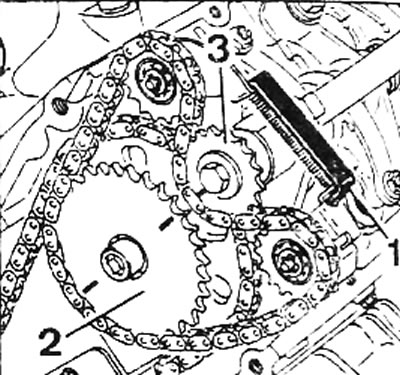
Fig. 2.5. Fixing the balance shaft chain:1 - Mot 1209 device; 2 - camshaft sprocket; 3 - balance shaft sprocket
- Apply Loctite FrenManche to the sprocket bolt threads and screw the bolt in.
- Remove the automatic chain tensioner locking device and check the chain tension
- Apply Loctite Frenetanche to the threads of the cylinder head cover bolts
- Install the cylinder head cover and secure it with bolts.
- Connect the cable to the negative terminal of the battery.