



Note: Before you begin, please refer to the Warnings given at the beginning of the Chapters 6 and 16.
Removal
1. Block the front wheels, select reverse (or "P") and release the handbrake. Jack up the rear of the vehicle and support it on axle stands. Remove the rear wheel.
2. Remove the brake pads as described in Chapter 16.
3. Disconnect the handbrake cable from the caliper operating lever, then knock the cable housing out of its bracket on the caliper.
4. Minimize fluid loss by placing a piece of plastic under the master cylinder reservoir cap and tightening it securely again to create a tight seal (do not damage the sensor), or by pinching the hose with a special clamp or clamp as close to the brake caliper as possible.
5. Wipe the area around the brake line connector on the caliper and remove the connector nut. Carefully remove the tube from its working position and plug its end to prevent dirt from entering. Wipe up any spilled liquid.
6. Loosen the two bolts securing the caliper assembly to the trailing arm and remove them along with the mounting plate, making a note of the correct position of the latter (see illustration).
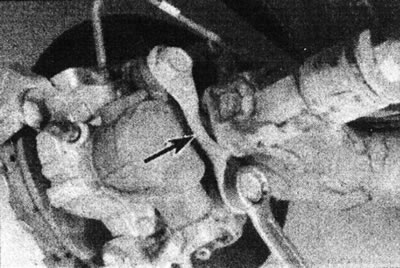
17.6. Remove the caliper mounting bolts, noting the correct location of the mounting plate (marked with an arrow).
Remove the caliper assembly from the brake disc.
Bulkhead
Note: Please purchase the appropriate repair kit before starting work.
7. Place the caliper on the workbench and wipe off all traces of dust and dirt, being careful not to inhale any particles that become airborne.
8. Using a small screwdriver, carefully pry the dust seal out of the caliper bore, being careful not to damage the piston (see illustration).
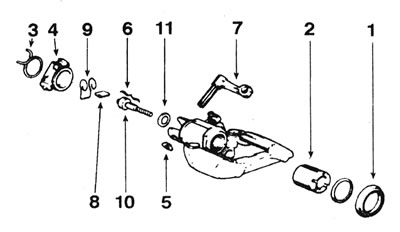
17.8. Rear brake caliper components: 1 - Dust cuff; 2 - Piston; 3 - Mounting clamp; 4 - Dust seal of the handbrake mechanism; 5 - Retaining ring; 6 - Spring washers; 7 - Handbrake operating lever; 8 - Plunger cam; 9 - Return spring; 10 - Adjusting screw; 11 - Thrust washer.
9. Remove the piston from the caliper by turning it counterclockwise using a suitable rod. If necessary, push the piston out with compressed air.
Warning: The piston may fly out with some acceleration. Use low air pressure from a foot pump to extract it.
10. Using a blunt tool such as a knitting needle, remove the piston hydraulic seal, being careful not to damage the caliper bore.
11. Remove the guide bushings from the caliper and remove their protective covers.
12. Inspect the caliper components as described in Chapter 10. Replace them as necessary, remembering that the inner part of the caliper piston should not be removed. If necessary, rebuild the handbrake mechanism as described below. Otherwise, go to step 16.
13. Release the handbrake dust boot retaining clip and remove the boot from the rear of the caliper. Draw the relative positions of the components to facilitate subsequent installation. Remove the snap ring from the base of the operating lever shaft, then compress the spring washers of the adjusting screw and remove the operating lever and dust boot from the caliper. Remove the return spring, plunger cam, adjusting screw, spring washers and thrust washer from the rear of the caliper. Using a suitable punch, carefully push the adjusting screw sleeve out of the caliper and remove the O-ring.
14. Clean all handbrake components in methylated spirits and inspect them for signs of wear or damage. If any are found, replace the mechanism assembly.
15. Make sure all components are clean and dry. Install the O-ring, then install the adjuster screw sleeve into position so that its outer edge is flush with the rear of the caliper; if necessary, tap the bushing using a suitable tubular drift. Install the thrust washer, then the adjusting screw and spring washers until the washers are positioned as shown (see illustration).
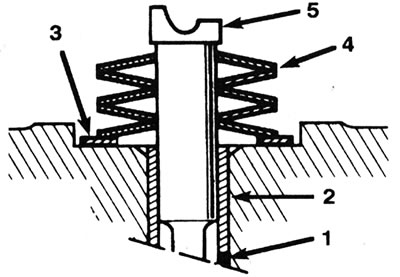
17.15. Location of the rear caliper handbrake mechanism adjusting screw and associated components: 1 - O-ring seal; 2 - Adjusting screw sleeve; 3 - Thrust washer; 4 - Correct positioning of spring washers; 5 - Adjusting screw.
Place the plunger cam onto the end of the adjusting screw and place the return spring into the caliper. Install a new dust seal onto the operating lever, then compress the spring washers of the adjusting screw and insert the lever shaft into the caliper until it is properly aligned with the return spring and plunger cam. Secure the operating lever with the retaining ring, then release the spring washers and check the operation of the handbrake mechanism. Apply a small amount of high temperature grease to the operating lever shaft and adjusting screw. Install the dust boot onto the caliper and secure it with a tie.
16. Soak the piston and its new hydraulic seal with clean brake fluid. Apply clean liquid to the inner walls of the cylinder.
17. Install the new hydraulic piston seal without using any tools, and then insert the piston assembly using a rotating motion (clockwise).
18. Install the dust seal on the caliper.
19. Apply the grease supplied in the repair kit or a good quality high temperature grease to the guide bushings. Insert the guide bushings into the caliper and install the new boots so that they fit into the grooves in the guide bushings and in the caliper.
Installation
20. Place the caliper on the brake disc. Install the two caliper mounting bolts and the mounting plate, making sure the mounting plate curves toward the caliper. Tighten the caliper bolts to the specified tightening torque Specifications.
21. Wipe the brake pipe connector. Install the tube into the support and tighten its union nut securely.
22. Remove the clamp from the brake hose or the plastic from under the master cylinder reservoir cap.
23. Pass the handbrake cable through the bracket on the caliper and tap the cable housing into position using a hammer and punch (see illustration).
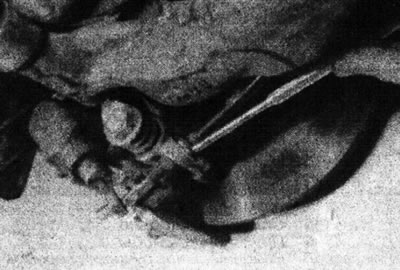
17.23. Install the handbrake cable housing into its working position using a hammer and punch.
Attach the cable to the caliper operating lever.
24. Install the brake pads as described in Chapter 16.
25. Bleed the brake hydraulic system (see Chapter 6). Please note that if appropriate precautions have been taken to minimize brake fluid loss, only the rear brake in question needs to be bled.
26. Press the brake pedal several times to move the pads towards the disc. Check and, if necessary, adjust the handbrake cable (see Section 1).
27. Install the wheel, lower the vehicle to the ground and tighten the wheel bolts to the specified tightening torque Specifications. Finally, check the brake fluid level.