
English Русский
Български
Беларускі
Український
Српски
Hrvatski
Română
Polski
Slovenský
Magyar
Bookmark Contacts Articles Sitemap
Company vehicles Peugeot Company vehicles Opel Company vehicles Skoda Company vehicles Land Rover Company vehicles Mitsubishi Company vehicles Volkswagen Company vehicles Honda
RenaultBook.ru


Duster   Fluence   Kangoo   Laguna   Logan   Megane   Sandero   Scenic   Symbol   Clio   Other
Symbol 1 (1999-2008, petrol) Symbol 2 (2008-2013, petrol)

Automatic transmission selector lever (Renault Symbol 2)

  • Main
  • Symbol
  • Symbol 2 (2008-2013, petrol)
  • Transmission
  • Automatic gearbox
  • Automatic transmission selector lever
0

Removal


  • place the car on a lift or raise the front of the car and place the body on safety supports;
  • disconnect the negative battery cable;
  • remove the center console in the car's interior (see section "Body");
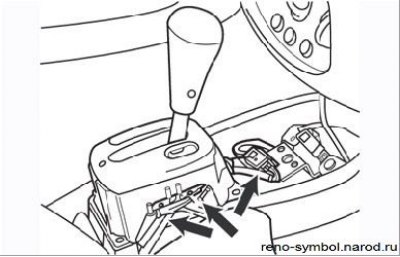
Figure 4.42. Disconnecting the contact connectors from the selector lever assembly (arrows)

Figure 4.42. Disconnecting the contact connectors from the selector lever assembly (arrows)

  • disconnect the contact connectors from the selector lever assembly: two on the right and one in front (Figure 4.42);
  • remove the clamp securing the exhaust pipe from underneath the vehicle, remove the heat-insulating shields from the underbody to gain access to the selector assembly;
  • remove the protective plate and unscrew the four nuts securing the unit to the body floor;
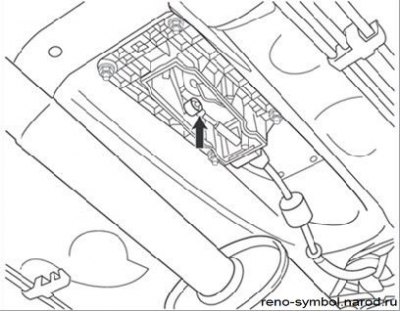
Figure 4.43. Connection of the selector cable to the selector lever joint (arrow)

Figure 4.43. Connection of the selector cable to the selector lever joint (arrow)


  • disconnect the selector cable end from the hinge on the bottom of the lever (Figure 4.43), pull the retainer and detach the shell from the stop (Figure 4.44), remove the unit from under the car;
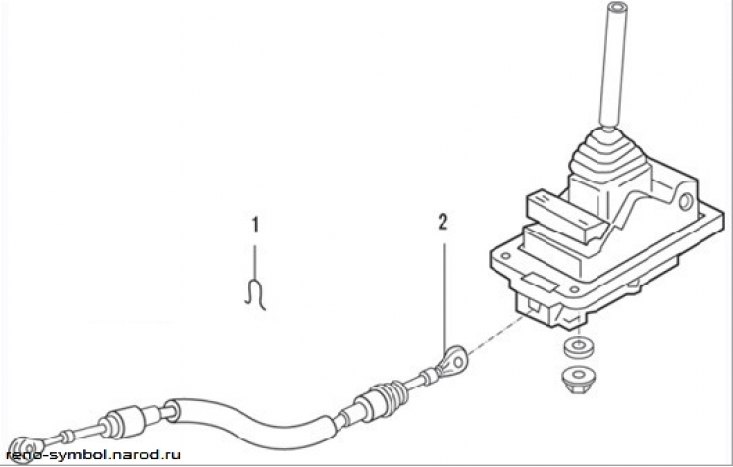
Figure 4.44. Selector lever cable: 1 – retainer; 2 – ball head
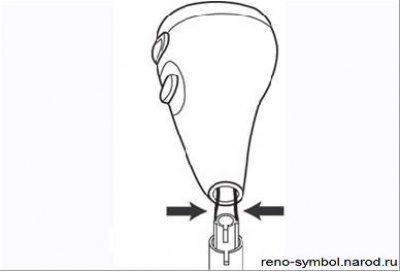
Figure 4.44. Selector lever cable: 1 – retainer; 2 – ball head


Figure 4.45. Selector lever handle (the arrows indicate the wires that must be laid in the guide…

Figure 4.45. Selector lever handle (the arrows indicate the wires that must be laid in the guide grooves on the lever)

  • if it is necessary to disconnect the handle from the selector lever, unscrew the handle mounting screw and lift it (Figure 4.45);
  • remember the connection of the wires that go through the lever and disconnect them from the connector so that the handle can be removed.

  • Contact - Wire Color
  • A1 - Black
  • A2 - Black
  • B1 - White
  • B2 - Light brown

Installation is carried out in the reverse order of removal, while not intertwining the wires and laying them in the grooves on the lever. Check the correct operation of the selector lever and, if necessary, adjust the selector cable.
This article is available on: russian, bulgarian, belarusian, ukrainian, serbian, croatian, romanian, polish, slovak, hungarian
Article has been reviewed by editor: Kupriyanov Sergey
Share with friends:
Previous
Symbol 2: Automatic gearbox
Next

Removal the automatic transmission
Automatic transmission valve block (DP0)
Automatic transmission fluid — level check, replacement
Automatic transmission — design description
Automatic transmission selector cable
Multifunctional automatic transmission switch
Differential seal — replacement
Torque Converter Seal — Replacement
Automatic transmission sensors
Other articles on other Renault models

➽ Removal and installation the automatic transmission control… Renault Sandero 1 (2007-2012, petrol)
➽ Automatic transmission Renault Duster 1 (2009-2017)
➽ Automatic transmission Renault Fluence 1 (2009-2020, petrol)
➽ Technical characteristics of the automatic transmission DPO Renault Laguna 2 (2001-2007)
➽ Manual transmission shift lever Renault Megane 1 (1995-2002)
Link to this article in different formats
Reviews and comments of visitors
No comments yet


Add two numbers 18 + 48


Symbol 2 (2008-2013, petrol) 
  • General information
  • User manual
  • Maintenance
  • Power unit
  • Engine repair
  • Cooling system
  • Fuel system
  • Exhaust system
  • Ignition system
  • Transmission
  • Clutch
  • Mechanical gearbox
  • Automatic gearbox
  • Drive shafts
  • Chassis, running gear
  • Front suspension
  • Rear suspension
  • Steering
  • Brake system
  • Body and interior
  • Exterior (external elements)
  • Interior (internal elements)
  • Doors, locks and windows
  • Heating and ventilation
  • Electrical equipment
  • Equipment and devices
  • Headlights and lighting
  • Power devices
  • Electrical circuits
Symbol 1 (1999-2008, petrol) 
  • General information
  • User manual
  • Car care
  • Maintenance
  • Power unit
  • Engine repair
  • Cooling and lubrication system
  • Supply system
  • Exhaust system
  • Ignition system
  • Transmission
  • Clutch
  • Mechanical gearbox
  • Automatic gearbox
  • Drive shafts
  • Chassis, running gear
  • Car suspension
  • Steering
  • Brake system
  • Body and interior
  • Exterior (external elements)
  • Interior (internal elements)
  • Doors, locks and windows
  • Restoration and repair
  • Electrical equipment
  • Equipment and devices
  • Headlights and lighting
  • Power devices
  • Heating and ventilation
  • Electrical circuits
RenaultBook.ru © 2018–2026 | Mobile version | News and articles | Sitemap: EN BG BY UA RS HR RO PL SK HU | Administration | Site search | Bookmark
Duster 1 (2009-2017) | Fluence 1 (2009-2020, petrol) | Kangoo 1 (1997-2007) | Laguna 2 (2001-2007) | Logan 1 (2004-2012, petrol) | Logan 2 (2012-2020) | Megane 1 (1995-2002) | Megan 2 (2002-2009, petrol) | Sandero 1 (2007-2012, petrol) | Scenic 1 (1996-2003) | Symbol 1 (1999-2008, petrol) | Symbol 2 (2008-2013, petrol) | Renault 19 (1988-1996) | Espace I and II (1984-1996) | Espace III (1996-2002) | Clio 1 (1990-1998) |
We want your visit to be comfortable 😌 and use cookies 🍪 to do so.