
English Русский
Български
Беларускі
Український
Српски
Hrvatski
Română
Polski
Slovenský
Magyar
Bookmark Contacts Articles Sitemap
Company vehicles Peugeot Company vehicles Opel Company vehicles Skoda Company vehicles Land Rover Company vehicles Mitsubishi Company vehicles Volkswagen Company vehicles Honda
RenaultBook.ru


Duster   Fluence   Kangoo   Laguna   Logan   Megane   Sandero   Scenic   Symbol   Clio   Other
Megane 1 (1995-2002) Megan 2 (2002-2009, petrol)

Adjusting the leaf spring lever (Renault Megane 2)

  • Main
  • Megane
  • Megan 2 (2002-2009, petrol)
  • Transmission
  • Automatic gearbox
  • Adjusting the leaf spring lever
0
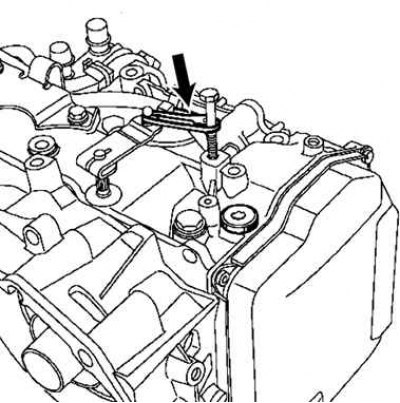
Fig. 3.145. Holding the multifunction switch lever with a clamp and bolt

Fig. 3.145. Holding the multifunction switch lever with a clamp and bolt


Hold the multifunction switch lever in the extreme position (in the forced first gear position) using a plastic clamp and a bolt screwed into the gearbox housing (fig. 3.145).
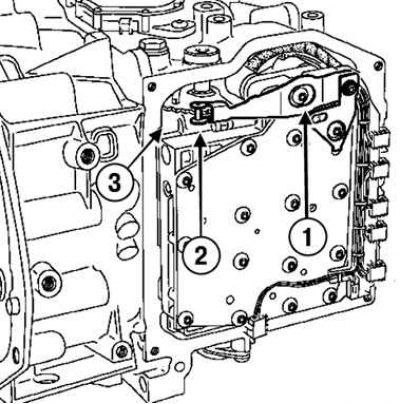
Fig. 3.146. Bolt for fastening the leaf spring lever: 1 – bolt; 2 – roller; 3 – sector

Fig. 3.146. Bolt for fastening the leaf spring lever: 1 – bolt; 2 – roller; 3 – sector


Unscrew bolt 1 (fig. 3.146).
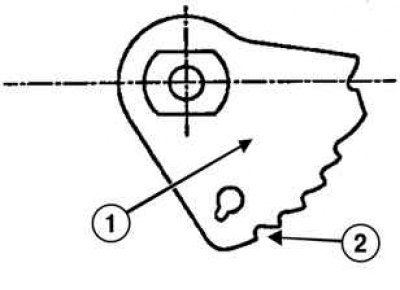
Fig. 3.147. Adjusting the leaf spring lever: 1 – sector; 2 - recess

Fig. 3.147. Adjusting the leaf spring lever: 1 – sector; 2 - recess


Install the leaf spring lever by inserting the roller into the recess of the sector corresponding to the forced engagement of the first gear (fig. 3.147).
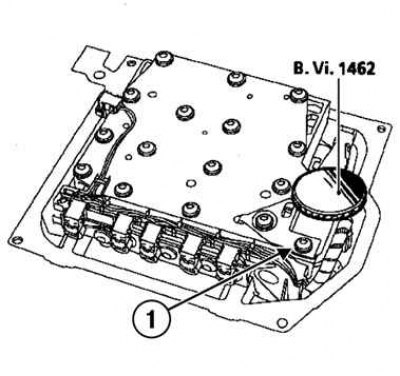
Fig. 3.148. Lever bracket mounting bolt: 1 – bolt

Fig. 3.148. Lever bracket mounting bolt: 1 – bolt


Screw in the lever bracket mounting bolt without tightening it (fig. 3.148).

Install the tool (Bvi. 1462) in place of bolt 1 (see fig. 3.146).

While holding the lever, screw the device in until it stops.

Tighten the leaf spring lever bracket mounting bolt to the specified torque (9 Nm).

Remove the tool (Bvi. 1462). Install the lever mounting bolt.

Tighten the lever mounting bolt to the specified torque (8 Nm).

If the hydraulic distributor is replaced, reset the self-tuning parameters using the command: RZ005 "Resetting self-tuning parameters" and reset the automatic transmission oil service life counter using the diagnostic tool by entering the command: CF074 "Record gearbox oil change date".

After executing command RZ005, be sure to drive the vehicle with multiple upshifts and downshifts to memorize the new values and settings.

Tighten to the specified torque:
  • cover mounting bolts (10 Nm);
  • battery (40 Nm);
  • amplifier mounting bolts (21 Nm).

Installation is carried out in the reverse order of removal.
This article is available on: russian, bulgarian, belarusian, ukrainian, serbian, croatian, romanian, polish, slovak, hungarian
Article has been reviewed by editor: Kupriyanov Sergey
Share with friends:
Previous
Megan 2: Automatic gearbox
Next

Removal and installation the hydraulic distributor
Measuring pressure in the pressure line
Checking the torque converter lockup
Automatic transmission oil filling
Draining oil from automatic transmission
Removal and installation of automatic transmission
Removal and installation the multifunction switch
Adjusting the multi-function switch
Removal and installation of the automatic transmission ECU
Replacing the automatic transmission ECU
Other articles on other Renault models

➽ Adjusting the leaf spring lever Renault Laguna 2 (2001-2007)
➽ Adjusting the gear shift lever Renault Fluence 1 (2009-2020, petrol)
➽ Adjusting the headlights in the vertical plane Renault Duster 1 (2009-2017)
➽ Adjusting clearances in the valve drive mechanism Renault Kangoo 1 (1997-2007)
➽ Adjusting the position of the front seats Renault Logan 1 (2004-2012, petrol)
Link to this article in different formats
Reviews and comments of visitors
No comments yet


Add two numbers 37 + 36


Megan 2 (2002-2009, petrol) 
  • User manual
  • Introduction to manual
  • Controls and instruments
  • Salon equipment
  • Operation and driving
  • Maintenance and care
  • Power unit
  • Engine repair
  • Fuel system
  • Injection system
  • Intake and exhaust system
  • Starting and charging system
  • Cooling system
  • Decreased toxicity
  • Transmission
  • Clutch
  • Mechanical gearbox
  • Automatic gearbox
  • Wheel drive mechanism
  • Chassis, running gear
  • Suspension and wheels
  • Steering
  • Brake system
  • Body and interior
  • Exterior (external elements)
  • Interior (internal elements)
  • Doors, locks and windows
  • Heating and air conditioning
  • Electrical equipment
  • Equipment and devices
  • Headlights and lighting
  • Electrical circuits
Megane 1 (1995-2002) 
  • General information
  • User manual
  • Maintenance
  • Power unit
  • Petrol engines 1.4/1.6 l
  • Petrol engines 2.0 l
  • Diesel engines 1.9 l
  • Overhaul of engines
  • Cooling system
  • Fuel system (petrol)
  • Fuel system (diesel)
  • Decreased toxicity
  • Charge and launch systems
  • Ignition system (petrol)
  • Preheat system (diesel)
  • Transmission
  • Clutch
  • Mechanical gearbox
  • Automatic gearbox
  • Drive shafts
  • Chassis, running gear
  • Brake system
  • Car suspension
  • Steering
  • Body and interior
  • Exterior (external elements)
  • Interior (internal elements)
  • Doors, locks and windows
  • Electrical equipment
  • Equipment and devices
  • Electrical circuits
RenaultBook.ru © 2018–2026 | Mobile version | News and articles | Sitemap: EN BG BY UA RS HR RO PL SK HU | Administration | Site search | Bookmark
Duster 1 (2009-2017) | Fluence 1 (2009-2020, petrol) | Kangoo 1 (1997-2007) | Laguna 2 (2001-2007) | Logan 1 (2004-2012, petrol) | Logan 2 (2012-2020) | Megane 1 (1995-2002) | Megan 2 (2002-2009, petrol) | Sandero 1 (2007-2012, petrol) | Scenic 1 (1996-2003) | Symbol 1 (1999-2008, petrol) | Symbol 2 (2008-2013, petrol) | Renault 19 (1988-1996) | Espace I and II (1984-1996) | Espace III (1996-2002) | Clio 1 (1990-1998) |
We want your visit to be comfortable 😌 and use cookies 🍪 to do so.