
Removing
Disconnect the wires from the battery terminals, starting with the negative terminal.
Raise the rear seat cushion.
Remove the mat holder. Open the rug.
Unscrew the lining fastening bolts, remove the lining and hatch cover.
Disconnect the wiring harnesses, one or more fuel door quick connectors.
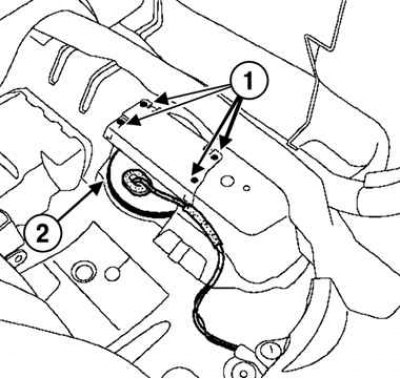
Pic. 2.222. Removing the lining and plug of the fuel tank hatch: 1 – bolts of fastening of an overlay; 2 - hatch cover
Take measures to collect the escaping fuel.
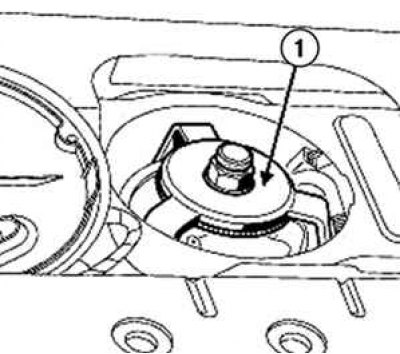
Pic. 2.223. Unscrewing the assembly fastening nut «fuel pump - fuel gauge - fuel filter»: 1 - special tool
Loosen the assembly nut «fuel pump - fuel gauge - fuel filter» using a device (Mot. 1397) (pic. 2.223).
Remove knot «fuel pump - fuel gauge - fuel filter».
Take care not to damage the float.
Attention! To eliminate the risk of deformation of the tank, install the nut of the fuel pump assembly with fuel level sensor and fuel filter immediately after removing this assembly.
Installation
Replace O-ring.
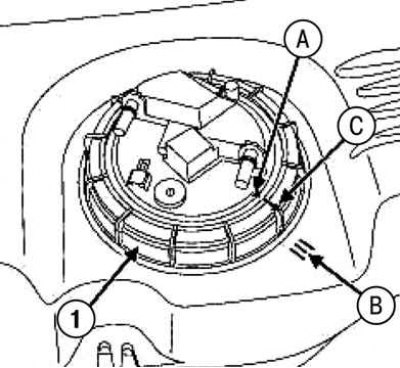
Pic. 2.224. Node installation «fuel pump - fuel gauge - fuel filter»: 1 - nut; A, B, C - labels
Install Node «fuel pump - fuel gauge - fuel filter», by aligning mark A on this assembly with mark B on the fuel tank (see fig. 2.224).
Screw on the nut.
Tighten the nut until mark C on the nut is aligned with mark B on the fuel tank and mark «avec» on fuel pump assembly with fuel level sensor and fuel filter (pic. 2.224).
The rest of the equipment is installed in the reverse order of removal.
Attach the wires to the battery terminals, starting with the positive terminal.