
English Русский
Български
Беларускі
Український
Српски
Hrvatski
Română
Polski
Slovenský
Magyar
Bookmark Contacts Articles Sitemap
Company vehicles Peugeot Company vehicles Opel Company vehicles Skoda Company vehicles Land Rover Company vehicles Mitsubishi Company vehicles Volkswagen Company vehicles Honda
RenaultBook.ru


Duster   Fluence   Kangoo   Laguna   Logan   Megane   Sandero   Scenic   Symbol   Clio   Other
Logan 1 (2004-2012, petrol) Logan 2 (2012-2020)

Removal and installation the rear door trim (Renault Logan 1)

  • Main
  • Logan
  • Logan 1 (2004-2012, petrol)
  • Body and interior
  • Doors, locks and windows
  • Removal and installation the rear door trim
0
You will need a TORX T20 key.

You will need a TORX T20 key.


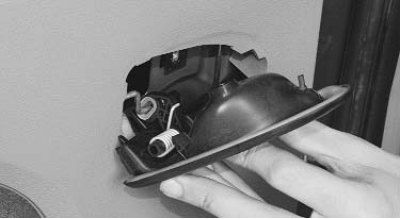
1. Remove the inner handle of the rear door lock actuator (see "Replacing the inner handle of the rear door lock drive").
1. Remove the inner handle of the rear door lock actuator (see «Replacing the inner handle of the…


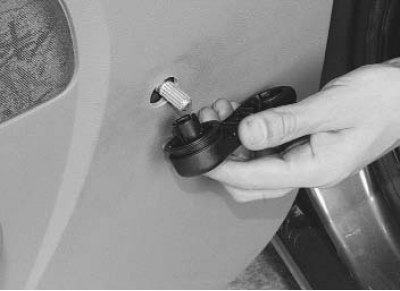
2. Remove the window lift handle by pulling it towards you, overcoming the force of the clamps.
2. Remove the window lift handle by pulling it towards you, overcoming the force of the clamps.


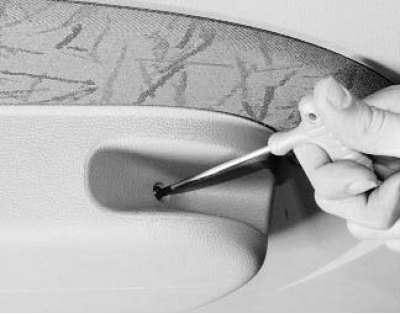
3. Remove the screw securing the upholstery to the armrest.


3. Remove the screw securing the upholstery to the armrest.


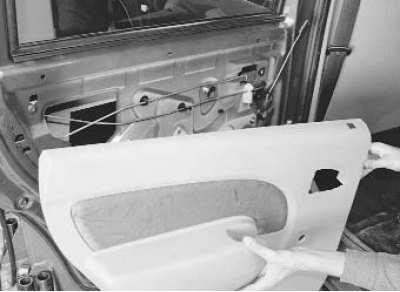
4. Disconnect the upholstery from the door panel, overcoming the force of its plastic pins, remove the lock button from the hole in the upholstery and remove the upholstery from the car.
4. Disconnect the upholstery from the door panel, overcoming the force of its plastic pins, remove…


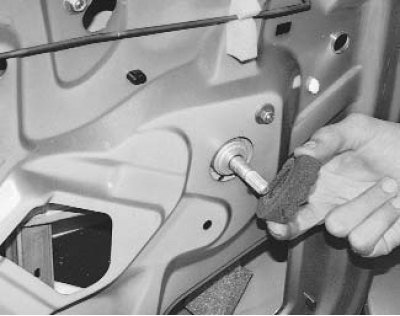
5. If necessary, remove the foam sealing ring from the window regulator shaft.
5. If necessary, remove the foam sealing ring from the window regulator shaft.


Text of the original source on this website: RenaultBook.ru


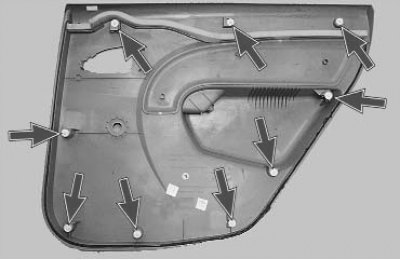
Note: Door trim (view from the back side) attached to the door panel with nine plastic pins.

Note: Door trim (view from the back side) attached to the door panel with nine plastic pins.


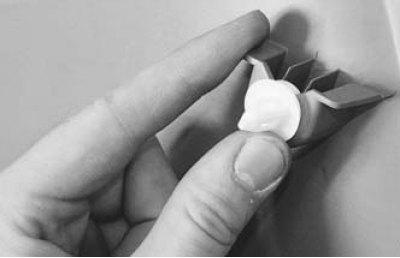
Replace damaged pins with new ones by removing them from the trim brackets.

6. Install the rear door trim and all removed parts in the reverse order of removal.
This article is available on: russian, bulgarian, belarusian, ukrainian, serbian, croatian, romanian, polish, slovak, hungarian
Article has been reviewed by editor: Podkrepilov Maxim
Share with friends:
Previous
Logan 1: Doors, locks and windows
Next

Removal and installation the front door
Replacing the front door opening limiter
Replacing the front door lock
Replacing the front door lock switch
Replacing the inner handle of the front door lock drive
Rear door glass replacement
Replacing the rear door window regulator
Replacing the outer rear door handle
Replacing the inner handle of the rear door lock actuator
Replacing the rear door lock
Other articles on other Renault models

➽ Rear side door trim Renault Duster 1 (2009-2017)
➽ Rear door protective trim Renault Fluence 1 (2009-2020, petrol)
➽ Removal and installation the outer decorative trim of the rear… Renault Laguna 2 (2001-2007)
➽ Removal and installation the decorative trim on the rear door Renault Megan 2 (2002-2009, petrol)
➽ Removal and installation the rear door trim Renault Sandero 1 (2007-2012, petrol)
Link to this article in different formats
Reviews and comments of visitors
No comments yet


Add two numbers 10 + 33


Logan 2 (2012-2020) 
  • General information
  • Faults en route
  • Daily checks
  • Governing bodies
  • Maintenance
  • Power unit
  • Petrol engines 1.2 l
  • Petrol engines 1.6 l
  • Diesel engines 1.5 l
  • Cooling system
  • Lubrication system
  • Power and control system
  • Intake and exhaust system
  • Engine electrical equipment
  • Transmission
  • Clutch
  • Car gearbox
  • Drive shafts
  • Chassis, running gear
  • Suspension and wheels
  • Brake system
  • Steering
  • Body and interior
  • Exterior (external elements)
  • Interior (internal elements)
  • Safety system
  • Heating and air conditioning
  • Electrical equipment
  • Equipment and devices
  • Wiring diagrams (sedan)
  • Wiring diagrams (wagon)
Logan 1 (2004-2012, petrol) 
  • General information
  • Vehicle device
  • User manual
  • Faults en route
  • Daily maintenance
  • First maintenance
  • Second maintenance
  • Driver tips
  • Power unit
  • Engine repair
  • Lubrication system
  • Cooling system
  • Power and exhaust system
  • Transmission
  • Clutch
  • Car gearbox
  • Drive shafts
  • Chassis, running gear
  • Front suspension
  • Rear suspension
  • Steering
  • Brake system
  • Wheels and tires
  • Body and interior
  • Exterior (external elements)
  • Interior (internal elements)
  • Doors, locks and windows
  • Body Care
  • Electrical equipment
  • Equipment and devices
  • Headlights and lighting
  • Power devices
  • Electrical circuits
RenaultBook.ru © 2018–2026 | Mobile version | News and articles | Sitemap: EN BG BY UA RS HR RO PL SK HU | Administration | Site search | Bookmark
Duster 1 (2009-2017) | Fluence 1 (2009-2020, petrol) | Kangoo 1 (1997-2007) | Laguna 2 (2001-2007) | Logan 1 (2004-2012, petrol) | Logan 2 (2012-2020) | Megane 1 (1995-2002) | Megan 2 (2002-2009, petrol) | Sandero 1 (2007-2012, petrol) | Scenic 1 (1996-2003) | Symbol 1 (1999-2008, petrol) | Symbol 2 (2008-2013, petrol) | Renault 19 (1988-1996) | Espace I and II (1984-1996) | Espace III (1996-2002) | Clio 1 (1990-1998) |
We want your visit to be comfortable 😌 and use cookies 🍪 to do so.