English Русский
Български
Беларускі
Український
Српски
Hrvatski
Română
Polski
Slovenský
Magyar
Bookmark Contacts Articles Sitemap
Company vehicles Peugeot Company vehicles Opel Company vehicles Skoda Company vehicles Land Rover Company vehicles Mitsubishi Company vehicles Volkswagen Company vehicles Honda
RenaultBook.ru


Duster   Fluence   Kangoo   Laguna   Logan   Megane   Sandero   Scenic   Symbol   Clio   Other
Renault 19 (1988-1996) Espace I and II (1984-1996) Espace III (1996-2002)

Drive shafts — removal and installation (Renault Espace I)

  • Main
  • Renault
  • Espace I and II (1984-1996)
  • Transmission
  • Drive shafts
  • Drive shafts — removal and installation
0
Contents: Removal 🠛 Installation 🠛

Removal


1 Install special supports or wooden blocks under the front suspension (see illustration 2.6 in Section 7). Remove the shock absorber bolt nut and close the stabilizer bar to provide more space for installing the wood blocks.

2. Place the front of the vehicle on a jack and remove the wheel on the appropriate side.

3. Remove the nut and washer of the drive shaft. To do this, block the wheel hub. It is best to take a plate that is screwed with wheel bolts, and place its end on the ground (see illustration).
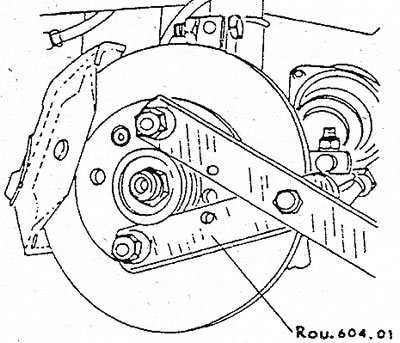
2.3 Locking the wheel hub with a special tool. Such a device can be easily made independently

2.3 Locking the wheel hub with a special tool. Such a device can be easily made independently


4. Unscrew the disc brake caliper and attach it to the front wheel suspension with wire. Do not allow the caliper to hang on the disc brake hose under any circumstances.

Original version on our portal: renaultbook

5. Remove the nuts of the tie rod joint and the suspension joint and use a suitable puller to press the joints away from the steering knuckle arm and the steering knuckle respectively. Then temporarily reinstall both joints.

6. To disconnect the drive shaft, knock out the pin from the drive shaft and the differential driven wheel with a punch of the appropriate diameter (see illustration). To do this, turn the drive shaft to the indicated position.
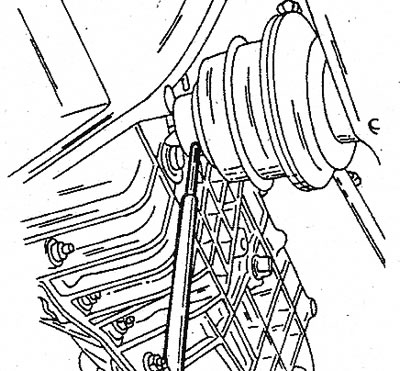


2.6 Knock out the locking pin from the drive shaft connection

2.6 Knock out the locking pin from the drive shaft connection


7. Remove the drive shaft from the wheel hub. Now remove both joints and pull outward and then press down on the steering knuckle (see illustration 2.11 in Section 7) until the splines of the drive shaft disengage from the gearbox.

8. To remove the wheel hub from the drive shaft, a puller is needed. Screw the puller into the wheel bolt and press the middle bolt against the shaft. Both joints must be installed again to guide the ends of the shaft. In doing so, adjust the position of the shaft well. Finally, remove the joints and pull out the shaft.

Installation


9. Install the drive shaft in the reverse order, paying attention to the points below.

10. Lubricate the gear shaft teeth with graphite grease.

11. Hammer in new locking pins that hold the shaft in the gear. Treat the ends of the pins with sealant.

12. New shafts are sold with protective bags for the joint boots and with installation instructions that must be followed. The bags must remain on the rubber boots until the drive shaft is reinstalled. When removing the bags, be careful not to damage the boot.


13. Align the drive shaft and gear holes and push the shaft in.

14. Use a punch to drive in the new spring-loaded pin (see illustration 2.26 in Section 7). Apply sealant to both ends of the pin.

15. Lubricate the toothed end of the shaft with sealant and push the shaft into the toothed engagement on the inside of the wheel hub until the end of the shaft with threads appears on the other side of the hub so that the nut and washer fit on it. If there is enough thread, screw on the nut and tighten it. Then remove the nut again and install the washer under it.

16. Raise the steering knuckle and install the suspension arm joint and the tie rod joint. Tighten the new nut in the suspension arm joint to 65 Nm and in the tie rod joint to 40 Nm.

17. Lubricate the disc brake caliper bolts with sealant and tighten to a torque of 35 Nm.

18. Lower the vehicle onto its wheels. Tighten the drive shaft nuts to 250 Nm, the wheels to 90 Nm (four bolts) or 100 Nm (five bolts).

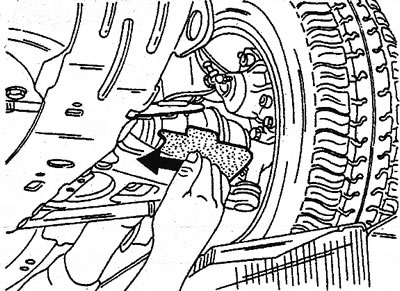
19. Remove the protective paper bags from the covers. To do this, hold the cover with one hand and remove the cover with the other (see illustration). Do not use a screwdriver or any sharp objects for this purpose.

2.19 Remove the protective bags

2.19 Remove the protective bags


20. Check the transmission oil level if the left drive shaft was removed and installed.
This article is available on: russian, bulgarian, belarusian, ukrainian, serbian, croatian, romanian, polish, slovak, hungarian
Article has been reviewed by editor: Fedoseev Denis
Share with friends:
Previous
Espace I and II: Drive shafts
Next

General description of drive shafts
Drive shaft specifications
Drive shaft joints — replacement of protective covers
Other articles on other Renault models

➽ Drive shafts — technical data Renault Kangoo 1 (1997-2007)
➽ Drive shafts — general information Renault Logan 2 (2012-2020)
➽ Drive shafts for wheels installed with manual transmissions Renault Megan 2 (2002-2009, petrol)
➽ Checking the protective covers of the front wheel drive shafts… Renault Symbol 1 (1999-2008, petrol)
➽ General description of drive shafts Renault Clio 1 (1990-1998)
Link to this article in different formats
Reviews and comments of visitors
No comments yet


Add two numbers 43 + 32


Renault 19 (1988-1996) 
  • General information
  • Maintenance
  • Power unit
  • Engine repair
  • Exhaust system
  • Cooling system
  • Supply system
  • Single-point injection
  • Multi-point injection
  • Diesel injection system
  • Transmission
  • Clutch
  • Car gearbox
  • Chassis, running gear
  • Car suspension
  • Steering
  • Brake system
  • Wheels and tires
  • Body and interior
  • Exterior (external elements)
  • Interior (internal elements)
  • Heating and ventilation
  • Electrical equipment
  • Equipment and devices
  • Headlights and lighting
  • Ignition system
  • Power devices
  • Electrical circuits
Espace I and II (1984-1996) 
  • General information
  • Introduction to the guide
  • Troubleshooting
  • Power unit
  • Engine repair
  • Cooling system
  • Carburetor fuel system
  • Injection fuel system
  • Diesel fuel system
  • Ignition system
  • Transmission
  • Clutch
  • Car gearbox
  • Drive shafts
  • Chassis, running gear
  • Brake system
  • Steering
  • Front suspension
  • Rear suspension
  • Body and interior
  • Exterior (external elements)
  • Interior (internal elements)
  • Doors, locks and windows
  • Electrical equipment
  • Equipment and devices
  • Electrical circuits
Espace III (1996-2002) 
  • General information
  • Introduction to the manual
  • User manual
  • Power unit
  • Petrol engines F3R
  • Petrol engines Z7X
  • Diesel engines G8T
  • Diesel engines G9T
  • Transmission
  • Clutch
  • Mechanical gearbox
  • Automatic gearbox
  • Drive shafts
  • Chassis, running gear
  • Steering
  • Front suspension
  • Rear suspension
  • Brake system
  • Body and interior
  • Exterior (external elements)
  • Interior (internal elements)
  • Doors, locks and windows
  • Heating and ventilation
  • Electrical equipment
  • Equipment and instruments
  • Power devices
  • Electrical circuits
RenaultBook.ru © 2018–2026 | Mobile version | News and articles | Sitemap: EN BG BY UA RS HR RO PL SK HU | Administration | Site search | Bookmark
Duster 1 (2009-2017) | Fluence 1 (2009-2020, petrol) | Kangoo 1 (1997-2007) | Laguna 2 (2001-2007) | Logan 1 (2004-2012, petrol) | Logan 2 (2012-2020) | Megane 1 (1995-2002) | Megan 2 (2002-2009, petrol) | Sandero 1 (2007-2012, petrol) | Scenic 1 (1996-2003) | Symbol 1 (1999-2008, petrol) | Symbol 2 (2008-2013, petrol) | Renault 19 (1988-1996) | Espace I and II (1984-1996) | Espace III (1996-2002) | Clio 1 (1990-1998) |
We want your visit to be comfortable 😌 and use cookies 🍪 to do so.