
English Русский
Български
Беларускі
Український
Српски
Hrvatski
Română
Polski
Slovenský
Magyar
Bookmark Contacts Articles Sitemap
Company vehicles Peugeot Company vehicles Opel Company vehicles Skoda Company vehicles Land Rover Company vehicles Mitsubishi Company vehicles Volkswagen Company vehicles Honda
RenaultBook.ru


Duster   Fluence   Kangoo   Laguna   Logan   Megane   Sandero   Scenic   Symbol   Clio   Other
Symbol 1 (1999-2008, petrol) Symbol 2 (2008-2013, petrol)

Removal and installation the clutch cable (Renault Symbol 1)

  • Main
  • Symbol
  • Symbol 1 (1999-2008, petrol)
  • Transmission
  • Clutch
  • Removal and installation the clutch cable
0
Removal procedure:
  • remove the air filter in the engine compartment;
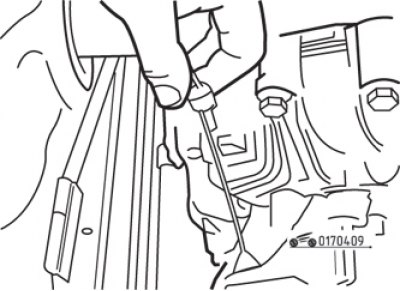
Fig. 4.9. Disconnecting the cable end from the clutch release fork
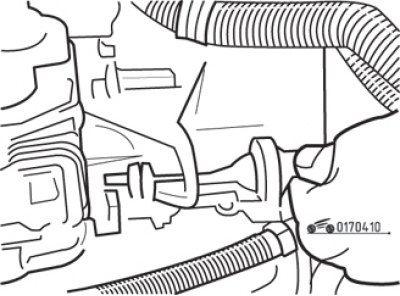
Fig. 4.9. Disconnecting the cable end from the clutch release fork


Fig. 4.10. Disconnecting the outer cable casing from the bracket on the clutch housing

Fig. 4.10. Disconnecting the outer cable casing from the bracket on the clutch housing

  • disconnect the cable end from the clutch release fork and release the cable housing from the bracket on the clutch housing (fig. 4.9 and 4.10);
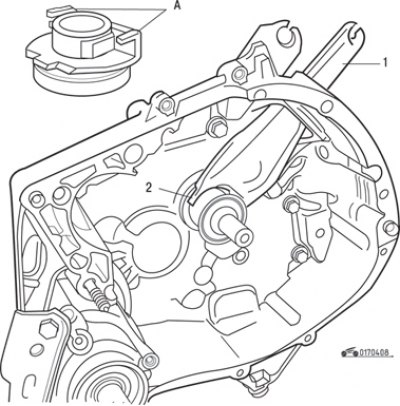
Fig. 4.8. Clutch release fork (1) and bearing (2) (A – protrusions of the clutch release bearing…

Fig. 4.8. Clutch release fork (1) and bearing (2) (A – protrusions of the clutch release bearing that must be engaged with the fork)


Caution! Do not lift the clutch release fork as it may come out of the clutch release bearing grooves (see fig. 4.8).
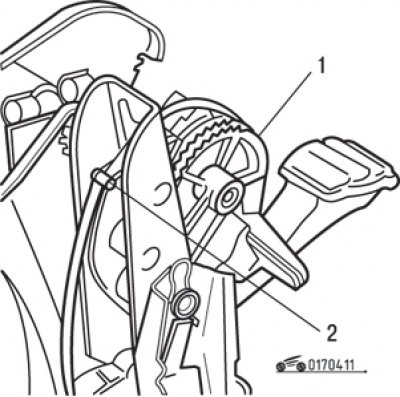

Fig. 4.11. Disconnecting the cable from the clutch pedal: 1 – sector; 2 – retainer

Fig. 4.11. Disconnecting the cable from the clutch pedal: 1 – sector; 2 – retainer

  • remove the lower protective panel in the passenger compartment near the driver's feet. Press the clutch pedal to the floor, then pull it up and disconnect the cable end from the toothed sector of the self-adjusting mechanism. If necessary, remove the clamps from the sector with a screwdriver (Fig. 4.11);
  • remove the cable sheath from the stop in the engine shield;
  • pull the cable completely out of the engine compartment;
  • inspect the cable to make sure it is in good condition.

Installation procedure:
  • from the engine compartment, pull the cable through the hole in the engine shield;
  • install the cable end into place in the toothed sector of the wear compensator;
  • under the hood, pull the outer casing through the clutch housing bracket, attach the cable end to the fork. Place the cable in the fasteners;
  • to set the automatic wear compensator to the working position, press the clutch pedal several times;
  • to ensure normal operation of the clutch, it is necessary that the cable connected to the clutch release fork is always taut and has a slack of at least 20 mm;
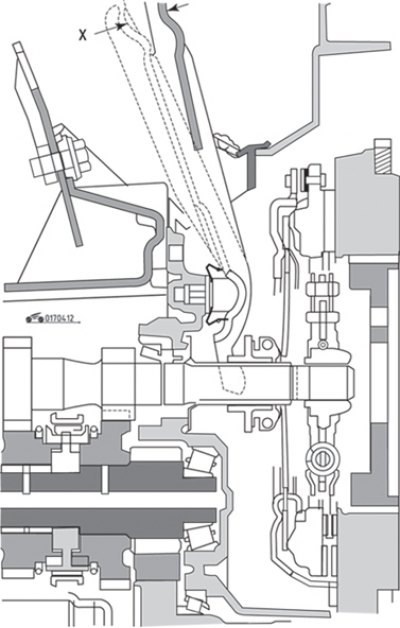
Fig. 4.12. Checking the travel (X) of the clutch release fork

Fig. 4.12. Checking the travel (X) of the clutch release fork

  • make sure that the toothed sector rotates on the axis, the latches return freely to their original position, and the clutch fork travel (Fig. 4.12) is within 27–30 mm.
This article is available on: russian, bulgarian, belarusian, ukrainian, serbian, croatian, romanian, polish, slovak, hungarian
Article has been reviewed by editor: Podkrepilov Maxim
Share with friends:
Previous
Symbol 1: Clutch
Next

Removal, checking and installation the clutch release bearing
Removal, checking and installation the clutch
General information about the clutch
Removal and installation the clutch pedal and adjusting the clutch…
Other articles on other Renault models

➽ Clutch cable Renault Fluence 1 (2009-2020, petrol)
➽ Removal and installation the clutch cable Renault Laguna 2 (2001-2007)
➽ Replacing and adjusting the clutch release cable Renault Logan 1 (2004-2012, petrol)
➽ Removal and installation the clutch cable Renault Megane 1 (1995-2002)
➽ Replacing and adjusting the clutch release cable Renault Sandero 1 (2007-2012, petrol)
Link to this article in different formats
Reviews and comments of visitors
No comments yet


Add two numbers 13 + 21


Symbol 2 (2008-2013, petrol) 
  • General information
  • User manual
  • Maintenance
  • Power unit
  • Engine repair
  • Cooling system
  • Fuel system
  • Exhaust system
  • Ignition system
  • Transmission
  • Clutch
  • Mechanical gearbox
  • Automatic gearbox
  • Drive shafts
  • Chassis, running gear
  • Front suspension
  • Rear suspension
  • Steering
  • Brake system
  • Body and interior
  • Exterior (external elements)
  • Interior (internal elements)
  • Doors, locks and windows
  • Heating and ventilation
  • Electrical equipment
  • Equipment and devices
  • Headlights and lighting
  • Power devices
  • Electrical circuits
Symbol 1 (1999-2008, petrol) 
  • General information
  • User manual
  • Car care
  • Maintenance
  • Power unit
  • Engine repair
  • Cooling and lubrication system
  • Supply system
  • Exhaust system
  • Ignition system
  • Transmission
  • Clutch
  • Mechanical gearbox
  • Automatic gearbox
  • Drive shafts
  • Chassis, running gear
  • Car suspension
  • Steering
  • Brake system
  • Body and interior
  • Exterior (external elements)
  • Interior (internal elements)
  • Doors, locks and windows
  • Restoration and repair
  • Electrical equipment
  • Equipment and devices
  • Headlights and lighting
  • Power devices
  • Heating and ventilation
  • Electrical circuits
RenaultBook.ru © 2018–2026 | Mobile version | News and articles | Sitemap: EN BG BY UA RS HR RO PL SK HU | Administration | Site search | Bookmark
Duster 1 (2009-2017) | Fluence 1 (2009-2020, petrol) | Kangoo 1 (1997-2007) | Laguna 2 (2001-2007) | Logan 1 (2004-2012, petrol) | Logan 2 (2012-2020) | Megane 1 (1995-2002) | Megan 2 (2002-2009, petrol) | Sandero 1 (2007-2012, petrol) | Scenic 1 (1996-2003) | Symbol 1 (1999-2008, petrol) | Symbol 2 (2008-2013, petrol) | Renault 19 (1988-1996) | Espace I and II (1984-1996) | Espace III (1996-2002) | Clio 1 (1990-1998) |
We want your visit to be comfortable 😌 and use cookies 🍪 to do so.