
2. Jack up the rear of the vehicle and place it on axle stands. Remove wheels.
3. Remove the brake drums as described in section «Brake system». If equipped with disc brakes, disconnect the brake calipers and attach with wire to the rear suspension without bending the hoses.
4. Disconnect the parking brake cables from the levers on the back of the brake shield or from the calipers, and remove all fasteners on the rear axle.
5. Disconnect the brake pipes from the trailing arms.
6. Jack up the rear axle until the springs and dampers are compressed.
7. Remove the nut and bolt from the underside of both shock absorbers. Now remove the shock absorber.
8. Remove the transverse arm brace from the rear axle (see illustration). If necessary, the stretch can be removed. Secure the axle with wire to the bottom of the car so that it stays in that position.

23.8 Place of attachment of the brace of the transverse suspension arm to the rear axle (1)
9. Remove nuts and bolts of fastening of both trailing arms of a suspension bracket to a body. Make sure the bridge is still up and well wired.
10. Slowly release the bridge until the springs are completely loose and can be removed. Now remove the wire. Have an assistant support the axle on one side and carefully remove the jack.
11. The following work is carried out with the set ride height adjustment.
12. Remove the air spring mount and bottom connections.
13. Disconnect the ride height adjustment lever by removing the ball joint located on the frame cross member (1) (see illustration).
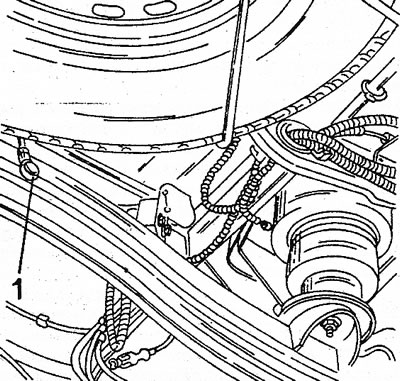
23.13 Air spring (on right). The ball joint is shown on the left (1) ride height adjuster
14. Air springs can be detached at the top after removing the axle.
15. If the rubber-metal bushings were knocked out in the trailing arms of the suspension and the extensions of the transverse arm, they must be replaced. Press out the old and press in the new bushings so that their edges protrude from both sides by the same amount. At installation of plugs of trailing arms of a suspension bracket be guided by an illustration 23.15. The specified value of 1.5 mm corresponds to the installation of the mounting bolt. Also inspect the position of the kidney hole in the bushing. Before pressing the bushing, it must be returned to its original position. It is not recommended to use a mallet and punch, as this can damage the sleeve. A vise or drift of a suitable diameter is best to press the bushing into the suspension arm.
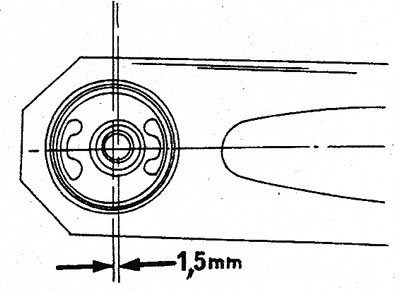
23.15 Prescribed installation dimension of the trailing arm bush
16. Install the rear axle in reverse order.
17. Jack up the bridge and set it in the correct position.
18. Ask an assistant to hold the trailing arm to the side so that it cannot tip over. Hammer the bolts from the outside in and screw the nuts on the other side.
19. Install the spring in the lower cup and continue to jack up the bridge while the upper ends of the springs are wound into their respective places. Install shock absorbers. Attach fasteners.
20. Fasten the air springs at the bottom first, then raise them together with the axle to the correct position.
21. Attach both ends of the control arm extension. Do not tighten bolts and nuts yet.
22. Lower vehicle onto wheels and tighten trailing arm bolts, shock absorbers, and transverse arm strut mount to specified torques, although some mounts may not be easily accessible. There should be no additional loads on the car. All self-locking nuts must also be replaced.