
English Русский
Български
Беларускі
Український
Српски
Hrvatski
Română
Polski
Slovenský
Magyar
Bookmark Contacts Articles Sitemap
Company vehicles Peugeot Company vehicles Opel Company vehicles Skoda Company vehicles Land Rover Company vehicles Mitsubishi Company vehicles Volkswagen Company vehicles Honda
RenaultBook.ru


Duster   Fluence   Kangoo   Laguna   Logan   Megane   Sandero   Scenic   Symbol   Clio   Other
Renault 19 (1988-1996) Espace I and II (1984-1996) Espace III (1996-2002)

Rear wheel hubs and bearings (Renault Espace I)

  • Main
  • Renault
  • Espace I and II (1984-1996)
  • Chassis, running gear
  • Rear suspension
  • Rear wheel hubs and bearings
0
Contents: Removal and installation 🠛 Replacing axles 🠛
The axial clearance of wheel bearings is 0-0.3 mm for drum brakes and 0.05 mm for disc brakes. To measure the bearing clearance with the wheel removed, mount the micrometer on the rear suspension or use a stand to secure it to the underbody and apply the measuring probe to the side of the brake drum or brake disc. Move the wheel hub. The micrometer will indicate the axial clearance.

The bearings are mounted in the hubs, which means that if the bearing fails, the wheel hub must also be replaced. In this regard, it is worth mentioning that the axle can be replaced separately, if, for example, the wheel bearing rotates with the end of the axle. The other end of the axle is attached to the axle beam and can be replaced after removing the wheel hub.

Removal and installation


1. Removing the wheel hub kit on models with drum and disc brakes is done in a similar way, plus remove the disc brake caliper in advance:

2. Jack up the rear of the vehicle, place it on axle stands and release the parking brake. Loosen the parking brake cable.

3. Vehicles with drum brakes are self-adjusting, as described in the section "Brake system". Then unscrew both socket head bolts from the end of the cylinder and remove the cylinder.

4. With disc brakes installed, remove the brake pads and disc brake caliper (see section "Brake system") and both mounting bolts from the end of the brake disc (using a hex key).

5. Carefully knock the plug out of the brake drum or brake disc with a screwdriver and mallet and remove the hub nut underneath (see illustration).
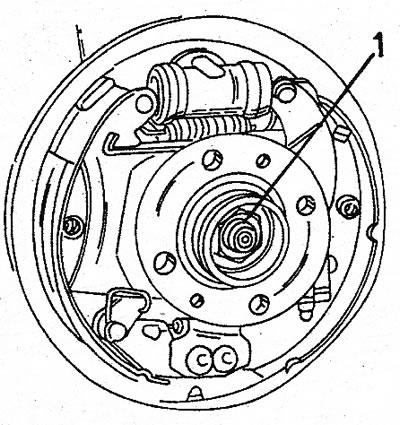


27.5 The wheel bearing nut (1) is only loosened or tightened when the vehicle is parked on the…

27.5 The wheel bearing nut (1) is only loosened or tightened when the vehicle is parked on the ground


6. Remove the wheel hub together with the bearing. If the hub is jammed, use a puller. You can also install a punch in the screw holes of the hub thread.

7. Install the wheel bolt in reverse order. Before installing the new hub, inspect the axle ends for wear. Lubricate the axle end with a small amount of transmission oil before installing the wheel hub. Since the tightening torque of the hub nut is quite high, tighten it only after the car has been lowered to the ground. Tighten the nut to a torque of 160 Nm. Also tighten the wheel nuts to the prescribed tightening torque.

8. With disc brakes installed, install the disc brake caliper and brake pads.

Replacing axles


9. The axles are mounted in the end surfaces of the bridge beams and can be replaced after removing the wheel hubs.

10. Remove the brake pads and shield (drum brakes) or protective cover (disc brakes) and unscrew the bolts with an Allen key.

11. On vehicles with drum brakes, disconnect the hoses from the brake cylinder pistons.

12. Install in reverse order. Previously installed bolts can be used again, just lubricate them with "Loctite". Tighten the bolts evenly in the sequence shown to a tightening torque of 22 Nm (see illustration). Install the remaining components.
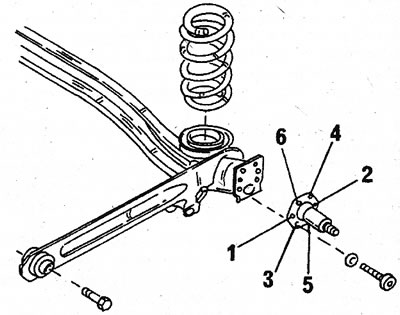


27.12 Tightening sequence of the six rear wheel axle mounting bolts

27.12 Tightening sequence of the six rear wheel axle mounting bolts
This article is available on: russian, bulgarian, belarusian, ukrainian, serbian, croatian, romanian, polish, slovak, hungarian
Article has been reviewed by editor: Fedoseev Denis
Share with friends:
Previous
Espace I and II: Rear suspension
 

Rear springs (springs)
Suspension control arm tensioner
Rear shock absorbers
Rear Axle — Removal and Installation
Rear suspension — general description
 
Other articles on other Renault models

➽ Checking and replacing rear wheel hub bearings Renault Megane 1 (1995-2002)
➽ Replacing the rear wheel hub bearings Renault Symbol 1 (1999-2008, petrol)
➽ Rear wheel hub bearings — inspection, removal and installation Renault Clio 1 (1990-1998)
➽ Rear wheel speed sensor Renault Duster 1 (2009-2017)
➽ Control and adjustment values of rear wheel alignment angles Renault Fluence 1 (2009-2020, petrol)
Link to this article in different formats
Reviews and comments of visitors
No comments yet


Add two numbers 48 + 15


Renault 19 (1988-1996) 
  • General information
  • Maintenance
  • Power unit
  • Engine repair
  • Exhaust system
  • Cooling system
  • Supply system
  • Single-point injection
  • Multi-point injection
  • Diesel injection system
  • Transmission
  • Clutch
  • Car gearbox
  • Chassis, running gear
  • Car suspension
  • Steering
  • Brake system
  • Wheels and tires
  • Body and interior
  • Exterior (external elements)
  • Interior (internal elements)
  • Heating and ventilation
  • Electrical equipment
  • Equipment and devices
  • Headlights and lighting
  • Ignition system
  • Power devices
  • Electrical circuits
Espace I and II (1984-1996) 
  • General information
  • Introduction to the guide
  • Troubleshooting
  • Power unit
  • Engine repair
  • Cooling system
  • Carburetor fuel system
  • Injection fuel system
  • Diesel fuel system
  • Ignition system
  • Transmission
  • Clutch
  • Car gearbox
  • Drive shafts
  • Chassis, running gear
  • Brake system
  • Steering
  • Front suspension
  • Rear suspension
  • Body and interior
  • Exterior (external elements)
  • Interior (internal elements)
  • Doors, locks and windows
  • Electrical equipment
  • Equipment and devices
  • Electrical circuits
Espace III (1996-2002) 
  • General information
  • Introduction to the manual
  • User manual
  • Power unit
  • Petrol engines F3R
  • Petrol engines Z7X
  • Diesel engines G8T
  • Diesel engines G9T
  • Transmission
  • Clutch
  • Mechanical gearbox
  • Automatic gearbox
  • Drive shafts
  • Chassis, running gear
  • Steering
  • Front suspension
  • Rear suspension
  • Brake system
  • Body and interior
  • Exterior (external elements)
  • Interior (internal elements)
  • Doors, locks and windows
  • Heating and ventilation
  • Electrical equipment
  • Equipment and instruments
  • Power devices
  • Electrical circuits
RenaultBook.ru © 2018–2026 | Mobile version | News and articles | Sitemap: EN BG BY UA RS HR RO PL SK HU | Administration | Site search | Bookmark
Duster 1 (2009-2017) | Fluence 1 (2009-2020, petrol) | Kangoo 1 (1997-2007) | Laguna 2 (2001-2007) | Logan 1 (2004-2012, petrol) | Logan 2 (2012-2020) | Megane 1 (1995-2002) | Megan 2 (2002-2009, petrol) | Sandero 1 (2007-2012, petrol) | Scenic 1 (1996-2003) | Symbol 1 (1999-2008, petrol) | Symbol 2 (2008-2013, petrol) | Renault 19 (1988-1996) | Espace I and II (1984-1996) | Espace III (1996-2002) | Clio 1 (1990-1998) |
We want your visit to be comfortable 😌 and use cookies 🍪 to do so.