



Contents: Removal 🠛 Installation 🠛

The drive shaft joint grease is supplied in the repair kit. For the GE86 joint, use MOBIL OIL 55911L611 grease (180 grams), for the RC462 joint - SHELL STAMINA 0233 grease (110 cm³).
Special tool:
- Punch — BW 31-01
- Drive shaft nut key - Rou. 604-01
- Ball joint puller - T.Av. 476
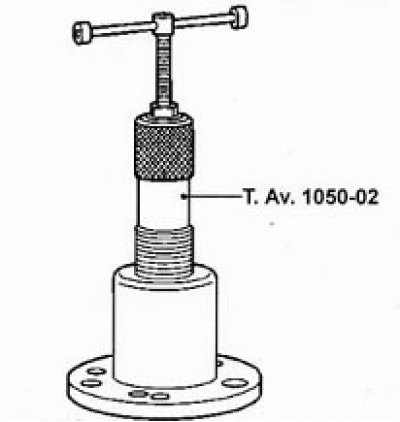
- Drive shaft puller - T.Av. 1050-02
Tightening torques:
- Drive shaft nut - 280 Nm
- Drive shaft joint bolts - 25 Nm
- Wheel bolts - 90 Nm
- Shock absorber support bolts - 180 Nm
- Brake caliper bolts - 100 Nm
- Ball joint nut - 37 Nm
Removal
To remove, follow these steps:
- loosen the hub nut on the side of the shaft being removed;
- loosen the wheel bolts;
- place the vehicle on a lift or raise the front of the vehicle and place safety supports under the body;
- remove the ABS sensor from the wheel (see section "Brake system");
- completely unscrew the previously loosened hub nut. When turning the wheel, ask an assistant to press the brake pedal and unscrew the nut;
- unscrew the two bolts securing the brake caliper to the steering knuckle, remove the caliper from the brake disc and tie it up away from the work area without pulling on the brake hose;
- unscrew the steering tip nut and disconnect the tip from the steering knuckle using a puller;
- unscrew the two nuts securing the shock absorber strut to the steering knuckle. Remove the top bolt, leaving the bottom one in place for now. Perform further actions depending on the side of the shaft being removed.
Left drive shaft (cars with manual transmission)
To remove, follow these steps:
- drain the oil from the gearbox housing;
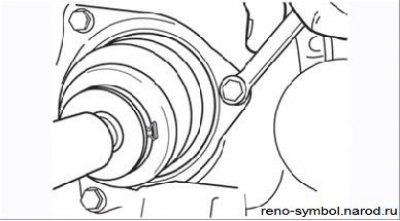
Figure 4.53. Unscrewing the bolts securing the inner joint boot to the gearbox
- unscrew the three bolts securing the inner joint boot holder to the gearbox (Figure 4.53);
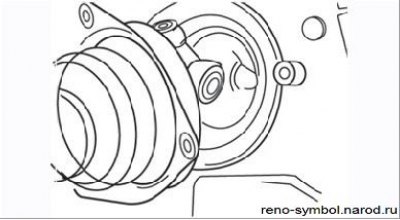
Figure 4.54. Disconnecting the inner joint from the gearbox (the hinge rollers are visible)
- move the wheel hub outward to disengage the inner joint from the splines of the gearbox half-axle gear. This may cause oil to leak out of the gearbox. Do not move the joint rollers from the studs (Figure 4.54);
- remove the lower shock absorber strut mounting bolt from the steering knuckle and carefully, avoiding damage to the covers, remove the splined part of the outer joint from the wheel hub. If necessary (in case of tight fit) use a soft metal drift. As a last resort, use a suitable puller to carefully remove the shaft from the wheel well;
- connect the wheel hub with bolts to the shock absorber strut.
Right drive shaft (on all cars)
The right drive shaft is removed in the same way as the left one. Remove, if provided, the sealing ring from the splines of the output shaft.
Left drive shaft (on cars with automatic transmission)
To remove, follow these steps:
- pull the wheel hub outward to clear the inner joint of the shaft from the gearbox. If necessary, use a large flat-head screwdriver as a lever;
- removing the outer joint is done in the same way as on a car with a manual transmission.
Attention! Protect the shaft covers from damage. The slightest puncture or tear in the cover allows water and dirt to penetrate into the joint cavity, which immediately puts it out of order. When installing drive shafts, it is recommended to wrap the covers in polyethylene film and secure with adhesive tape.
Installation
Left drive shaft (on cars with manual transmission)
Please do the following:
- clean the splined parts of the joints, hubs and gearboxes from dirt and grease;
- install the inner joint into the gearbox housing, keeping the shaft horizontal. Align the holes in the holder with the holes in the gearbox housing, insert and tighten the mounting bolts to the specified torque, making sure that the boot does not twist;
- insert the splined part of the outer joint until it stops in the hub, insert both bolts connecting the steering knuckle to the shock absorber strut (the bolt heads should be forward in the direction of travel
- car), put washers on the bolts and tighten the nuts to the specified torque;
- install the new hub nut by tightening it by hand first;
- perform the remaining operations in the reverse order of removal;
- lower the vehicle, tighten the hub nut to the specified torque;
- add oil to the gearbox if necessary.
Right drive shaft (on vehicles with all types of gearboxes)
Please do the following:
- clean the splined parts of the shafts, hubs and gearboxes. Apply Molykote BR2 grease to the splined parts of the specified parts;
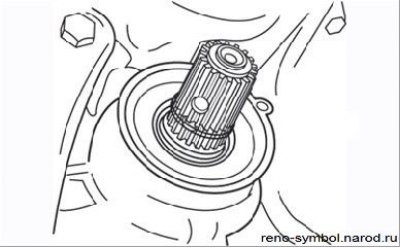
Figure 4.55. Installing a new sealing ring on the gearbox output spline shaft
- install a new sealing ring on the gearbox output shaft and slide it until it stops in the seal (Figure 4.55);
- align the splines of the output shaft and the inner joint of the drive shaft, push the shaft until it stops on the splined part of the gearbox shaft;
- the installation of the outer joint is carried out in the same way as on cars with a manual transmission.
Left drive shaft (on cars with automatic transmission)
Please do the following:
- clean the splined parts of the shafts, hubs and gearboxes. Apply Molykote BR2 grease to the splined parts of the specified parts;
- align the splined parts of the gearbox output shaft and the inner joint of the drive shaft, push the shaft until it stops on the splined part of the gearbox shaft;
- the remaining operations are performed in the same way as on cars with a manual transmission.
(Source link is located on: www.RENAULTBOOK.ru)