
English Русский
Български
Беларускі
Український
Српски
Hrvatski
Română
Polski
Slovenský
Magyar
Bookmark Contacts Articles Sitemap
Company vehicles Peugeot Company vehicles Opel Company vehicles Skoda Company vehicles Land Rover Company vehicles Mitsubishi Company vehicles Volkswagen Company vehicles Honda
RenaultBook.ru


Duster   Fluence   Kangoo   Laguna   Logan   Megane   Sandero   Scenic   Symbol   Clio   Other
Symbol 1 (1999-2008, petrol) Symbol 2 (2008-2013, petrol)

Replacing the corrugated boot of the inner hinge type GL69 (at the gearbox) (Renault Symbol 2)

  • Main
  • Symbol
  • Symbol 2 (2008-2013, petrol)
  • Transmission
  • Drive shafts
  • Replacing the corrugated boot of the inner hinge type GL69 (at the gearbox)
0
Attention! To perform the work, you need the T.Av. 1331 mandrel for installing the boot bearing.
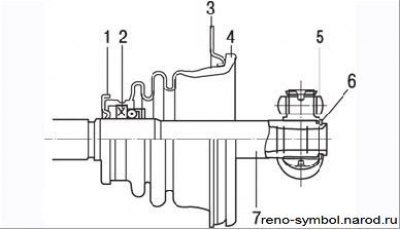

Figure 4.52. Constant velocity joint type GL 69 («tripod»): 1 – mudguard ring; 2 – support ring; 3…

Figure 4.52. Constant velocity joint type GL 69 ("tripod"): 1 – mudguard ring; 2 – support ring; 3 – holder; 4 – corrugated cover; 5 - three-spined; 6 – retaining ring; 7 – drive shaft


When working, refer to Figure 4.52.

Work order:
  • remove the drive shaft;
  • remove the snap ring securing the joint to the shaft;
  • mark the position of the joint on the shaft;
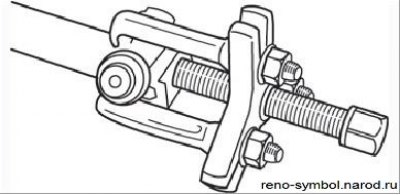
Figure 4.56. Removing the joint from the drive shaft

Figure 4.56. Removing the joint from the drive shaft


[Original publication on the website: RENAULTBOOK]
  • press the joint off the shaft using a puller (Figure 4.56). Do not press the puller paws against the rollers, as they may become deformed;
  • remove the bellows together with the bearing and mudguard ring in the same way as the hinge;
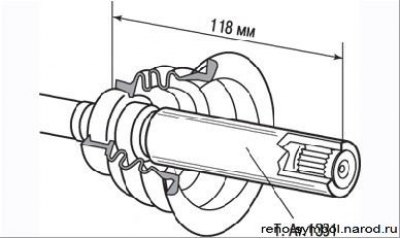
Figure 4.57. Position of the GL 69 joint cover on the drive shaft (the arrow shows the groove on…

Figure 4.57. Position of the GL 69 joint cover on the drive shaft (the arrow shows the groove on the shaft for installing the puller)


  • for precise positioning on the shaft, the bearing of the new cover must be pressed onto it until the size L=(118±0.2) mm is obtained between the rear end of the bearing and the end of the shaft (Figure 4.57). This dimension is obtained by using the T.Av. 1331 mandrel, when its end is flush with the end of the shaft;

Note: To avoid deformation of sealed bearings and consequently grease leakage, do not press the bearing in with a hammer, use a press so that the applied force can be gradually increased.

  • to press in, hold the shaft by the groove with a puller and install it on the shaft according to the marks made;
  • after pressing, check the smooth movement of the hinge in all planes;
  • secure the joint with a retaining ring by installing it in the groove of the shaft;
  • fill equally with grease from the tube supplied with the case.
This article is available on: russian, bulgarian, belarusian, ukrainian, serbian, croatian, romanian, polish, slovak, hungarian
Article has been reviewed by editor: Kupriyanov Sergey
Share with friends:
Previous
Symbol 2: Drive shafts
Next

Drive shaft — removal and installation
Front wheel drive faults
Front Wheel Drive — Design Description
Replacing the corrugated boot of the inner hinge type RC462 (near the…
Replacing the bellows of the outer joint type GE86 (at the hub)
Drive shaft joints — inspection
Other articles on other Renault models

➽ Replacing the left front drive shaft boot on the gearbox side Renault Logan 2 (2012-2020)
➽ Replacing bearings in the gearbox housing Renault Fluence 1 (2009-2020, petrol)
➽ Replacing differential bearings (JR gearbox) Renault Laguna 2 (2001-2007)
➽ Replacing the protective boot of the inner CV joint of the right… Renault Megane 1 (1995-2002)
➽ Replacing gearbox seals Renault Sandero 1 (2007-2012, petrol)
Link to this article in different formats
Reviews and comments of visitors
No comments yet


Add two numbers 39 + 16


Symbol 2 (2008-2013, petrol) 
  • General information
  • User manual
  • Maintenance
  • Power unit
  • Engine repair
  • Cooling system
  • Fuel system
  • Exhaust system
  • Ignition system
  • Transmission
  • Clutch
  • Mechanical gearbox
  • Automatic gearbox
  • Drive shafts
  • Chassis, running gear
  • Front suspension
  • Rear suspension
  • Steering
  • Brake system
  • Body and interior
  • Exterior (external elements)
  • Interior (internal elements)
  • Doors, locks and windows
  • Heating and ventilation
  • Electrical equipment
  • Equipment and devices
  • Headlights and lighting
  • Power devices
  • Electrical circuits
Symbol 1 (1999-2008, petrol) 
  • General information
  • User manual
  • Car care
  • Maintenance
  • Power unit
  • Engine repair
  • Cooling and lubrication system
  • Supply system
  • Exhaust system
  • Ignition system
  • Transmission
  • Clutch
  • Mechanical gearbox
  • Automatic gearbox
  • Drive shafts
  • Chassis, running gear
  • Car suspension
  • Steering
  • Brake system
  • Body and interior
  • Exterior (external elements)
  • Interior (internal elements)
  • Doors, locks and windows
  • Restoration and repair
  • Electrical equipment
  • Equipment and devices
  • Headlights and lighting
  • Power devices
  • Heating and ventilation
  • Electrical circuits
RenaultBook.ru © 2018–2026 | Mobile version | News and articles | Sitemap: EN BG BY UA RS HR RO PL SK HU | Administration | Site search | Bookmark
Duster 1 (2009-2017) | Fluence 1 (2009-2020, petrol) | Kangoo 1 (1997-2007) | Laguna 2 (2001-2007) | Logan 1 (2004-2012, petrol) | Logan 2 (2012-2020) | Megane 1 (1995-2002) | Megan 2 (2002-2009, petrol) | Sandero 1 (2007-2012, petrol) | Scenic 1 (1996-2003) | Symbol 1 (1999-2008, petrol) | Symbol 2 (2008-2013, petrol) | Renault 19 (1988-1996) | Espace I and II (1984-1996) | Espace III (1996-2002) | Clio 1 (1990-1998) |
We want your visit to be comfortable 😌 and use cookies 🍪 to do so.