
English Русский
Български
Беларускі
Український
Српски
Hrvatski
Română
Polski
Slovenský
Magyar
Bookmark Contacts Articles Sitemap
Company vehicles Peugeot Company vehicles Opel Company vehicles Skoda Company vehicles Land Rover Company vehicles Mitsubishi Company vehicles Volkswagen Company vehicles Honda
RenaultBook.ru


Duster   Fluence   Kangoo   Laguna   Logan   Megane   Sandero   Scenic   Symbol   Clio   Other
Sandero 1 (2007-2012, petrol)

Replacing gearbox seals (Renault Sandero 1)

  • Main
  • Sandero
  • Sandero 1 (2007-2012, petrol)
  • Transmission
  • Manual gearbox
  • Replacing gearbox seals
0
The primary shaft seal is installed in a non-separable unit of the clutch release bearing guide sleeve together with the primary shaft front bearing. The guide sleeve block is pressed into the clutch housing. Special tools are required to press out and then press in the guide sleeve block, so if oil leaks through the primary shaft seal, contact a service center to replace it.

The seal of the inner constant velocity joint (CV joint) of the left front wheel drive is installed in the CV joint mud boot. If oil leaks through this seal, remove the CV joint boot and replace the bearing assembly with the seal (see "Repair of constant velocity joints").

This subsection describes the replacement of the differential right axle gear shaft seal installed in the gearbox housing.

Note: The differential axle pinion shaft seal can be replaced without removing the gearbox from the vehicle. The gearbox oil must first be drained.


You will need: all the tools necessary to remove the front wheel drive, as well as a screwdriver, hammer, and drift.

1. Place the vehicle on an inspection pit or lift.
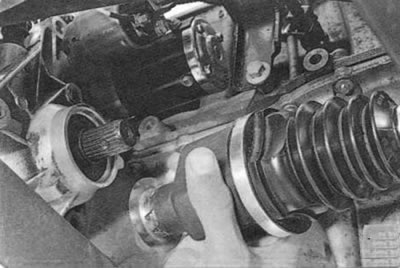
1. Place the vehicle on an inspection pit or lift.


2. To replace the differential right axle gear shaft seal, remove the right drive (see "Removal and installation front wheel drives").
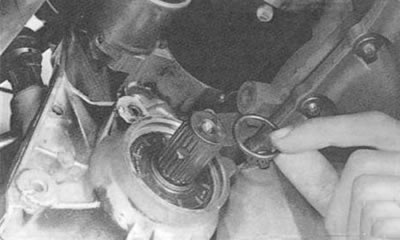


2. To replace the differential right axle gear shaft seal, remove the right drive (see «Removal and…


3. Remove the rubber sealing ring from the axle gear shank.

Note: Replace a ring that is too compressed, hardened or torn.
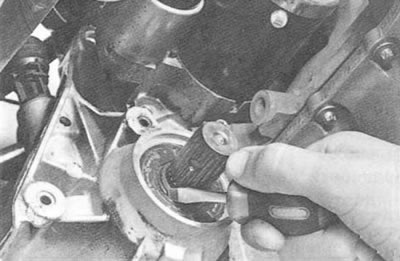

Note: Replace a ring that is too compressed, hardened or torn.


4. Using a screwdriver, remove the oil seal from its socket in the gearbox housing.

Helpful advice. It is quite difficult to pry the oil seal with a screwdriver through the gap between its edge and the tail of the axle gear. Since the oil seal cannot be reinstalled, you can use a hammer blow through a punch on one edge of the oil seal to turn it in the socket, deforming it so that the other edge protrudes beyond the edge of the socket in the gearbox housing. Then grab the protruding edge of the oil seal with pliers and remove it from the socket.


5. Lubricate the working edge of the new oil seal with transmission oil and press it in using a mandrel of a suitable diameter with the working edge inside the box.


Warning. Install the oil seal into the gearbox seat very carefully before pressing in, so as not to damage the working edge of the oil seal with the sharp splines of the axle gear shank. We recommend wrapping the splined end of the shank with a strip of tin or thick aluminum foil to protect the oil seal from damage before installing it. You can also select a thin-walled bushing of a suitable diameter for this purpose.


6. Install the rubber sealing ring onto the axle gear shank.

7. Install the front wheel drive (see "Removal and installation front wheel drives").

8. Fill the gearbox with oil (see "Checking the level and adding oil to a manual transmission").
This article is available on: russian, bulgarian, belarusian, ukrainian, serbian, croatian, romanian, polish, slovak, hungarian
Article has been reviewed by editor: Podkrepilov Maxim
Share with friends:
Previous
Sandero 1: Manual gearbox
Next

Checking the level and adding oil to a manual transmission
Manual gearbox — design features
Removal and installation of a manual gearbox
Replacing the control rod of a manual transmission
Removal, installation and repair of the manual transmission control…
Adjusting the manual transmission control drive
Other articles on other Renault models

➽ Replacing gearbox seals Renault Logan 1 (2004-2012, petrol)
➽ Replacing bearings in the gearbox housing Renault Fluence 1 (2009-2020, petrol)
➽ Replacing camshaft seals Renault Laguna 2 (2001-2007)
➽ Replacing camshaft seals Renault Megane 1 (1995-2002)
➽ Replacing the corrugated boot of the inner hinge type GL69 (at… Renault Symbol 2 (2008-2013, petrol)
Link to this article in different formats
Reviews and comments of visitors
No comments yet


Add two numbers 46 + 25


Sandero 1 (2007-2012, petrol) 
  • General information
  • Structure of car
  • User manual
  • Troubleshooting
  • Maintenance
  • Practical advice
  • Power unit
  • Engine repair
  • Lubrication system
  • Cooling system
  • Fuel and exhaust system
  • Transmission
  • Clutch
  • Manual gearbox
  • Automatic gearbox
  • Drive shafts
  • Chassis, running gear
  • Front suspension
  • Rear suspension
  • Steering
  • Brake system
  • Wheels and tires
  • Body and interior
  • Exterior (external elements)
  • Interior (internal elements)
  • Doors, locks and windows
  • Car body care
  • Heater and air conditioner
  • Security system
  • Electrical equipment
  • Equipment and devices
  • Headlights and lighting
  • Power devices
  • Ignition system
  • Electrical diagrams
RenaultBook.ru © 2018–2026 | Mobile version | News and articles | Sitemap: EN BG BY UA RS HR RO PL SK HU | Administration | Site search | Bookmark
Duster 1 (2009-2017) | Fluence 1 (2009-2020, petrol) | Kangoo 1 (1997-2007) | Laguna 2 (2001-2007) | Logan 1 (2004-2012, petrol) | Logan 2 (2012-2020) | Megane 1 (1995-2002) | Megan 2 (2002-2009, petrol) | Sandero 1 (2007-2012, petrol) | Scenic 1 (1996-2003) | Symbol 1 (1999-2008, petrol) | Symbol 2 (2008-2013, petrol) | Renault 19 (1988-1996) | Espace I and II (1984-1996) | Espace III (1996-2002) | Clio 1 (1990-1998) |
We want your visit to be comfortable 😌 and use cookies 🍪 to do so.