English Русский
Български
Беларускі
Український
Српски
Hrvatski
Română
Polski
Slovenský
Magyar
Bookmark Contacts Articles Sitemap
Company vehicles Peugeot Company vehicles Opel Company vehicles Skoda Company vehicles Land Rover Company vehicles Mitsubishi Company vehicles Volkswagen Company vehicles Honda
RenaultBook.ru


Duster   Fluence   Kangoo   Laguna   Logan   Megane   Sandero   Scenic   Symbol   Clio   Other
Fluence 1 (2009-2020, petrol)

Timing chain (H4J engine) (Renault Fluence 1)

  • Main
  • Fluence
  • Fluence 1 (2009-2020, petrol)
  • Power unit
  • Engine repair
  • Timing chain (H4J engine)
0
Contents: Removal the timing belt drive target 🠛 Setting the Timing Drive Target 🠛
Remove the engine assembly with the gearbox.

Place the engine on the assembly and disassembly stand.

Drain the engine oil. Loosen the water pump pulley bolts (1) by blocking the water pump pulley with a screwdriver.
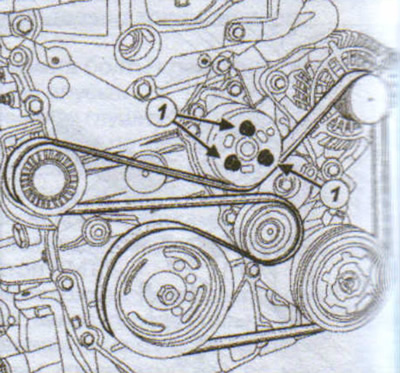
Drain the engine oil. Loosen the water pump pulley bolts (1) by blocking the water pump pulley with…


Remove the accessory drive belt.

Remove the ignition coil wiring harness and the cylinder head cover.

Turn the crankshaft clockwise until the mark (2) is aligned (not painted) crankshaft pulley and marks (3) on the timing belt cover.
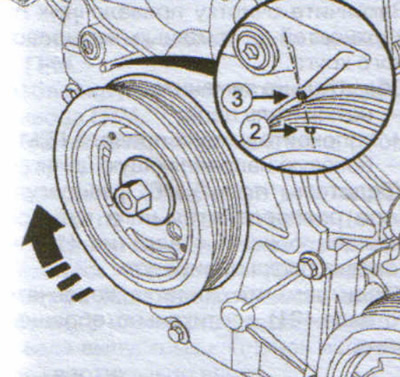
Turn the crankshaft clockwise until the mark (2) is aligned (not painted) crankshaft pulley and…


Make sure that the camshaft phase adjuster (4) and exhaust camshaft sprocket (5) marks are positioned as shown in the figure.

Otherwise, rotate the crankshaft one more revolution until the unpainted mark on the crankshaft pulley aligns with the mark on the timing cover.
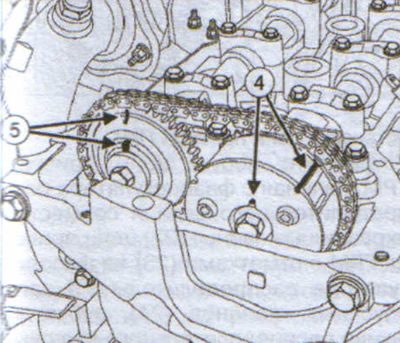


Otherwise, rotate the crankshaft one more revolution until the unpainted mark on the crankshaft…


Install the engine flywheel locking device (Mot. 1431) (6).
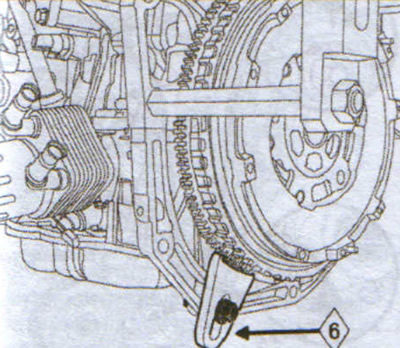
Install the engine flywheel locking device (Mot. 1431) (6).


Remove:
  • crankshaft pulley;
  • crankshaft oil seal on the timing drive side.

Remove:
  • water pump pulley mounting bolts;
  • water pump pulley.

Loosen the bolts (7) securing the timing belt cover.
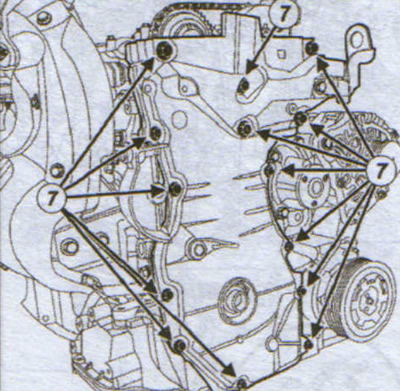
Loosen the bolts (7) securing the timing belt cover.


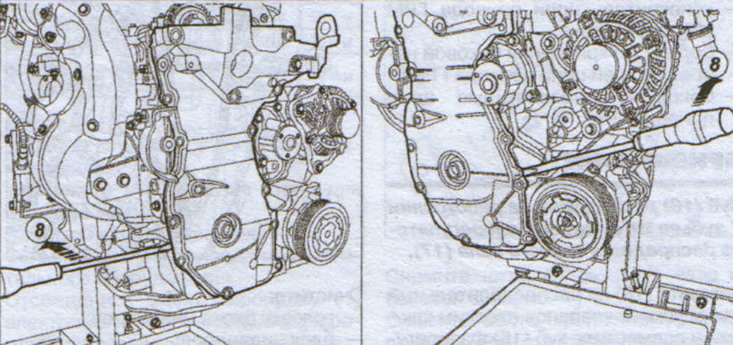
Remove the timing belt cover using a flat-blade screwdriver (8).


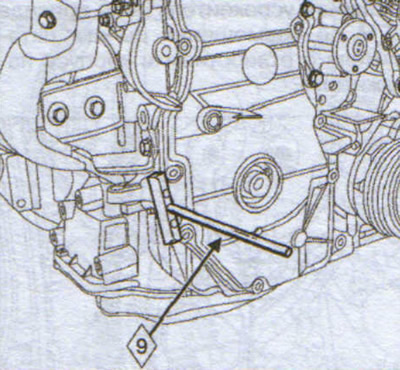
Remove the timing belt cover using the crankcase separator with silicone seals (Mot. 1716) (9) and a mallet.

Remove the timing belt cover.

Removal the timing belt drive target


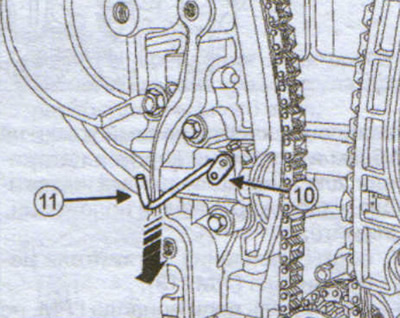
Lower the timing chain tensioner lever (10) fully using a 2.5 mm Allen key (11) to release the tensioner plunger.

Press the timing chain tensioner until the timing chain tensioner plunger (12) is completely pressed out.
Press the timing chain tensioner until the timing chain tensioner plunger (12) is completely…


Press the timing chain tensioner until the timing chain tensioner plunger (12) is completely…

Remove the 2.5mm Allen key from the timing chain tensioner.
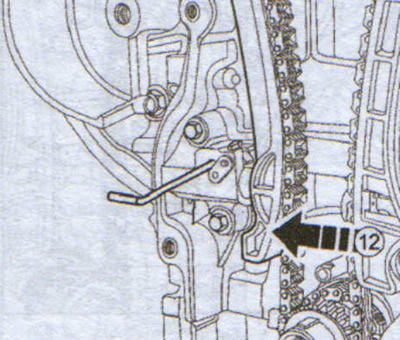


Remove the 2.5mm Allen key from the timing chain tensioner.


Loosen the timing chain tensioner until the tensioner lever aligns with the hole in the tensioner housing.
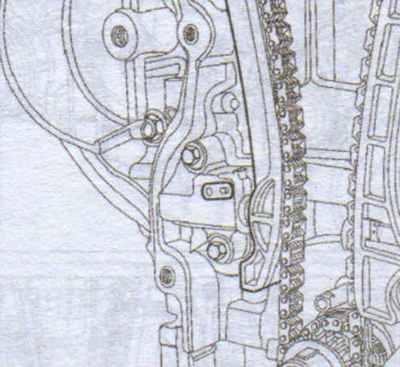
Loosen the timing chain tensioner until the tensioner lever aligns with the hole in the tensioner…


Insert a 2.5mm Allen key into the tensioner housing hole to lock the tensioner arm in the locked position.

Remove:
  • timing chain tensioner mounting bolts (13);
  • timing chain tensioner, preventing it from being unlocked.
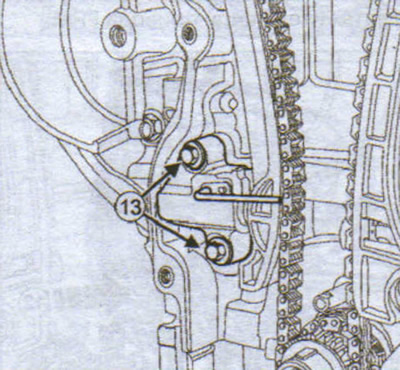
timing chain tensioner, preventing it from being unlocked.


Remove:
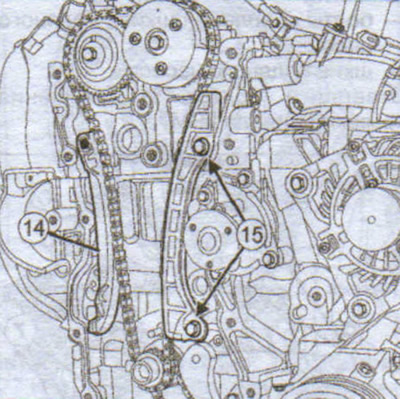
  • timing chain damper (14) with its rod;
  • bolts (15) for fastening the side guide of the timing chain drive;
  • side guide of the timing chain.

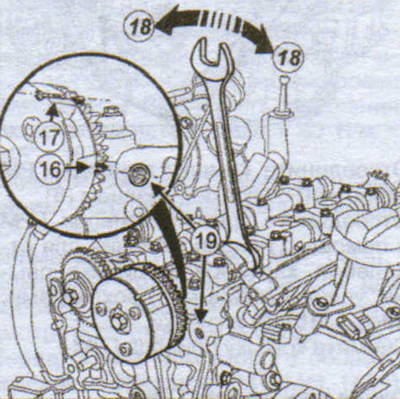
Note: Tooth (16) is located 7 teeth from the camshaft phase regulator mark (17).


Press (18) on the intake camshaft with a flat wrench and align the tooth (16) of the camshaft phase adjuster with the axis of the hole (19) on the cylinder head to facilitate removal of the timing chain.
Press (18) on the intake camshaft with a flat wrench and align the tooth (16) of the camshaft phase…

Remove the timing chain (20), starting from the crankshaft toothed pulley.
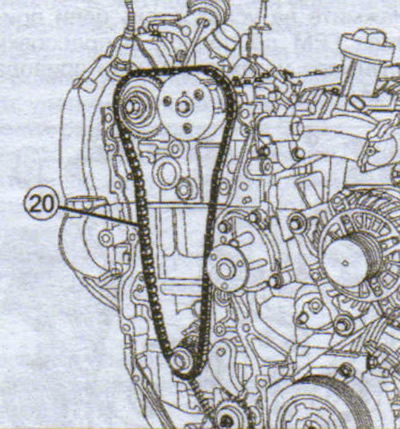
Remove the timing chain (20), starting from the crankshaft toothed pulley.


Clean:
  • cylinder head;
  • cylinder block;
  • cylinder block amplifier;
  • timing belt cover.

Remove any residue with a plastic spatula.


Finish cleaning the mating surfaces with a mating wheel.

Be sure to replace:
  • chain tensioner;
  • timing chain damper;
  • side chain guide.

Make sure that the tooth (16) of the camshaft phase regulator is aligned with the axis of the hole (19) on the cylinder head.

Make sure the crankshaft mark (21) is vertically facing downwards.
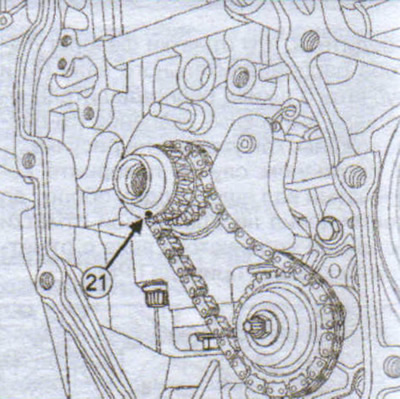
Make sure the crankshaft mark (21) is vertically facing downwards.


Setting the Timing Drive Target


Install the new timing chain starting at the camshaft phase adjuster and aligning the painted links (22) of the timing chain with the marks (23) on the intake camshaft phase adjuster (24), exhaust camshaft sprocket and (25) on the crankshaft sprocket.
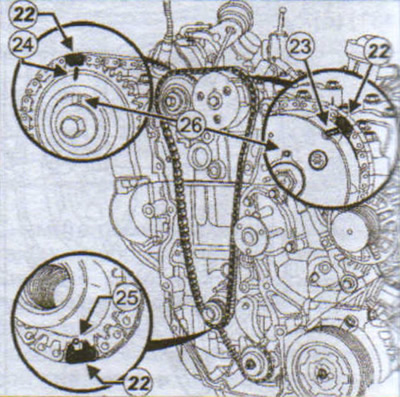
Install the new timing chain starting at the camshaft phase adjuster and aligning the painted links…


Install:
  • side guide of the new timing chain;
  • new timing chain damper;
  • tensioner of the new timing chain.

Unlock the timing chain tensioner.


Remove the flywheel locking tool (Mot. 1431).

Turn the crankshaft two revolutions clockwise (if you look from the timing drive side). Make sure that the marks (26) on the camshaft phase adjuster and the exhaust camshaft toothed pulley are pointing vertically upwards.

Apply beads of silicone sealant gasket in the area (27) with a diameter of 3-4 mm.
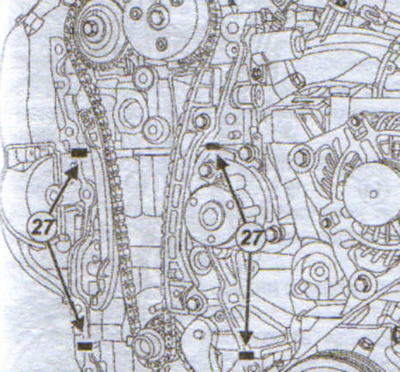
Apply beads of silicone sealant gasket in the area (27) with a diameter of 3-4 mm.


Apply beads of silicone sealant gasket in area (28) with a diameter of 3-4 mm to the mating surface of the timing cover, installed at a distance (A) of 1-2 mm from the inner edge of the timing cover.
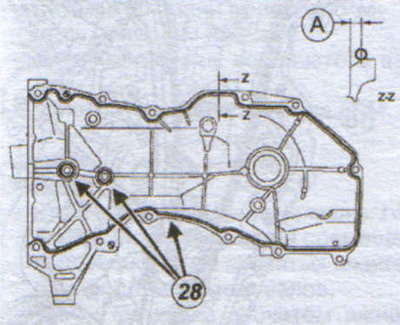
Apply beads of silicone sealant gasket in area (28) with a diameter of 3-4 mm to the mating surface…


Install the timing belt cover. Tighten to the specified torque in the following order:
  • m8 bolts #6, 7, 13, and 12 on the timing belt cover (pre-tightening) 8 Nm;
  • m10 bolts No.1, 2, 3, 4 and 5 on the timing belt cover 55 Nm;
  • m8 bolts No.6, 7, 8, 9, 10, 11, 12, 13 and 14 on the timing belt cover 25 Nm.
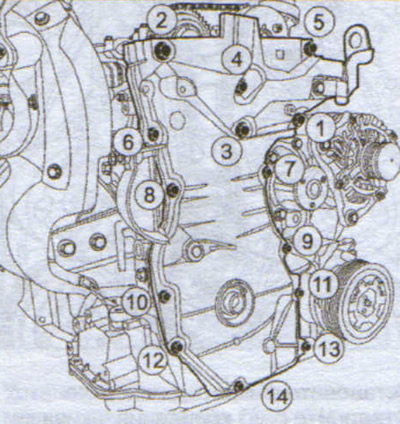
m8 bolts No.6, 7, 8, 9, 10, 11, 12, 13 and 14 on the timing belt cover 25 Nm.


Use a plastic spatula to remove excess silicone sealant gasket at three points (cylinder head / timing cover / cylinder head cover).

Install all previously removed parts in reverse order.
This article is available on: russian, bulgarian, belarusian, ukrainian, serbian, croatian, romanian, polish, slovak, hungarian
Article has been reviewed by editor: Podkrepilov Maxim
Share with friends:
Previous
Fluence 1: Engine repair
Next

Timing belt (engine K4M)
Electrical Wiring and Connectors
Wiring harnesses
Left pendulum suspension (engine K4M)
Right pendulum suspension (engine K4M)
Timing chain (M4R engine)
Cylinder head gasket for K4M engine
Cleaning the cylinder head of the K4M engine
Checking the mating surface of the cylinder head of the K4M engine
Removal valve springs of the K4M engine
Other articles on other Renault models

➽ Removal and installation the timing belt, K4M engine (16 valves) Renault Logan 2 (2012-2020)
➽ Every 10,000 km or 6 months — check ignition timing (c-series… Renault Clio 1 (1990-1998)
➽ Electronic engine start immobilizer system Renault Duster 1 (2009-2017)
➽ Electronic anti-theft engine immobilizer system Renault Kangoo 1 (1997-2007)
➽ Engine specifications Renault Laguna 2 (2001-2007)
Link to this article in different formats
Reviews and comments of visitors
No comments yet


Add two numbers 25 + 20


Fluence 1 (2009-2020, petrol) 
  • General information
  • Maintenance
  • Governing bodies
  • Car driving
  • Power unit
  • Engine repair
  • Cooling and lubrication system
  • Fuel system
  • Fuel injection
  • Transmission
  • Clutch and drive shafts
  • Mechanical gearbox
  • Automatic gearbox
  • Chassis, running gear
  • Front suspension
  • Rear suspension
  • Steering
  • Brake system
  • Body and interior
  • Exterior (external elements)
  • Interior (internal elements)
  • Doors, locks and windows
  • Air conditioning
  • Electrical equipment
  • Power devices
  • Fuses and relays
  • Headlights and lighting
  • Equipment and devices
  • Safety system
  • Electrical circuits
RenaultBook.ru © 2018–2026 | Mobile version | News and articles | Sitemap: EN BG BY UA RS HR RO PL SK HU | Administration | Site search | Bookmark
Duster 1 (2009-2017) | Fluence 1 (2009-2020, petrol) | Kangoo 1 (1997-2007) | Laguna 2 (2001-2007) | Logan 1 (2004-2012, petrol) | Logan 2 (2012-2020) | Megane 1 (1995-2002) | Megan 2 (2002-2009, petrol) | Sandero 1 (2007-2012, petrol) | Scenic 1 (1996-2003) | Symbol 1 (1999-2008, petrol) | Symbol 2 (2008-2013, petrol) | Renault 19 (1988-1996) | Espace I and II (1984-1996) | Espace III (1996-2002) | Clio 1 (1990-1998) |
We want your visit to be comfortable 😌 and use cookies 🍪 to do so.