Share with friends:

Doors, locks and windows of the car Renault Fluence 1

Removing the side door
This operation can be performed in two ways. Removal with hinges: allows you to keep the original adjustments. Removal without hinges: performed when replacing the door. Removal without loops Disconnect front door...
This operation can be performed in two ways. Removal with hinges: allows you to keep the original adjustments. Removal without hinges: performed when replacing the door. Removal without loops Disconnect front door...

Front door adjustment
Note. All information on setting values for the front door can be found in chapter « Gaps between car body parts ». Follow the zone adjustment order (1), (2), (3), (4), (5), (6), (7) And (8). Note. Zone adjustment (4),...
Note. All information on setting values for the front door can be found in chapter « Gaps between car body parts ». Follow the zone adjustment order (1), (2), (3), (4), (5), (6), (7) And (8). Note. Zone adjustment (4),...

Rear door adjustment
Note. All information on setting values for the front door can be found in chapter « Gaps between car body parts ». Follow the correct zone adjustment order (1), (2), (3), (4), (5) And (6). Height and length adjustment...
Note. All information on setting values for the front door can be found in chapter « Gaps between car body parts ». Follow the correct zone adjustment order (1), (2), (3), (4), (5) And (6). Height and length adjustment...

Door upholstery
Note. Below is the description for the front and rear doors of the car. Remove internal facing of a rear-view mirror. Remove the plug (2). Loosen the screws (3). Detach the front door trim. Disconnect the front door...
Note. Below is the description for the front and rear doors of the car. Remove internal facing of a rear-view mirror. Remove the plug (2). Loosen the screws (3). Detach the front door trim. Disconnect the front door...

Door seal film
Start the operation from the top of the door seal film (1). Carefully peel off the bead of mastic from the door frame around the perimeter of the door seal film. Note. If the bead of mastic is difficult to remove, use a...
Start the operation from the top of the door seal film (1). Carefully peel off the bead of mastic from the door frame around the perimeter of the door seal film. Note. If the bead of mastic is difficult to remove, use a...

External window sill door seal
Fully lower the front door glass. Carefully remove the outer window sill seal of the front door using the lever (Sag. 1363) in that order (1), (2) And (3) (do not damage the part when removing). Install the front door...
Fully lower the front door glass. Carefully remove the outer window sill seal of the front door using the lever (Sag. 1363) in that order (1), (2) And (3) (do not damage the part when removing). Install the front door...

Glass guide groove
Remove the front door glass guide groove (1). Disconnect the guide groove of the front door glass at the points (2), (3) And (4). Remove the front door glass guide groove.
Remove the front door glass guide groove (1). Disconnect the guide groove of the front door glass at the points (2), (3) And (4). Remove the front door glass guide groove.

Bracket for guide groove, front door
Disconnect the wiring harness (1) from the side impact sensor. Note. Be careful as the side impact sensor is mounted on the front side door guide channel support. Remove mounting bolts (2) bracket for the guide groove...
Disconnect the wiring harness (1) from the side impact sensor. Note. Be careful as the side impact sensor is mounted on the front side door guide channel support. Remove mounting bolts (2) bracket for the guide groove...

Power window motor
Disconnect front door power window motor connectors (1). Remove mounting bolts (2) and the front door power window motor. Disconnect the rear window motor connector (3). Remove mounting bolts (4) and the rear window...
Disconnect front door power window motor connectors (1). Remove mounting bolts (2) and the front door power window motor. Disconnect the rear window motor connector (3). Remove mounting bolts (4) and the rear window...

Front door glass
Partially remove the cap (2) front door wiring. Remove the door seal. Lower the glass to gain access to the mounting bolts. Disconnect the battery. Note. To prevent damage to the side impact sensor, protect it with...
Partially remove the cap (2) front door wiring. Remove the door seal. Lower the glass to gain access to the mounting bolts. Disconnect the battery. Note. To prevent damage to the side impact sensor, protect it with...

Door window mechanism
Front door power window mechanism Loosen the fastening nuts (1) front door power window mechanism. Remove the power window mechanism (2) front door. Rear window mechanism Turn away bolts (3). Secure the rear door glass...
Front door power window mechanism Loosen the fastening nuts (1) front door power window mechanism. Remove the power window mechanism (2) front door. Rear window mechanism Turn away bolts (3). Secure the rear door glass...

Rear door glass
Remove: partial channel for rear side door glass (1); partially external window sill seal (2); rear speaker. Loosen the mounting bolts (4). Remove the glass from the rear door (5).
Remove: partial channel for rear side door glass (1); partially external window sill seal (2); rear speaker. Loosen the mounting bolts (4). Remove the glass from the rear door (5).

Loudspeakers — general information
Rear speakers Disconnect the rear speaker connector (1). Remove the rivets (2) and rear speaker. Front speakers Disconnect the front speaker connector (1). Remove the rivets (2) and front speaker.
Rear speakers Disconnect the rear speaker connector (1). Remove the rivets (2) and rear speaker. Front speakers Disconnect the front speaker connector (1). Remove the rivets (2) and front speaker.

Front door lock cylinder
Remove the plug (1) front door lock cylinder mechanism. Insert the tool for removing and installing the door lock cylinder and lock (Car. 1904) in the door frame. Turn the tool a quarter of a turn. Pull the tool in the...
Remove the plug (1) front door lock cylinder mechanism. Insert the tool for removing and installing the door lock cylinder and lock (Car. 1904) in the door frame. Turn the tool a quarter of a turn. Pull the tool in the...

External door handle
Remove the outer door handle following the arrows (1) And (2). Before installation, check the presence and condition of the seal (3).
Remove the outer door handle following the arrows (1) And (2). Before installation, check the presence and condition of the seal (3).

Front door lock
Remove the screw (1) and gasket (2). Disconnect the outside door handle lock module. Turn away bolts (3). Slightly lifting the front door lock, remove it from the fastening hook. Remove the lock assembly with the outer...
Remove the screw (1) and gasket (2). Disconnect the outside door handle lock module. Turn away bolts (3). Slightly lifting the front door lock, remove it from the fastening hook. Remove the lock assembly with the outer...

Door stops
Front door stop Remove the seal (1) front door stop and bolt (2). Remove the screws (3) and remove the front door stop through the door frame. Rear door stop Remove the seal (1) rear door stop. Remove the bolt (2) rear...
Front door stop Remove the seal (1) front door stop and bolt (2). Remove the screws (3) and remove the front door stop through the door frame. Rear door stop Remove the seal (1) rear door stop. Remove the bolt (2) rear...

Tailgate
This operation can be performed in two ways. Removal without hinges: This method is mainly used when replacing the tailgate. Removal using hinges: This method is mainly used when replacing the body and installing the...
This operation can be performed in two ways. Removal without hinges: This method is mainly used when replacing the tailgate. Removal using hinges: This method is mainly used when replacing the body and installing the...

Tailgate adjustment
Note. All information on setting values for the front door can be found in chapter « Gaps between car body parts ». The position of the tailgate can be adjusted in three ways: tailgate bolts; tailgate hinge nuts: an...
Note. All information on setting values for the front door can be found in chapter « Gaps between car body parts ». The position of the tailgate can be adjusted in three ways: tailgate bolts; tailgate hinge nuts: an...

Tailgate disassembly
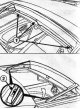
Tailgate lock Loosen the tailgate lock bolts (1). Disconnect connector (2). Remove the tailgate lock (3). At installation tighten bolts of fastening of the lock of a back door of 8 Nm by the demanded moment. Remove...
Tailgate lock Loosen the tailgate lock bolts (1). Disconnect connector (2). Remove the tailgate lock (3). At installation tighten bolts of fastening of the lock of a back door of 8 Nm by the demanded moment. Remove...
Sunroof
Sunroof deflector Open the sliding sunroof panel. Turn away bolts (1) And (2), while supporting the sunroof deflector, and remove it. Note. When removing and installing the sunroof deflector, apply high-strength locking...
Sunroof deflector Open the sliding sunroof panel. Turn away bolts (1) And (2), while supporting the sunroof deflector, and remove it. Note. When removing and installing the sunroof deflector, apply high-strength locking...
This section is available on: russian, bulgarian, belarusian, ukrainian, serbian, croatian, romanian, polish, slovak, hungarian
Other sections on other Renault models
➽ Body and interior: Doors, locks and windows Renault Kangoo 1 (1997-2007)
➽ Body and interior: Doors, locks and windows Renault Laguna 2 (2001-2007)
➽ Body and interior: Doors, locks and windows Renault Logan 1 (2004-2012, petrol)
➽ Body and interior: Doors, locks and windows Renault Megane 1 (1995-2002)
➽ Body and interior: Doors, locks and windows Renault Scenic 1 (1996-2003)
➽ Body and interior: Doors, locks and windows Renault Symbol 1 (1999-2008, petrol)
➽ Body and interior: Doors, locks and windows Renault Espace III (1996-2002)
Link to this section in different formats
TEXTHTMLBB Code
- General information
- Maintenance
- Governing bodies
- Car driving
- Power unit
- Engine repair
- Cooling and lubrication system
- Fuel system
- Fuel injection
- Transmission
- Clutch and drive shafts
- Mechanical gearbox
- Automatic gearbox
- Chassis, running gear
- Front suspension
- Rear suspension
- Steering
- Brake system
- Body and interior
- Exterior (external elements)
- Interior (internal elements)
- Doors, locks and windows
- Air conditioning
- Electrical equipment
- Power devices
- Fuses and relays
- Headlights and lighting
- Equipment and devices
- Safety system
- Electrical circuits
RenaultBook.ru © 2018–2024 | Mobile version | News and articles | Sitemap: EN BG BY UA RS HR RO PL SK HU | Administration | Site search | Bookmark
Duster 1 (2009-2017) | Fluence 1 (2009-2020, petrol) | Kangoo 1 (1997-2007) | Laguna 2 (2001-2007) | Logan 1 (2004-2012, petrol) | Logan 2 (2012-2020) | Megane 1 (1995-2002) | Megan 2 (2002-2009, petrol) | Scenic 1 (1996-2003) | Symbol 1 (1999-2008, petrol) | Symbol 2 (2008-2013, petrol) | Renault 19 (1988-1996) | Espace I and II (1984-1996) | Espace III (1996-2002) |