Share with friends:

Vehicle controls and instruments Renault Fluence 1

Renault Map
The Renault Card provides: locking / unlocking opening body parts (all doors) and a fuel filler hatch; remote switching on of car lighting; engine starting. Renault map: 1 - unlocking of all opening elements of the...
The Renault Card provides: locking / unlocking opening body parts (all doors) and a fuel filler hatch; remote switching on of car lighting; engine starting. Renault map: 1 - unlocking of all opening elements of the...

Power windows and sunroof
These systems operate with the ignition on or off until the driver's door is opened (but not more than 3 minutes). Power windows Press or pull the power window switch to lower or raise the window to the desired height....
These systems operate with the ignition on or off until the driver's door is opened (but not more than 3 minutes). Power windows Press or pull the power window switch to lower or raise the window to the desired height....

Tailgate and luggage compartment lid
Luggage compartment lid (Auens 4-door) Press button 1 and lift the boot lid. Tailgate Press button 2 and lift the tailgate. Manual opening from the inside If the tailgate lock cannot be opened from the outside, the lock...
Luggage compartment lid (Auens 4-door) Press button 1 and lift the boot lid. Tailgate Press button 2 and lift the tailgate. Manual opening from the inside If the tailgate lock cannot be opened from the outside, the lock...
On-board computer
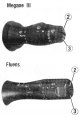
The search for information is carried out by successive short presses on the buttons: up (2) or down (3). The on-board computer display depends on the equipment of the vehicle and the country of delivery. a) The counter...
The search for information is carried out by successive short presses on the buttons: up (2) or down (3). The on-board computer display depends on the equipment of the vehicle and the country of delivery. a) The counter...
Lighting control
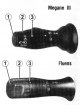
Parking lights Turn ring 2 until the symbol appears opposite mark 3. The corresponding signal lamp lights up on the instrument panel. Low beam headlights Manual mode: turn ring 2 until the symbol appears opposite mark...
Parking lights Turn ring 2 until the symbol appears opposite mark 3. The corresponding signal lamp lights up on the instrument panel. Low beam headlights Manual mode: turn ring 2 until the symbol appears opposite mark...

Windshield wiper and washer
Vehicle equipped with a rain-sensing front wiper A - stop B - automatic activation of the wipers After setting the lever to this position (when water drops appear on the front glass) the windshield wiper switches on...
Vehicle equipped with a rain-sensing front wiper A - stop B - automatic activation of the wipers After setting the lever to this position (when water drops appear on the front glass) the windshield wiper switches on...
Rear window wiper
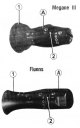
With the ignition on, turn ring A of switch lever 1 to the position where mark 2 aligns with the corresponding symbol, then release. To stop operation, turn ring A again. The wiper frequency depends on the vehicle...
With the ignition on, turn ring A of switch lever 1 to the position where mark 2 aligns with the corresponding symbol, then release. To stop operation, turn ring A again. The wiper frequency depends on the vehicle...

Exterior mirrors
Adjustment Select the rearview mirror with switch 3, then use button 1 to adjust it to the desired position. Folding door mirrors Rear-view mirrors fold automatically when the car is locked (switch 2 in position B). In...
Adjustment Select the rearview mirror with switch 3, then use button 1 to adjust it to the desired position. Folding door mirrors Rear-view mirrors fold automatically when the car is locked (switch 2 in position B). In...

Interior rear view mirror
While driving at night, in order to avoid glare from the headlights of a car coming behind, press lever 4 located at the back of the mirror housing. The rear-view mirror without lever 4 dims automatically if a vehicle...
While driving at night, in order to avoid glare from the headlights of a car coming behind, press lever 4 located at the back of the mirror housing. The rear-view mirror without lever 4 dims automatically if a vehicle...

Sound and light alarm
Sound signal Press the edges of trim A of the steering wheel cushion. High beam signaling To signal the high beam headlights, pull the stalk stalk 1 towards you. Direction indicators To turn on the direction indicators,...
Sound signal Press the edges of trim A of the steering wheel cushion. High beam signaling To signal the high beam headlights, pull the stalk stalk 1 towards you. Direction indicators To turn on the direction indicators,...

Steering column adjustment
Pull lever 1 and set the steering wheel to the desired position. Then press the lever all the way against the resistance of its movement to fix the steering wheel. Check up reliability of fastening of a steering wheel.
Pull lever 1 and set the steering wheel to the desired position. Then press the lever all the way against the resistance of its movement to fix the steering wheel. Check up reliability of fastening of a steering wheel.

Heating and air conditioning system
Air supply Turn knob 1 (breaking the point of resistance). Up: fully open. Down: closed. Turn knob 3 (breaking the point of resistance). Rightmost position of the handle: maximum opening. Handle leftmost position:...
Air supply Turn knob 1 (breaking the point of resistance). Up: fully open. Down: closed. Turn knob 3 (breaking the point of resistance). Rightmost position of the handle: maximum opening. Handle leftmost position:...

Salon equipment
Front dome light Move switch 3, its different positions provide: constant lighting mode; turning on the lighting when opening any car door. The lighting will go out some time after the corresponding doors are closed;...
Front dome light Move switch 3, its different positions provide: constant lighting mode; turning on the lighting when opening any car door. The lighting will go out some time after the corresponding doors are closed;...

Seats — general information
Front seats with manual adjustment To move the seat forward or backward, lift handle 1 to unlock the seat. Once the seat is in the desired position, release the handle and check that it is secure. To raise or lower the...
Front seats with manual adjustment To move the seat forward or backward, lift handle 1 to unlock the seat. Once the seat is in the desired position, release the handle and check that it is secure. To raise or lower the...

Security systems
Seat belt adjustment Shoulder branch 1 of the belt should be located as close as possible to the lower part of the neck, but not lie on it. The pelvic section of the belt 2 must fit snugly against the hips and hold the...
Seat belt adjustment Shoulder branch 1 of the belt should be located as close as possible to the lower part of the neck, but not lie on it. The pelvic section of the belt 2 must fit snugly against the hips and hold the...
This section is available on: russian, bulgarian, belarusian, ukrainian, serbian, croatian, romanian, polish, slovak, hungarian
Link to this section in different formats
TEXTHTMLBB Code
- General information
- Maintenance
- Governing bodies
- Car driving
- Power unit
- Engine repair
- Cooling and lubrication system
- Fuel system
- Fuel injection
- Transmission
- Clutch and drive shafts
- Mechanical gearbox
- Automatic gearbox
- Chassis, running gear
- Front suspension
- Rear suspension
- Steering
- Brake system
- Body and interior
- Exterior (external elements)
- Interior (internal elements)
- Doors, locks and windows
- Air conditioning
- Electrical equipment
- Power devices
- Fuses and relays
- Headlights and lighting
- Equipment and devices
- Safety system
- Electrical circuits
RenaultBook.ru © 2018–2024 | Mobile version | News and articles | Sitemap: EN BG BY UA RS HR RO PL SK HU | Administration | Site search | Bookmark
Duster 1 (2009-2017) | Fluence 1 (2009-2020, petrol) | Kangoo 1 (1997-2007) | Laguna 2 (2001-2007) | Logan 1 (2004-2012, petrol) | Logan 2 (2012-2020) | Megane 1 (1995-2002) | Megan 2 (2002-2009, petrol) | Scenic 1 (1996-2003) | Symbol 1 (1999-2008, petrol) | Symbol 2 (2008-2013, petrol) | Renault 19 (1988-1996) | Espace I and II (1984-1996) | Espace III (1996-2002) |