
English Русский
Български
Беларускі
Український
Српски
Hrvatski
Română
Polski
Slovenský
Magyar
Bookmark Contacts Articles Sitemap
Company vehicles Peugeot Company vehicles Opel Company vehicles Skoda Company vehicles Land Rover Company vehicles Mitsubishi Company vehicles Volkswagen Company vehicles Honda
RenaultBook.ru


Duster   Fluence   Kangoo   Laguna   Logan   Megane   Sandero   Scenic   Symbol   Clio   Other
Renault 19 (1988-1996) Espace I and II (1984-1996) Espace III (1996-2002)

Checking and adjusting idle speed (Renault Espace I)

  • Main
  • Renault
  • Espace I and II (1984-1996)
  • Power unit
  • Diesel fuel system
  • Checking and adjusting idle speed
0
Contents: Checking the idle speed 🠛 Adjusting the idle speed 🠛 Adjusting the high pressure fuel pump 🠛
1. All adjustments are interconnected, i.e. if one of the adjustable parameters is incorrect, it is necessary to check and adjust the others. Perform all adjustments only if the engine is warmed up to operating temperature, i.e. the coolant temperature should be above 80°C. The location of the individual adjustment screws is shown in Illustration 18.1. The maximum speed adjustment screw (4) is set at the factory and its position cannot be changed. Perform further adjustments as follows.
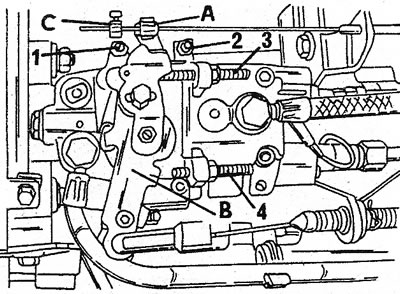
18.1 Location of the various adjustment screws on the fuel pump; A Idle and fast idle lever; In the…

18.1 Location of the various adjustment screws on the fuel pump; A Idle and fast idle lever; In the gas lever; With clamp nipple; 1. Fast idle speed adjustment screw; 2. Idle speed adjustment screw; 3. Minimum speed limit screw; 4. Maximum speed limiting screw


Checking the idle speed


2. Start the engine and wait until it reaches operating temperature. You can also take a short drive to warm up the engine.

3. Check the idle speed. The idling speed of the engine must be within 750±50 rpm. To get accurate data, use a tachometer designed for diesel engines. If the idle speed is not normal, adjust the high-pressure pump according to the description below.


Adjusting the idle speed


4. If the idle speed readings are within the normal range, install a 1.0 mm thick feeler gauge between the adjusting screw (3) and the lever (B) (see illustrations 18.1 and 18.4), and check whether the engine speed increases by 10-20 rpm. If there is a greater increase, adjust the high pressure pump as described below. If the increase in speed is less than 10 rpm, adjust the idle speed as follows:
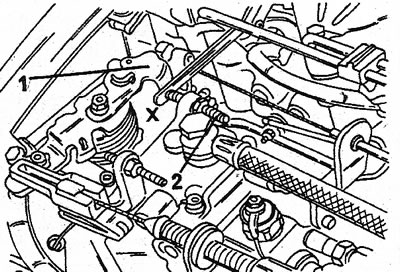
18.4 The feeler gauge is installed between the throttle lever (1) and the idle speed adjustment…

18.4 The feeler gauge is installed between the throttle lever (1) and the idle speed adjustment screw (2)


5. Loosen the screw lock nut (3) and turn the screw until the speed increases by 10-20 rpm. Install the measuring probe as shown in Illustration 18.4. Tighten the lock nut again.

6. Remove the dipstick and check that the idle speed is within normal limits.

7. Increase the engine speed several times and return to idle mode. Check the idle speed adjustment with and without the measuring probe. If the value is not within the norm, repeat the adjustment.

Adjusting the high pressure fuel pump


8. If necessary, adjust the high-pressure pump in the sequence shown. Refer to Illustration 18.1.


9. Remove the screw lock nut (3) and turn the screw until the speed stabilizes, i.e. the engine runs at a uniform but lower idle speed. From this position, turn the screw (3) two more turns.

10. Make sure that the clamp nipple above the fast idle adjusting screw (1) does not interfere with the lever (A) when moving.

11. Loosen the lock nut and turn the adjusting screw (2) until the idle speed is 750 rpm. Tighten the lock nut and check the idle speed.

12. Insert a 1.0 mm thick feeler gauge between the adjusting screw (3) and the lever (B) as shown in Illustration 18.4 and check that the speed has increased by 10-20 rpm. Otherwise, repeat the described adjustment.

13. Loosen the lock nut of the screw (3) and turn the screw until the idle speed increases by 10-20 rpm, do not remove the measuring probe yet. Tighten the lock nut, pull out the measuring probe and make sure that the idle speed returns to normal.

14. Accelerate the engine, then let it idle again. Check the main idle and idle speed with the dipstick installed. If the readings do not match, repeat the adjustment.
This article is available on: russian, bulgarian, belarusian, ukrainian, serbian, croatian, romanian, polish, slovak, hungarian
Article has been reviewed by editor: Fedoseev Denis
Share with friends:
Previous
Espace I and II: Diesel fuel system
Next

Fuel pump — removal, installation and adjustment
Diesel engine fuel filter
Precautions when working with a diesel device
Diesel engine fuel system — general description
Fast Idle Speed Adjustment
Thermal block cable tension
Maximum rotation speed
Air filter
Turbocharger — Precautions
Other articles on other Renault models

➽ Checking and adjusting idle speed and deceleration speed Renault Megane 1 (1995-2002)
➽ Idle speed (diesel 90 hp) — checking and adjustment Renault Scenic 1 (1996-2003)
➽ Idle speed and deceleration frequency — checking and adjustment Renault Clio 1 (1990-1998)
➽ Adjusting the fan speed Renault Duster 1 (2009-2017)
➽ Checking the thickness of the adjusting half rings of the… Renault Fluence 1 (2009-2020, petrol)
Link to this article in different formats
Reviews and comments of visitors
No comments yet


Add two numbers 18 + 31


Renault 19 (1988-1996) 
  • General information
  • Maintenance
  • Power unit
  • Engine repair
  • Exhaust system
  • Cooling system
  • Supply system
  • Single-point injection
  • Multi-point injection
  • Diesel injection system
  • Transmission
  • Clutch
  • Car gearbox
  • Chassis, running gear
  • Car suspension
  • Steering
  • Brake system
  • Wheels and tires
  • Body and interior
  • Exterior (external elements)
  • Interior (internal elements)
  • Heating and ventilation
  • Electrical equipment
  • Equipment and devices
  • Headlights and lighting
  • Ignition system
  • Power devices
  • Electrical circuits
Espace I and II (1984-1996) 
  • General information
  • Introduction to the guide
  • Troubleshooting
  • Power unit
  • Engine repair
  • Cooling system
  • Carburetor fuel system
  • Injection fuel system
  • Diesel fuel system
  • Ignition system
  • Transmission
  • Clutch
  • Car gearbox
  • Drive shafts
  • Chassis, running gear
  • Brake system
  • Steering
  • Front suspension
  • Rear suspension
  • Body and interior
  • Exterior (external elements)
  • Interior (internal elements)
  • Doors, locks and windows
  • Electrical equipment
  • Equipment and devices
  • Electrical circuits
Espace III (1996-2002) 
  • General information
  • Introduction to the manual
  • User manual
  • Power unit
  • Petrol engines F3R
  • Petrol engines Z7X
  • Diesel engines G8T
  • Diesel engines G9T
  • Transmission
  • Clutch
  • Mechanical gearbox
  • Automatic gearbox
  • Drive shafts
  • Chassis, running gear
  • Steering
  • Front suspension
  • Rear suspension
  • Brake system
  • Body and interior
  • Exterior (external elements)
  • Interior (internal elements)
  • Doors, locks and windows
  • Heating and ventilation
  • Electrical equipment
  • Equipment and instruments
  • Power devices
  • Electrical circuits
RenaultBook.ru © 2018–2026 | Mobile version | News and articles | Sitemap: EN BG BY UA RS HR RO PL SK HU | Administration | Site search | Bookmark
Duster 1 (2009-2017) | Fluence 1 (2009-2020, petrol) | Kangoo 1 (1997-2007) | Laguna 2 (2001-2007) | Logan 1 (2004-2012, petrol) | Logan 2 (2012-2020) | Megane 1 (1995-2002) | Megan 2 (2002-2009, petrol) | Sandero 1 (2007-2012, petrol) | Scenic 1 (1996-2003) | Symbol 1 (1999-2008, petrol) | Symbol 2 (2008-2013, petrol) | Renault 19 (1988-1996) | Espace I and II (1984-1996) | Espace III (1996-2002) | Clio 1 (1990-1998) |
We want your visit to be comfortable 😌 and use cookies 🍪 to do so.