
English Русский
Български
Беларускі
Український
Српски
Hrvatski
Română
Polski
Slovenský
Magyar
Bookmark Contacts Articles Sitemap
Company vehicles Peugeot Company vehicles Opel Company vehicles Skoda Company vehicles Land Rover Company vehicles Mitsubishi Company vehicles Volkswagen Company vehicles Honda
RenaultBook.ru


Duster   Fluence   Kangoo   Laguna   Logan   Megane   Sandero   Scenic   Symbol   Clio   Other
Clio 1 (1990-1998)

Front brake disc — inspection, removal and installation (Renault Clio 1)

  • Main
  • Clio
  • Clio 1 (1990-1998)
  • Chassis, running gear
  • Brake system
  • Front brake disc — inspection, removal and installation
0
Contents: Inspection 🠛 Removal 🠛 Installation 🠛
Note: Before you begin, please refer to the Warning given at the beginning Chapter 9. If the disk needs replacing, replace the second disk as well (on a coaxial wheel), to ensure equal and effective braking. It is also recommended to install new brake pads.


Inspection


1. Block the rear wheels, apply the handbrake, jack up the front of the car and place it on axle stands. Remove the front wheel.

2. Slowly rotate the brake disc and inspect it from both sides. If better access is required to the inner side, remove the brake pads (see Chapter 9). The presence of shallow scratches in the area covered by the brake pads is quite acceptable - the surface can be sanded with sandpaper. If deep grooves are found in this area, the disc requires replacement.

3. The presence of a protrusion on the periphery of the disc, formed by rust or stuck dust, is completely acceptable. This thickening can be scraped off. If, however, the thickness difference has formed due to wear in the area covered by the pads, measure the thickness of the disc with a micrometer (see illustration).
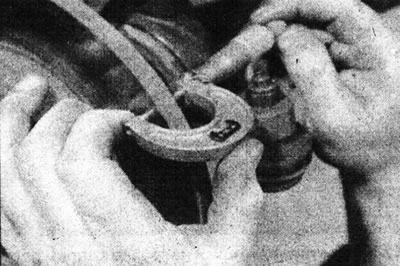
11.3. Measure the thickness of the brake disc.

11.3. Measure the thickness of the brake disc.


Take measurements in several places, in the area in contact with the pads and outside of it. If any of the measurements is equal to or less than the minimum thickness stated in the Specifications, replace the disc.

4. If the disc is suspected of being warped, check it for runout using a pointer micrometer (see illustration).
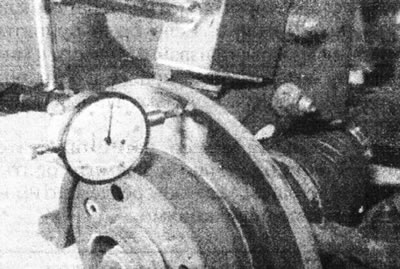
11.4 Measure the disc runout.

11.4 Measure the disc runout.


Alternatively, slowly rotate the disc and use feeler gauges to take several measurements of the clearance between the disc and a fixed point, such as the caliper mounting bracket. If the obtained measurements are equal to or greater than those specified in Specifications at most, the disk is deformed and must be replaced. However, first check the condition of the wheel bearings (Sections 1 and 10). To be completely sure, remove the disc, turn it 180° and reinstall it on the hub; if the disc runout is still excessive, replace the disc.

5. Check the disc for cracks (especially around the wheel bolt holes), other damage and signs of wear. Replace the disk if necessary.

Removal


Note: A suitable blocking compound will be required during installation.


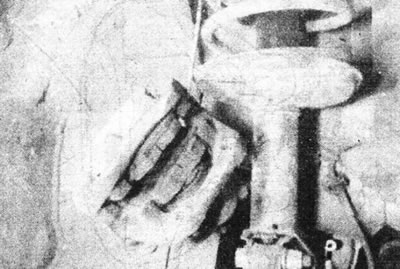
6. Remove the two bolts securing the caliper bracket to the steering knuckle and pull the caliper assembly off the disc. Tie the caliper to the front suspension spring with a piece of wire and twine to avoid damaging the brake hose or the brake pad wear sensor wiring (see illustration).
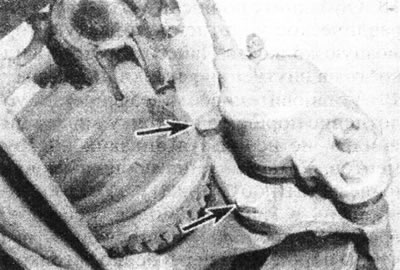
11.6a. Unscrew the two bolts (marked with arrows), attaching the caliper to the steering knuckle...
11.6a. Unscrew the two bolts (marked with arrows), attaching the caliper to the steering knuckle...


11.6b....then remove the caliper from the disc and tie it to the suspension spring (girling support…

11.6b....then remove the caliper from the disc and tie it to the suspension spring (girling support shown).


7. If the disc is not to be replaced, apply alignment marks to the disc and the hub. Remove the screws securing the disc to the hub and remove the disc. If this does not work, lightly tap the back of the disc with a mallet.


Installation


8. Install in the reverse order of removal, paying attention to the following:
  • Make sure the mating surfaces of the disc and hub are clean and smooth.
  • If applicable, align the marks made before removal.
  • Tighten the disc mounting screws securely.
  • If installing a new disc, use a suitable solvent to remove the protective coating from the disc before installation.
  • Apply locking compound to the threads of the caliper mounting bolts and tighten them to the specified tightening torque Specifications.
  • Install the wheel, then lower the vehicle to the ground and tighten the wheel bolts to the specified torque Specifications. Finally, press the brake pedal several times to move the pads into working position.

(Text published on the website: «Renaultbook.ru»)
This article is available on: russian, bulgarian, belarusian, ukrainian, serbian, croatian, romanian, polish, slovak, hungarian
Article has been reviewed by editor: Fedoseev Denis
Share with friends:
Previous
Clio 1: Brake system
Next

Front Brake Caliper — removal, overhaul, and installation
Front brake pads — replacement
Master cylinder — removal and installation
Brake pipes and hoses — replacement
Brake hydraulic system — bleeding
Load-sensing brake pressure control valve — general description
Rear brake drum — removal, inspection and installation
Rear brake pads — inspection and replacement
Rear Brake Cylinder — removal and installation
Rear Disc Brake Pads — inspection and replacement
Other articles on other Renault models

➽ Front brake disc protective cover Renault Duster 1 (2009-2017)
➽ Front brake disc Renault Fluence 1 (2009-2020, petrol)
➽ Front disc brake mechanism Renault Logan 2 (2012-2020)
➽ Inspection, removal and installation of the front brake disc Renault Megane 1 (1995-2002)
➽ Removal, checking and installation the front brake disc Renault Symbol 1 (1999-2008, petrol)
Link to this article in different formats
Reviews and comments of visitors
No comments yet


Add two numbers 48 + 44


Clio 1 (1990-1998) 
  • General information
  • Maintenance
  • Troubleshooting
  • Power unit
  • Petrol engines 1.1 l (C)
  • Petrol engines 1.2 l (D)
  • Petrol engines 1.2/1.4 l (E)
  • Petrol engines 1.8 l (F)
  • Diesel engines
  • Overhaul of engines
  • Cooling and heating
  • Fuel system (carburetor)
  • Central fuel injection
  • Distributed fuel injection
  • Fuel system (diesel)
  • Starting and charging system
  • Ignition system (transistor)
  • Ignition system (electronic)
  • Pre-heating of diesel engines
  • Transmission
  • Clutch
  • Manual gearbox
  • Automatic gearbox
  • Drive shafts
  • Chassis, running gear
  • Brake system
  • Car suspension
  • Steering system
  • Body and interior
  • Exterior (external elements)
  • Doors, locks and windows
  • Electrical equipment
  • Equipment and devices
  • Electrical circuits
RenaultBook.ru © 2018–2026 | Mobile version | News and articles | Sitemap: EN BG BY UA RS HR RO PL SK HU | Administration | Site search | Bookmark
Duster 1 (2009-2017) | Fluence 1 (2009-2020, petrol) | Kangoo 1 (1997-2007) | Laguna 2 (2001-2007) | Logan 1 (2004-2012, petrol) | Logan 2 (2012-2020) | Megane 1 (1995-2002) | Megan 2 (2002-2009, petrol) | Sandero 1 (2007-2012, petrol) | Scenic 1 (1996-2003) | Symbol 1 (1999-2008, petrol) | Symbol 2 (2008-2013, petrol) | Renault 19 (1988-1996) | Espace I and II (1984-1996) | Espace III (1996-2002) | Clio 1 (1990-1998) |
We want your visit to be comfortable 😌 and use cookies 🍪 to do so.