
English Русский
Български
Беларускі
Український
Српски
Hrvatski
Română
Polski
Slovenský
Magyar
Bookmark Contacts Articles Sitemap
Company vehicles Peugeot Company vehicles Opel Company vehicles Skoda Company vehicles Land Rover Company vehicles Mitsubishi Company vehicles Volkswagen Company vehicles Honda
RenaultBook.ru


Duster   Fluence   Kangoo   Laguna   Logan   Megane   Sandero   Scenic   Symbol   Clio   Other
Clio 1 (1990-1998)

Master cylinder — removal and installation (Renault Clio 1)

  • Main
  • Clio
  • Clio 1 (1990-1998)
  • Chassis, running gear
  • Brake system
  • Master cylinder — removal and installation
0
Contents: Removal 🠛 Installation 🠛
Note: Before you begin, see: Warning given at the beginning Chapter 6.


Removal


1. Remove the master cylinder reservoir cap by disconnecting the sensor wiring connector and pump out the brake fluid from the reservoir. Alternatively, open any convenient pair of bleed nipples (one in each circuit) and gently press the brake pedal several times to drain the fluid (see Chapter 6).

Note: Do not suck out the liquid by mouth as it is poisonous; use a syringe or an old rubber bulb.


2. Remove the reservoir from the master cylinder by pulling it upwards.

3. Wipe the area around the brake pipe connectors on the wall of the master cylinder and place a rag under the connectors to catch any remaining fluid. Mark the location of the couplings, then unscrew the coupling nuts and carefully remove the tubes. Cap the ends of the lines and the master cylinder openings to minimize brake fluid loss and prevent dirt from entering the system. Rinse any spilled liquid from the components with cold water.

4. Loosen and remove the two nuts securing the master cylinder to the booster unit, then remove the cylinder from the engine compartment. Remove the O-ring from the rear of the master cylinder - it needs to be replaced.

5. The master cylinder seals and internal components, unlike the reservoir mounting seals, are not sold separately, so if they are damaged, replace the cylinder assembly. The O-ring installed between the master cylinder and the vacuum booster must be replaced whenever the unit is removed.


Installation


6. Before installing the cylinder, make sure that the distance between the end of the push rod facing the master cylinder and the front of the booster is 22.3 mm (see illustration 3.9).
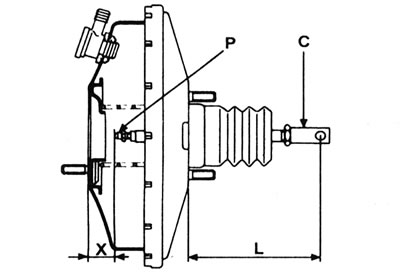
3.9. Adjusting the length of the booster push rod: C - Push rod fork; L - 110 mm; R - Push rod nut;…

3.9. Adjusting the length of the booster push rod: C - Push rod fork; L - 110 mm; R - Push rod nut; X - 22.3 mm.


If necessary, adjust this distance using the "P" nut.

7. Clean all dirt from the mating surfaces of the master cylinder and booster. Install the new O-ring into the groove on the master cylinder.

8. Install the master cylinder onto the booster, ensuring that the push rod enters the cylinder centered. Install the master cylinder mounting nuts and tighten them to the torque specified in the Specifications.

9. Wipe the brake pipe connectors clean, then install them onto the master cylinder ports. Tighten the union nuts to the torque specified in the Specifications.

10. Carefully align the tank with the mounting seals and push it into the working position.

11. Fill the master cylinder reservoir with new fluid and bleed the brake hydraulic system as described in Chapter 6.
This article is available on: russian, bulgarian, belarusian, ukrainian, serbian, croatian, romanian, polish, slovak, hungarian
Article has been reviewed by editor: Fedoseev Denis
Share with friends:
Previous
Clio 1: Brake system
Next

Brake pipes and hoses — replacement
Brake hydraulic system — bleeding
Vacuum Booster Air Filter Replacement
Vacuum booster control valve — removal, inspection and installation
Vacuum booster unit — checking for proper operation, removal and…
Front brake pads — replacement
Front Brake Caliper — removal, overhaul, and installation
Front brake disc — inspection, removal and installation
Load-sensing brake pressure control valve — general description
Rear brake drum — removal, inspection and installation
Other articles on other Renault models

➽ Brake line between the hydraulic unit and the master cylinder Renault Duster 1 (2009-2017)
➽ Clutch master cylinder Renault Fluence 1 (2009-2020, petrol)
➽ Master brake cylinder Renault Kangoo 1 (1997-2007)
➽ Removal and installation the master brake cylinder Renault Laguna 2 (2001-2007)
➽ Checking the level and adding brake fluid to the master cylinder… Renault Logan 1 (2004-2012, petrol)
Link to this article in different formats
Reviews and comments of visitors
No comments yet


Add two numbers 34 + 20


Clio 1 (1990-1998) 
  • General information
  • Maintenance
  • Troubleshooting
  • Power unit
  • Petrol engines 1.1 l (C)
  • Petrol engines 1.2 l (D)
  • Petrol engines 1.2/1.4 l (E)
  • Petrol engines 1.8 l (F)
  • Diesel engines
  • Overhaul of engines
  • Cooling and heating
  • Fuel system (carburetor)
  • Central fuel injection
  • Distributed fuel injection
  • Fuel system (diesel)
  • Starting and charging system
  • Ignition system (transistor)
  • Ignition system (electronic)
  • Pre-heating of diesel engines
  • Transmission
  • Clutch
  • Manual gearbox
  • Automatic gearbox
  • Drive shafts
  • Chassis, running gear
  • Brake system
  • Car suspension
  • Steering system
  • Body and interior
  • Exterior (external elements)
  • Doors, locks and windows
  • Electrical equipment
  • Equipment and devices
  • Electrical circuits
RenaultBook.ru © 2018–2026 | Mobile version | News and articles | Sitemap: EN BG BY UA RS HR RO PL SK HU | Administration | Site search | Bookmark
Duster 1 (2009-2017) | Fluence 1 (2009-2020, petrol) | Kangoo 1 (1997-2007) | Laguna 2 (2001-2007) | Logan 1 (2004-2012, petrol) | Logan 2 (2012-2020) | Megane 1 (1995-2002) | Megan 2 (2002-2009, petrol) | Sandero 1 (2007-2012, petrol) | Scenic 1 (1996-2003) | Symbol 1 (1999-2008, petrol) | Symbol 2 (2008-2013, petrol) | Renault 19 (1988-1996) | Espace I and II (1984-1996) | Espace III (1996-2002) | Clio 1 (1990-1998) |
We want your visit to be comfortable 😌 and use cookies 🍪 to do so.