
As a rule, welded parts of the body frame are not replaced until they are convinced that there is no irreversible damage to the body.
Inspect the car's power frame for the presence of folds resulting from deformation in the area of the opening elements of the body.
Check if the gaps between the body parts are correct, if the edges of the door seal holder are wrinkled.
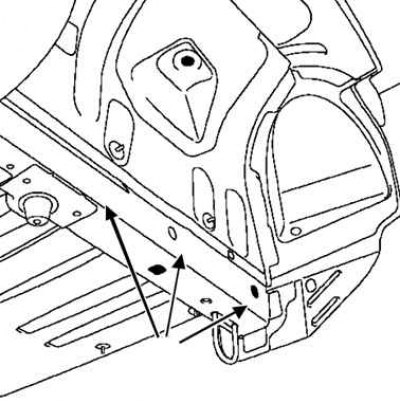
Pic. 8.1. Checking in the areas of fastening of mechanical components
Carry out a check in the areas of fastening of mechanical components, excluding the so-called «vulnerable» zones (to a change in the thickness of the part, the absence of damage to the edges of the amplifiers, etc.) (pic. 8.1).
In addition to the visual check, if necessary, carry out a diagonal comparison test using jigs, which allows, by comparing the symmetry (between right and left side) find some distortion.
On some vehicles, the extreme front or rear points may not be symmetrical. In this case, the exact dimensions are given in the workshop manual of the respective vehicle.
In order to determine the effect of an impact on the behavior of a car on the road, check the wheel alignment.
In some cases, a visual check of the undercarriage parts, which may also have been deformed, should not be neglected.
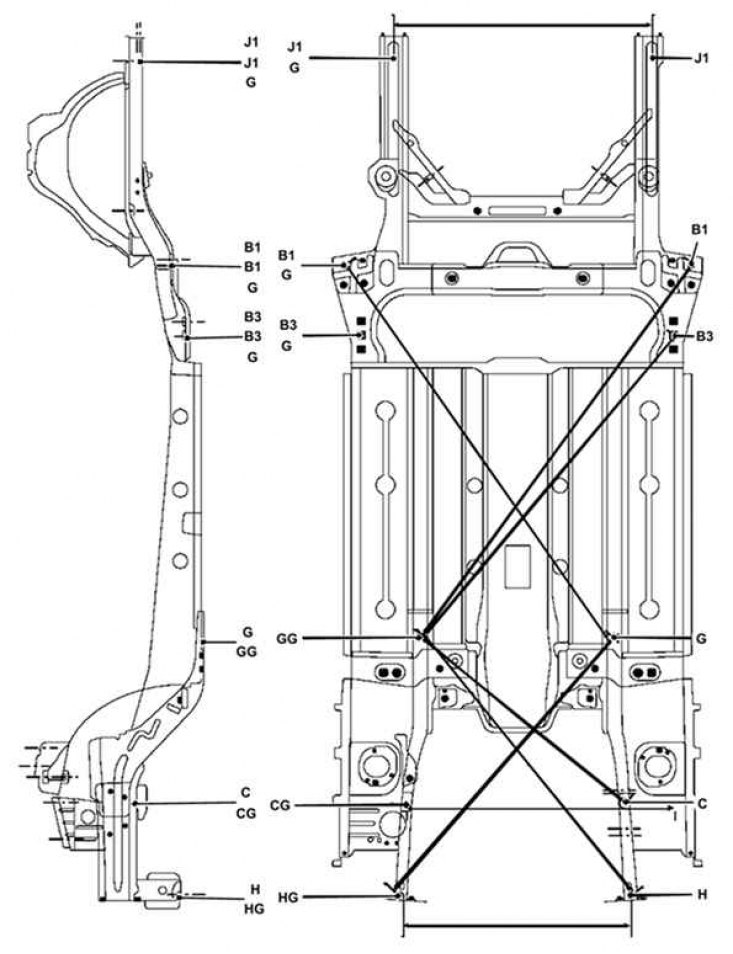
Pic. 8.2. Checking the control points of the car body
Frontal impact
Check by comparing the left and right sides the symmetry of the front reference point with respect to the rear reference point, see example in Figure 8.2: OT - GG = B3G - G.
Check by comparing the left and right sides the symmetry of the points in the strike zone, see example in figure 8.2: G - CG = GG - C.
If the sides of the vehicle are not symmetrical, check the dimensions given in the appropriate vehicle repair manual, see example in figure 8.2: GG - H = 1391 mm and G - HG = 1401 mm.
Back kick
Check by comparing the left and right sides the symmetry of the rear reference point with respect to the front reference point, see example in figure 8.2: G – B3G = GG – OT MG-B1G = GG-B1
Check by comparing the left and right sides the symmetry of the points in the impact zone, see example in figure 8.2: OT - JG = B3G - J.
If the sides of the vehicle are not symmetrical, the dimensions given in the appropriate vehicle repair manual must be checked.
Note. The holes under the bottom of the body are closed with plastic plugs to ensure the tightness of hidden cavities.
Note. When checking by comparing the diagonals, it is necessary to remove some of these plugs.
Note. If the plugs are damaged, be sure to replace them with new ones to protect the vehicle from corrosion.
Equipment selection
Depending on the nature of the deformations, it is necessary to determine the expediency of using a stand for body repair. As a rule, in the presence of deformation outside the areas of fastening of mechanical assemblies, work is carried out on the stand to ensure the correct geometry of the parts (for example: front body panel or rear wheel arch) and the normal behavior of the vehicle on the road.
Car preparation
Significant impacts may require pre-jacking to free electrical wiring or some mechanical components, or to gain access to critical connections to be removed. In some cases, it is necessary to cut out the damaged part of the body.
This work can be done in two ways:
- install the car on a body repair stand in cases where the geometry of the bearing base is broken as a result of an impact;
- use offline dressing tools on the floor.
In a word, the repair of serious damage to the body should be carried out in a specialized car repair shop, which has all the necessary equipment at its disposal.
Dent Repair
When repairing dents, the first priority is to stretch the deformed surface to the initial level. It is impossible to achieve 100% compliance with the original due to the violation of the internal structure of the metal of the body panel upon impact. Optimal is to bring the concave surface to a level of approximately 3 mm below the surface of the surrounding undamaged area of the body panel. If the dent is not deep, a full pull is useless.
In the case where the concave area can be reached from the back of the panel, try to straighten the dent from the inside by hitting a hammer with a soft material striker (rubber, plastic). While tapping out the dent, firmly press a wooden mallet against the face of the dent to dampen the shock impulse to avoid excessive outward bending of the deformed panel metal.
If the indentation occurs in the two-layer section of the panel, or if access to the back side is otherwise impossible, a different pulling technique should be used. Make several small holes in the concave section of the panel, trying to ensure that they are in the deepest areas of the dent. Then screw long self-tapping screws into the holes, leaving their heads sticking out enough so that they can be grabbed with pliers. Then pull the dent out with pliers behind the screws.
In the next stage of the treatment of the dent, remove the remnants of the paintwork from the damaged surface and in an area approximately 3 cm wide around it. This work is best done with a wire attachment or a grinding wheel mounted in an electric drill chuck, but manual sanding is no less effective. The final stage of preparation for puttying is scratching the dent, cleaned of paint, with a screwdriver or a piece of file, or drilling small holes in it to ensure maximum adhesion of the putty to the metal surface. Next, proceed to the procedures of puttying and painting.
Repair of through corrosion damages and holes
With a sanding disc or wire attachment clamped in the chuck of an electric drill, remove traces of paint from the damaged area and in an area about 3 cm wide around it. In the absence of the possibility of using an electric drill, the work can be done no less efficiently by hand with sandpaper.
After removing the paint, you can assess the degree of damage to the metal by corrosion and determine whether it makes sense to proceed with the repair or it would be more reasonable to replace the entire panel (if it is possible in principle). New panels can be purchased not as expensive as many motorists believe. It is often much faster and even more economical to install a new panel than to repair extensive damage to the body.
Remove all body trim from the damaged panel, with the exception of those that can serve as a guide to recreate the original shape of the deformed areas (such as headlamp trim, etc.). Using metal shears or a hacksaw blade, remove all loose, loose, and hopelessly corroded metal sections. Then bend the edges of the hole inward with a hammer to form a recess that will be filled with putty.
Use a wire brush to remove powdered rust from damaged metal. If there is access to the reverse side of the damaged area, treat it with a corrosion inhibitor.
Before starting puttying, the hole must be plugged. This can be done by riveting or screwing a piece of tin to the damaged area on its reverse side or by blocking the hole with a wire mesh.
After the hole is closed, the damaged area can be puttied and painted.
Removing minor scratches
If the scratch is superficial and does not affect the metal of the body panel, it is extremely easy to repair. Lightly rub the scratched area with fine sanding paste to remove loose paint particles and wax. Rinse the treated surface with clean water.
Use a small brush to paint over the scratch with exterior body paint. Continue applying the paint layer by layer until the surface of the paint inside the scratch is level with the surrounding surface of the panel paintwork. Allow the new paint to cure for at least two weeks, then sand the transition surface flush with the finish of the rest of the panel using the finest sanding paste. Then cover the treated surface with wax.
If the scratch has penetrated through the paint layer, reaching the metal of the body and causing it to corrode, another repair technology should be used. Scrape powdered rust out of the scratch with a penknife, then treat the surface with a corrosion inhibitor to prevent future corrosion. Use a rubber or plastic spatula to cover the damaged area treated with the inhibitor with putty. If necessary, and this is especially useful when filling narrow scratches, the putty can be diluted with a solvent to form a fine paste. Before the putty hardens inside the scratch, wrap your fingertip with a smooth cotton cloth. Then, after soaking your finger in the solvent, quickly run it along the puttied surface of the scratch. This will make the surface slightly concave. Now that the putty has cured, the treated scratch can be painted according to the instructions given for cases where the scratch does not affect the metal.
Puttying and painting
Many types of body fillers are produced, however, it should be noted that for this type of work, the putty paste with hardener attached to the body panel repair kits is best suited. In order to achieve a smooth and regular contour of the puttied surface, the paste must be applied with a flexible plastic or nylon spatula. Strictly following the putty manufacturer's instructions (violation can lead to improper hardening of the putty mass), knead a small amount of putty on a clean wooden or cardboard surface (use hardener carefully).
Apply putty with a spatula to the previously prepared surface of the damaged area of the body panel. To achieve the desired surface contour and putty level, each stroke with a spatula should go through the entire surface to be repaired. As soon as the contour of the putty surface becomes close to the required one, immediately stop applying the putty, as it, when cured, will begin to stick to the spatula, forming lumps and leaving gaps on the surface to be treated. Continue applying coats of paste at intervals of about 20 minutes until the filler surface is slightly above the surrounding metal of the panel.
After the putty has hardened, remove its excess with a file. Next, the stage of sanding and grinding the puttied surface begins. Waterproof sandpaper is best suited for this purpose. Start with #180 Coarse Grain and work your way down to #600 Grain (wood or foam) or stick on it. Moisten the paper regularly and frequently with water during processing. This technology allows you to achieve absolute smoothness and evenness of the treated surface at the final stage.
As a result, the machined surface should be surrounded by a ring of pure metal. Rinse the treated surface with clean water, washing off all the dust formed during grinding.
From an aerosol can, apply a thin layer of a light primer on the treated surface, the so-called developing layer. This will reveal all the defects made during grinding, which can be eliminated by applying a new layer of putty. Repeat sanding and sanding. Repeat puttying, treatment and priming of the surface until a satisfactory (on the quality of the resulting surface) result. When finished, rinse the treated surface with water and dry it.
The surface is now ready for painting. Apply paint from an aerosol can in a dry area. If circumstances force you to paint the body outdoors, you should be very serious about choosing the right weather conditions. If you are painting one body panel of the car, cover the surrounding undamaged panels. This precaution will minimize the effect of a slight difference in tones between the old and new paints. Finishing elements such as chrome decorative strips, door handles, etc. should also be covered (better yet, take it off). To protect non-paintable surfaces, use a special adhesive tape (painting «tape») and old newspapers stacked in several layers.
Shake the can thoroughly before painting with an aerosol can, then apply the paint to a test surface, practicing the painting technique. Coat the surface prepared for painting with a primer in several stages. Sparing no water, use moisture-resistant sandpaper No. 600 to process the primed surface, achieving its absolute smoothness. Allow the primer to dry completely before proceeding with the final painting.
Apply a layer of paint, again achieving the required thickness by applying it several times. Start painting from the center of the area to be repaired, making circular movements with the can. Increase their radius by moving in a spiral until the entire damaged area and part of the old paintwork is covered by a width of about five centimeters. After 10-15 minutes (not later, so as not to damage the edge of the fresh paint starting to harden) after applying the last coat of paint, peel off the newspapers and adhesive tape that covered the surrounding body panels. The paint cures completely within about two weeks, after which, to smooth the transition from fresh paint to previously applied paint, treat the repaired surface with the finest sanding paste. Finally, apply a layer of protective wax to the panel.