
Note:: You must use a special tool/fixture.
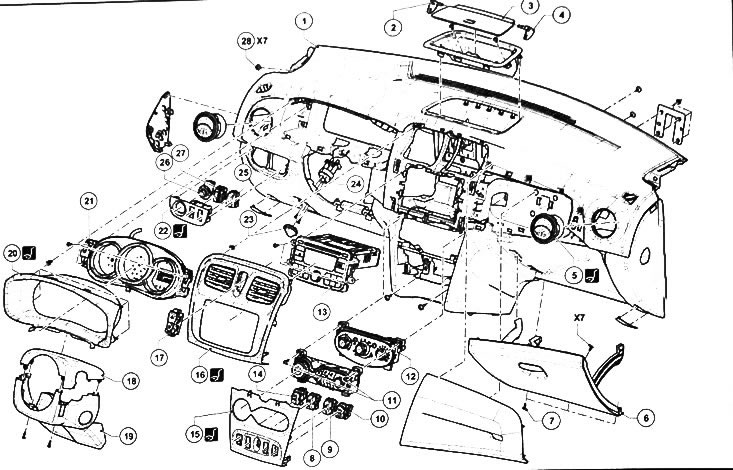
1. Dashboard. 2. Hinge pins for left glove box lid. 3. Glove box lid. 4. Hinge pins for right glove box lid. 5. Dashboard deflectors. 6. Glove box lid. 7. Right glove box cover screw. 8. Speed limiter switch. 9. Rear window heating switch. 10. Right rear power window switch. 11. Bolt of the air conditioning control panel. 12. Control panel for the air conditioning system. 13. Radio tape recorder. 14. Left rear power window switch. 15. Facing the control panel of the air conditioning system. 16. Facing the audio system (Car. 1363). 17. Light alarm switch. 18. The upper casing of the steering column. 19. The lower casing of the steering column. 20. Front lining of the instrument cluster (Car. 1363). 21. Instrument cluster. 22. Facing the mirror adjustment panel. 23. Switch disk. 24. Headlight leveling switch. 25. Parking assistance switch. 26. Switch for adjusting the exterior mirrors. 27. ESP switch. 28. Dashboard screws.
Removal and installation of the dashboard
Removing the dashboard
Caution: Do not use near pyrotechnic devices (seat belt pretensioners and airbags) heat sources and open flames - pyrotechnic devices may work.
1. Block the airbag processor.
2. Disconnect the negative battery terminal.
3. To remove facings of racks of a windscreen.
4. Remove the driver's airbag.
5. Remove the steering wheel.
6. To remove understeering switches in gathering.
7. Remove contact disc.
8. Remove the instrument cluster.
9. Remove the center console (see later in this chapter).
10. Remove the center front panel.
11. Disconnect the hazard warning light switch connector.
12. Disconnect the central locking switch connector.
13. Remove the radio.
14. Remove the center top trim.
15. Remove the central lining.
16. Remove the radio shelf.
17. To turn away bolts of the control panel.
18. Unhook the control panel.
19. Remove the fuse access flap.
20. Unhook the switch disk.
21. Remove the diagnostic connector.
22. Remove the switch plate from the dashboard.
23. Disconnect the switch plate connector.
24. Unscrew the mounting bolts and remove the dashboard (this will require two people).
Note: Before removing the dashboard, it is necessary to mark the gasket of the various wiring.
Dashboard Installation
To prevent damage to the wiring during installation, the original wiring under the instrument panel must be respected.
To ensure a proper electrical connection, make sure that the wire connectors are not impacted by surrounding components.
Installation is made in an order, the return to removal.
Connect the battery and unlock the airbag processor, then check the operation of all systems