
English Русский
Български
Беларускі
Український
Српски
Hrvatski
Română
Polski
Slovenský
Magyar
Bookmark Contacts Articles Sitemap
Company vehicles Peugeot Company vehicles Opel Company vehicles Skoda Company vehicles Land Rover Company vehicles Mitsubishi Company vehicles Volkswagen Company vehicles Honda
RenaultBook.ru


Duster   Fluence   Kangoo   Laguna   Logan   Megane   Sandero   Scenic   Symbol   Clio   Other
Logan 1 (2004-2012, petrol) Logan 2 (2012-2020)

Door panels (door cards) (Renault Logan 2)

  • Main
  • Logan
  • Logan 2 (2012-2020)
  • Body and interior
  • Interior (internal elements)
  • Door panels (door cards)
0
Contents: Removal and installation the front…🠛 Removal and installation the rear…🠛 Removal and installation door film 🠛

Removal and installation the front door trim


Removal the front door trim


1. Remove the outside rearview mirror cover.

2. Unhook the clip (1) of the front door trim.
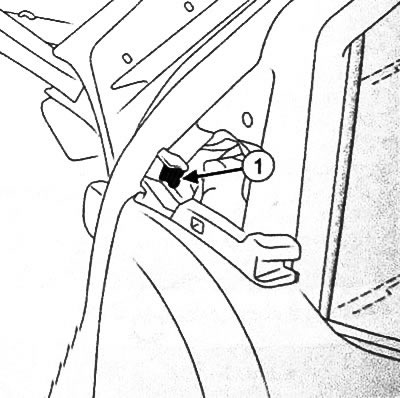
2. Unhook the clip (1) of the front door trim.


3. Loosen the bolt of the inner front door release handle.

4. Remove the inside front door release handle.

5. Remove the door handle cover.

6. Loosen the door handle bolts. Versions with manual windows

7. Remove the window lift handle.

Versions with electric windows


8. Using a suitable tool, detach the power window switch plate (2) from the front door trim.
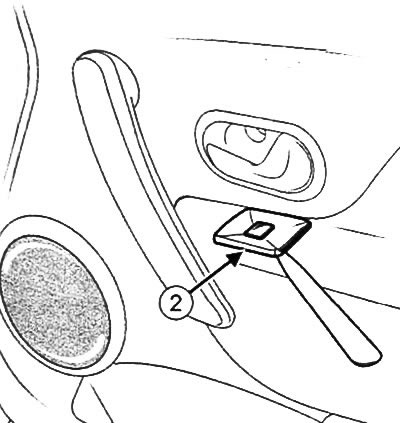
8. Using a suitable tool, detach the power window switch plate (2) from the front door trim.


9. Disconnect the connector (3) of the power window switch.
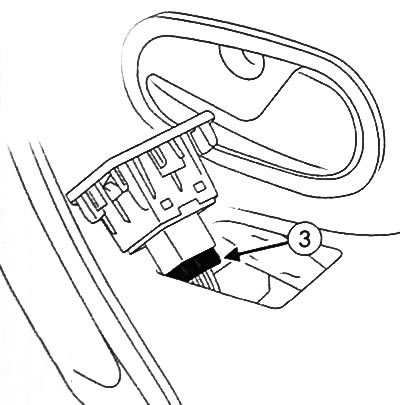


9. Disconnect the connector (3) of the power window switch.


Continuation for all versions


10. Loosen the front door trim bolt.

11. Using a special tool, remove the front door trim.
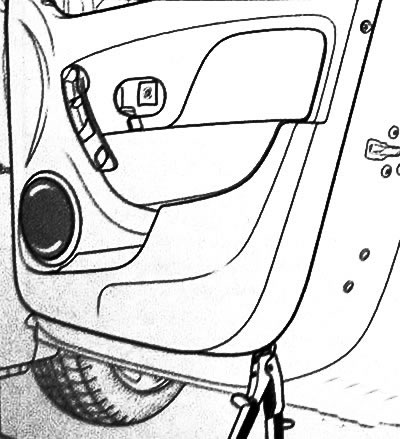
11. Using a special tool, remove the front door trim.


Installing the front door trim


Check the condition of the clips and, if necessary, replace them with new ones.

Installation is carried out in the reverse order of removal.

Removal and installation the rear door trim


Removal the rear door trim


1. Loosen the bolt of the inner front door release handle.

2. Remove the inside front door release handle.

3. Remove the window lift handle.

4. Unscrew the door handrail bolts.

5. Using a special tool, remove the front door trim.
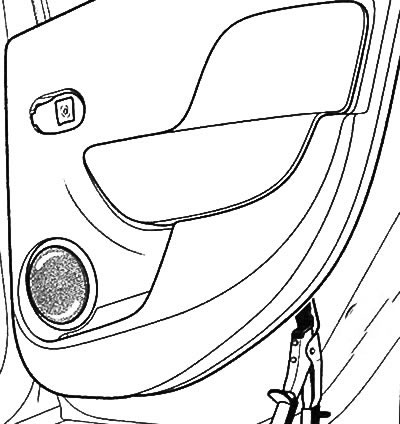
5. Using a special tool, remove the front door trim.


Installing the front door trim


Check the condition of the clips and, if necessary, replace them with new ones.


Installation is carried out in the reverse order of removal.

Removal and installation door film


Removal the door film


1. Remove the door trim.

2. Using a special tool, unhook the fastener (1) (depending on the equipment level).
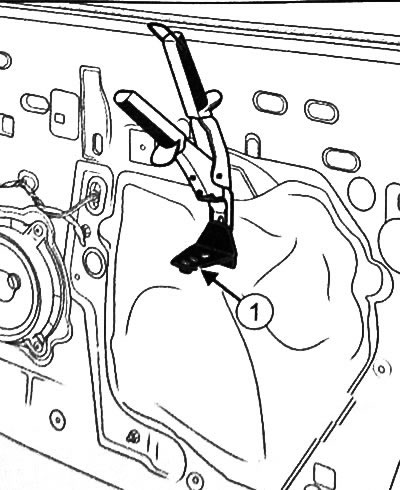
2. Using a special tool, unhook the fastener (1) (depending on the equipment level).


3. Remove the sealing film from the door.
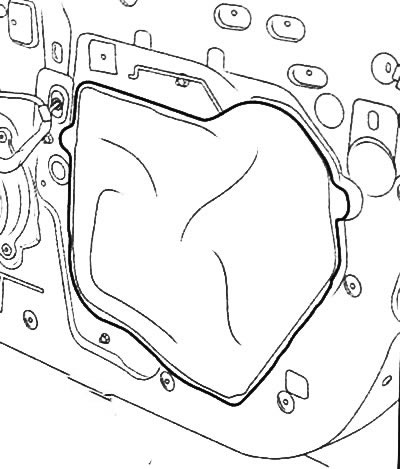
3. Remove the sealing film from the door.


4. Carefully remove the layer of mastic from the door frame along the edges of the sealing film.

Note: If the mastic layer is too viscous, use an industrial hair dryer to heat it up to approximately 100°C to facilitate removal.


Installing door film


Note:
  • Remove any remaining glue from the door frame by placing wide tape over it and gently pulling it off.
  • Clean the door frame with lint-free cloths.


Attention:
  • To ensure proper adhesion of the door sealing film:
  • The door must be clean (from dust, dirt and other contaminants) and without condensation.
  • The area of the door frame where the film will be applied must be completely painted.
  • The surface temperature must be at least 15°C.


1. Remove the protective paper from the layer of mastic applied to the door surface.


Note: Do not touch the mastic layer.


2. Place the sealing film correctly along the edges without applying pressure.

3. Press the sealing film securely to the door frame along the entire perimeter.

4. Check the tightness of the sealing film.

5. Assemble the door in the reverse order of disassembly.
This article is available on: russian, bulgarian, belarusian, ukrainian, serbian, croatian, romanian, polish, slovak, hungarian
Article has been reviewed by editor: Petrovsky Roman
Share with friends:
Previous
Logan 2: Interior (internal elements)
Next

Floor covering
Car ceiling
Central console
Dashboard
Interior trim
Front seats
Back sofa
Other articles on other Renault models

➽ Lights built into door panels Renault Megan 2 (2002-2009, petrol)
➽ Front side door Renault Duster 1 (2009-2017)
➽ Front door protective strip Renault Fluence 1 (2009-2020, petrol)
➽ Front door protective pads Renault Kangoo 1 (1997-2007)
➽ Door opening control Renault Laguna 2 (2001-2007)
Link to this article in different formats
Reviews and comments of visitors
No comments yet


Add two numbers 18 + 21


Logan 2 (2012-2020) 
  • General information
  • Faults en route
  • Daily checks
  • Governing bodies
  • Maintenance
  • Power unit
  • Petrol engines 1.2 l
  • Petrol engines 1.6 l
  • Diesel engines 1.5 l
  • Cooling system
  • Lubrication system
  • Power and control system
  • Intake and exhaust system
  • Engine electrical equipment
  • Transmission
  • Clutch
  • Car gearbox
  • Drive shafts
  • Chassis, running gear
  • Suspension and wheels
  • Brake system
  • Steering
  • Body and interior
  • Exterior (external elements)
  • Interior (internal elements)
  • Safety system
  • Heating and air conditioning
  • Electrical equipment
  • Equipment and devices
  • Wiring diagrams (sedan)
  • Wiring diagrams (wagon)
Logan 1 (2004-2012, petrol) 
  • General information
  • Vehicle device
  • User manual
  • Faults en route
  • Daily maintenance
  • First maintenance
  • Second maintenance
  • Driver tips
  • Power unit
  • Engine repair
  • Lubrication system
  • Cooling system
  • Power and exhaust system
  • Transmission
  • Clutch
  • Car gearbox
  • Drive shafts
  • Chassis, running gear
  • Front suspension
  • Rear suspension
  • Steering
  • Brake system
  • Wheels and tires
  • Body and interior
  • Exterior (external elements)
  • Interior (internal elements)
  • Doors, locks and windows
  • Body Care
  • Electrical equipment
  • Equipment and devices
  • Headlights and lighting
  • Power devices
  • Electrical circuits
RenaultBook.ru © 2018–2026 | Mobile version | News and articles | Sitemap: EN BG BY UA RS HR RO PL SK HU | Administration | Site search | Bookmark
Duster 1 (2009-2017) | Fluence 1 (2009-2020, petrol) | Kangoo 1 (1997-2007) | Laguna 2 (2001-2007) | Logan 1 (2004-2012, petrol) | Logan 2 (2012-2020) | Megane 1 (1995-2002) | Megan 2 (2002-2009, petrol) | Sandero 1 (2007-2012, petrol) | Scenic 1 (1996-2003) | Symbol 1 (1999-2008, petrol) | Symbol 2 (2008-2013, petrol) | Renault 19 (1988-1996) | Espace I and II (1984-1996) | Espace III (1996-2002) | Clio 1 (1990-1998) |
We want your visit to be comfortable 😌 and use cookies 🍪 to do so.