



Contents: Instructions for performing forced…🠛 Features of using a muffler kit with…🠛 Procedure for forced regeneration of…🠛
Note: Forced regeneration of the diesel particulate filter is performed only after the SERVICE indicator light comes on, accompanied by the message: "DISSIPINE PARTICULATE FILTER NEEDS REGENERATING." or the orange indicator light: "CHECK POLLUTANT REDUCTION SYSTEM".
Instructions for performing forced regeneration of the diesel particulate filter
Currently, two additional exhaust ventilation kits for service stations are used (see garage equipment catalog 2005), certified for use at high temperatures, with forced regeneration of the particulate filter.
Two additional kits certified for forced regeneration of the diesel particulate filter;
- diesel Particulate Filter Kit for Single Pipe Muffler Vehicles;
- dual intake manifold kit for vehicles with dual exhaust pipes.
Note: During forced regeneration of the diesel particulate filter, a significant increase in temperature occurs in the exhaust system.
Use one of these two sets. certified for use at high temperatures, during forced regeneration performed at the service station. with the application of these topics exhaust ventilation of exhaust gases or in the open air.
Make sure that the kit used does not come into contact with the rear bumper during the regeneration of the diesel particulate filter.
Features of using a muffler kit with two exhaust pipes
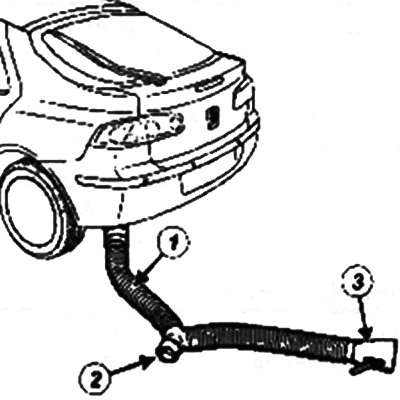
Note: Please ensure that when using the Dual Intake Pipe Kit 1 on a vehicle with a single exhaust pipe:
- place the exhaust ventilation hoses on openings 2 and 3 when performing forced regeneration at a service station;
- direct openings 2 and 3 so that hot exhaust gases do not fall on another vehicle or on people when working outdoors.
Procedure for forced regeneration of the diesel particulate filter (using the CLIP diagnostic tool)
Connect the diagnostic tool to the vehicle.
Note: During forced regeneration of the diesel particulate filter, a significant increase in temperature occurs in the exhaust system.
Use one of these two kits, which are certified for use at high temperatures, when forced regeneration is performed at a service station, when using exhaust gas ventilation systems, or outdoors.
Make sure that the kit used does not come into contact with the rear bumper during the regeneration of the diesel particulate filter.
Caution! Before giving the command for forced regeneration, check the engine oil level using the dipstick to prevent engine runaway.
The oil level should be between the "MIN" and "MAX" marks on the dipstick.
Note: If necessary, forced regeneration can be stopped by pressing the engine start button twice in succession.
Note: During forced regeneration of the diesel particulate filter, a large amount of smoke with a pungent odor is released.
After forced regeneration of the diesel particulate filter using a diagnostic tool:
- handle the existing faults;
- delete stored faults from memory.
Place the vehicle on a two-post lift.
Note: Allow the engine to cool before draining the oil.
 |
 |
Remove the oil filter using the tool (Mot. 1329) for the F9Q engine, (Mot. 1281-01) for G9T engine.
Lubricate the gasket of the new oil filter with engine oil.
Screw the oil filter on until the gasket touches the engine block.
Tighten the oil filter by hand 3/4 turn.
Wipe off any traces of oil.
Remove:
- engine oil filler plug;
- engine sump protection;
- the engine oil pan drain plug using the tool (Mot. 1018) or an 8 mm socket for the drain plug.
Material is located on the source website (renaultbook)
Allow the oil to drain completely into an oil collection container.
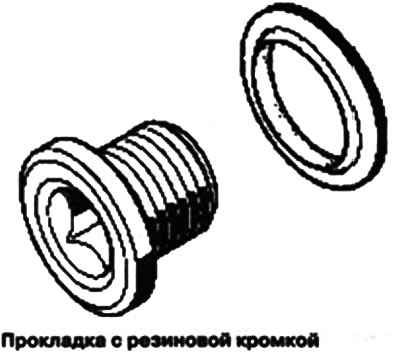
Install a new gasket (for gaskets with a rubber edge, the installation direction does not matter).
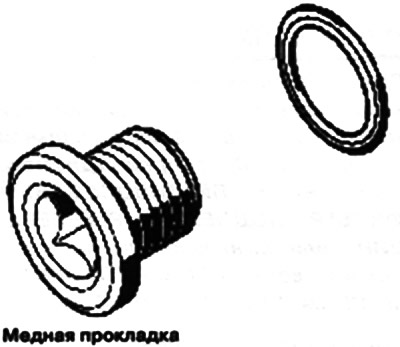
Note: The copper drain plug gasket is installed with the slot facing the plug.
Tighten the drain plug to the specified torque of 20 Nm.
Clean the engine oil pan from any leaks of drained oil.
Install the engine oil pan guard.
Fill the engine with oil.
Replace the oil filler cap.
Wait 10 minutes.
Check the engine oil level using the dipstick.
If necessary, add oil to the normal level.
Note: The oil level should be between the "MIN" and "MAX" marks on the dipstick.