
Cars with F engines
Removal
- Place the vehicle on a two-post lift and disconnect the cable from the negative terminal of the battery.
- Remove the air filter along with the bracket.
- Remove the thermal insulation shield.
- Disconnect all wires from the starter.
- Unscrew the 3 bolts and remove the starter.
Installation
- Installation of the starter is carried out in sequence. reverse to withdrawal.
- Check the presence of a centering sleeve, which must be located in the hole for the starter mounting bolt (pic. 15.15).
Cars with Z engines
Removal
- Place the car on a lift and disconnect the cable from the negative terminal of the battery.
- At points (3 and 4. fig. 15.16) disconnect the exhaust pipe.
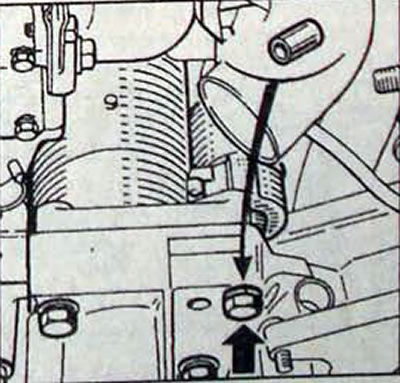
Pic. 15.15. Location of the centering sleeve under the bolt (V) when installing the starter
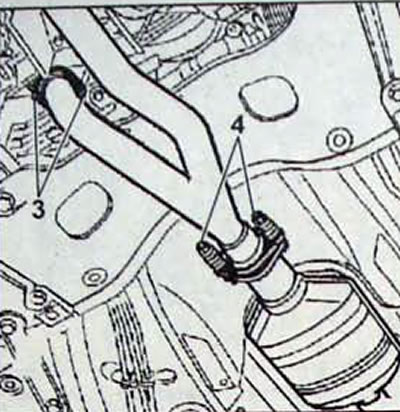
Pic. 15.16. Points (3 and 4) disconnecting the exhaust pipe
- Unscrew the 2 bolts and remove the thermal insulation shield protecting the oil filter.
- Unscrew the 3 bolts and remove the starter thermal insulation shield.
- Remove the clamp securing the starter power cable.
- Disconnect the starter relay wire and power wire.
- Remove the 3 starter mounting bolts.
- Cut the plastic clamp securing the wiring harness.
- Remove the starter.
- A protective casing made of sheet steel is installed between the starter and the clutch housing.
Installation
- Install the steel guard, aligning it with the existing centering ring on the clutch housing.
- Install the starter and secure it. screwing the bolt into the centering ring.
- Connect the wires to the starter.
- Screw in the two remaining starter mounting bolts.
- Install the plastic clamp securing the wiring harness.
- Install the starter cable mounting bracket.
- Install the starter and oil filter thermal insulation shield.
- Install the exhaust pipe.
Vehicles with G8T engines
Removal
- Place the car on a lift and disconnect the cable from the negative terminal of the battery.
- Disconnect the oil cooler from the engine cooling system radiator.
- Install the radiator shield. made independently from steel or aluminum sheet.
- Remove the protective shields under the engine. an air filter with a bracket and a bracket located in front of the air filter.
- Remove the plastic tube located between the oil cooler and the manifold.
- Remove the engine oil level dipstick guide tube, the starter heat shield and the reinforcement brace located between the engine and the power steering pump.
- Remove the bolt securing the power steering hoses to the front of the transmission.
- Disconnect all wires from the starter.
- Remove the bolts securing the rear part of the starter (Figure 15.17).
- Disconnect the starter relay wire and power wire.
- Remove the power steering hose fasteners
- Remove the 3 starter mounting bolts.
- Remove the starter
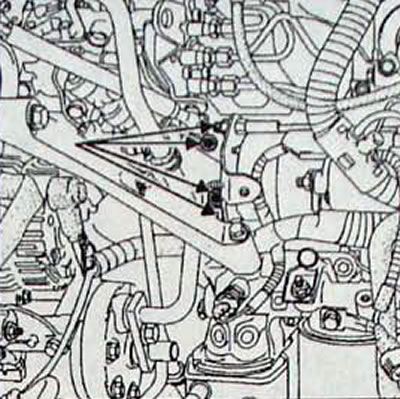
Pic. 15.17. Location of the starter rear mounting bolts
Installation
- Installation of the starter is carried out in sequence. reverse to withdrawal.
- Check for the presence of a centering sleeve, which must be located in the upper hole for one of the starter mounting bolts.
Vehicles with G9T engines
Removal
- Place the vehicle on a two post lift.
- Disconnect the cable from the negative terminal of the battery.
- Remove the engine oil pan protection and the pipe leading from the heat exchanger to the throttle body.
- Remove the oil level dipstick.
- Remove the 3 starter mounting bolts.
- Remove the oil filter holder and move the filter holder assembly aside without disconnecting it (pic. 15.18).
- Disconnect the wire connectors from the starter.
- Remove the starter.
Installation
- Installation of the starter is carried out in sequence. reverse to withdrawal.
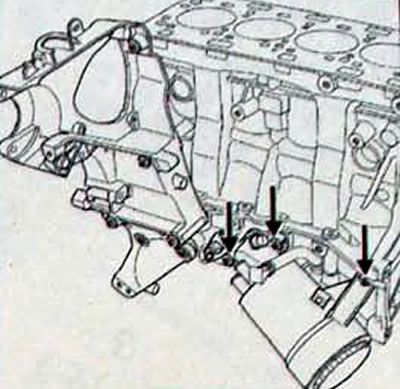
Pic. 15.18. Location of oil filter holder mounting bolts
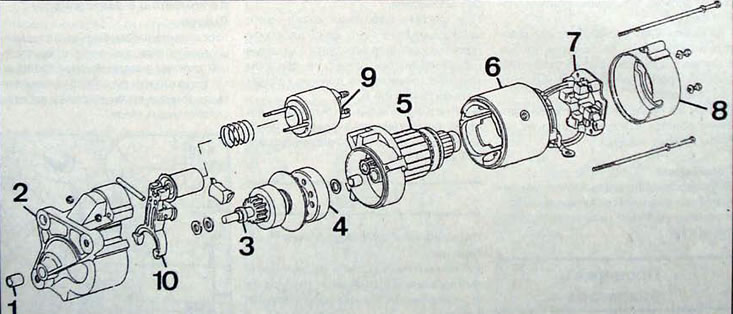
Pic. 15.19. Starter: 1 - bearing; 2 - front cover; 3 - freewheel with drive gear; 4 - main gear; 5 - rotor; 6 - inductive stator winding; 7 - straightener and brushes; 8 - back cover; 9 - traction relay; 10 - fork-shaped lever