



Attention! A detailed description of the starter removal and installation procedure is given for cars with E7J, K7M, F3R, F7R, F8Q and F9Q engines. Differences concerning cars with 1.4-71.6 liter K4J/K4M gasoline engines are given at the end of the chapter. In any case, disconnect the battery before starting work.
1. Disconnect the negative (-) terminal from the battery.
Attention! This will delete the recorded information from some devices, and the security code from the radio receiver, as well as all automatic settings for radio stations. Therefore, before disconnecting the battery, read the provisions of Chapter "Battery - removal and installation".
2. Remove the starter heat shield, if present, by unscrewing bolts C (see illustration).
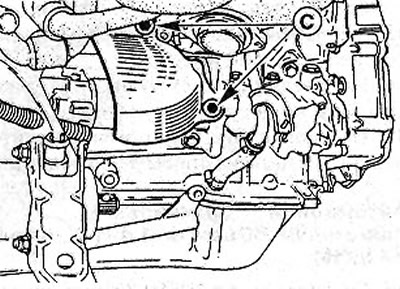
20.2 Remove the starter heat shield, if present, by unscrewing bolts C
Cars with 150 hp engine.
3. Remove the exhaust manifold bracket bolts.
4. Unscrew the bolts E securing the rear starter bracket(see illustration).
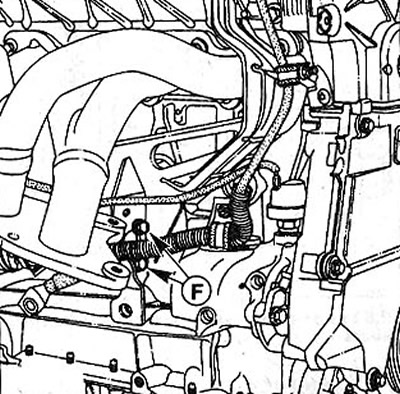
20.4 Unscrew the bolts F securing the rear starter bracket
5. Remove the G bolts of the rear starter bracket (see illustration).
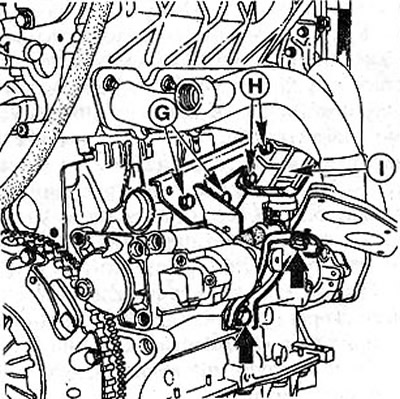
20.5 Remove the G bolts of the rear starter bracket
6. Unscrew the bolts H of the fuel line cover I (see illustration 20.5).
All engines
7. Disconnect the thick cross-section positive potential supply wire from terminal 30 on the back of the starter, and the thin wire from terminal 50 to the ignition switch.
8. Unscrew the three starter mounting bolts (see illustration). In this case, mark the installation position of the centering sleeve B with a marker. This sleeve is located at point Y in the bolt hole for cars with a 1.4 and 1.6 liter engine, and at point Z for cars with a 2.0 liter petrol engine and a diesel engine (see illustration 20.8).
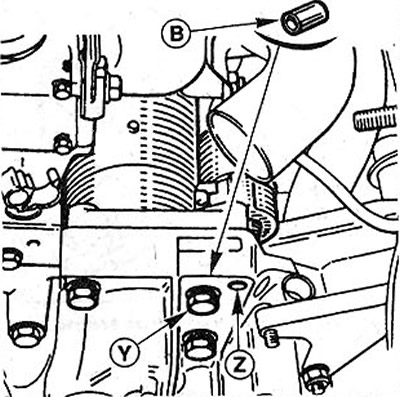
20.8 Unscrew the three starter mounting bolts
9. Remove the starter by pushing it upwards.
Installation
10. Make sure that the centering sleeve B is in place.
11. Install the starter and secure it with the bolts.
12. Connect the electrical wires to the starter terminals.
13. Vehicles with 150hp petrol engine: Bolt the rear starter bracket and fuel line cover.
14. Cars with 150 hp petrol engine Install the exhaust manifold bracket.
15. Secure the heat shield, if applicable.
16. Connect the negative (-) wire terminal to the battery terminal.
17. Set the clock and program the radio to receive radio stations.
Cars with 1.4-/1.6-liter petrol engine K4J/K4M
18. Mark the position of the right front wheel on the hub with paint. This will allow you to install the balanced wheel in its original position during assembly.
19. Loosen the wheel mounting bolts. The car must be on the ground.
20. Place the front of the car on jack stands and remove the front wheel.
21. Remove, if necessary, the right wheel arch liner.
22. Remove the engine splash guard if necessary.
23. Remove the retaining pin from the right drive axle shaft.
24. Unscrew the bolts securing the lower part of the shock absorber strut to the steering knuckle.
25. Move the steering knuckle down, disconnecting the axle shaft.
26. Remove the air filter resonator located in front of the filter.
27. Unscrew nut 3 of the wiring harness clamp and disconnect plug 4 (see illustration).
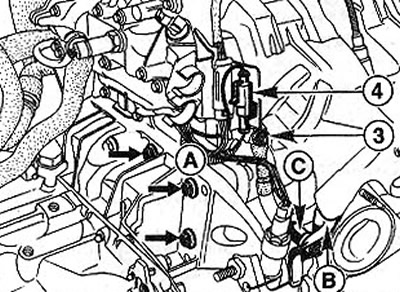
20.27 Unscrew nut 3 of the wiring harness clamp and disconnect plug 4
28. Unscrew the heat-deflecting shield mounting bolts B and the lower mounting bolt of the supporting frame C (see illustration 20.27).
29. Unscrew the engine oil level sensor.
30. Unscrew bolts A securing the starter and remove the starter.
The starter is installed in the reverse order of removal.
If the starter does not turn, you must first check whether there is at least 8 volts at terminal 50 of the traction relay, which is necessary to start the engine. If less voltage is supplied to terminal 50, then you must check the wires related to the starter circuit according to the electrical diagram.
Whether the starter pinion engages under normal voltage can be checked as follows:
31. Remove the starter and connect it with auxiliary wires to the car battery.
32. Short-circuit with an auxiliary wire (cross-section of at least 4 mm²) between starter terminals 30 and 50.
If the starter gear engages, the wires going to the starter are faulty, for example, the ground wire (-) is broken, or the terminal of the wire (+) is corroded, or the ignition switch is faulty.
[Original of this article on the website: Renaultbook.ru]