
With the left half of the housing of the heating and ventilation device removed, the following elements can be seen
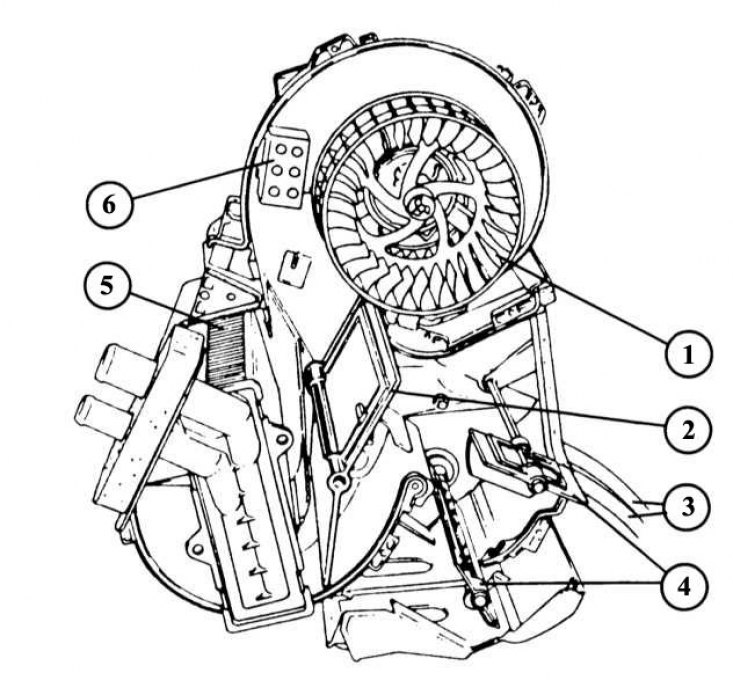
1 - centrifugal fan; 2 - mixing valve for warm and cold air; 3 - control cables; 4 - air mixer valves; 5 - heat exchanger; 6 - additional resistance of the electric fan motor.
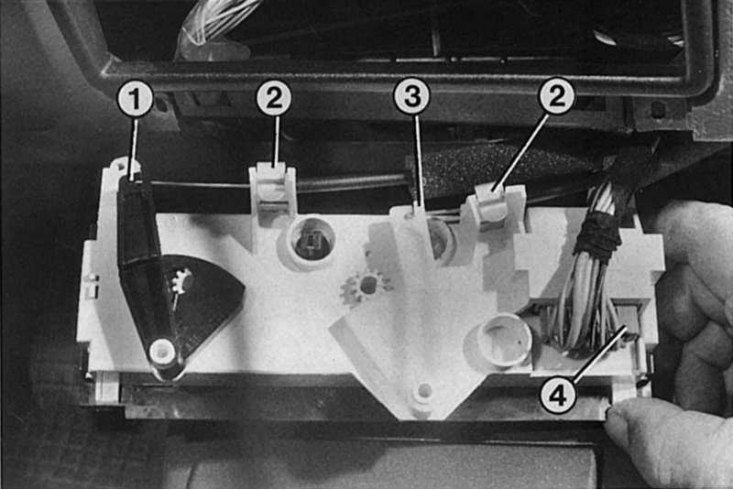
For trouble-free operation of the heating and ventilation device, in accordance with the symbols of the air mixer valves (1) and mixing valve for cold and warm air (3) it is extremely important to correctly and firmly fix the cable sheath in the safety bracket (2) regulator platforms. Also, before installing the platform, you should check the correct fastening of the pin connection (4) rotary fan speed switch. It is best to check the operation of all regulators before final installation.
- Does warm air enter the passenger compartment when the heating fan control is turned on when the engine is warm?
- Does the air distribution control work up and down?
- Set the regulator to position «Cold» - after a short time, cold air must begin to flow, otherwise the warm air valve does not close correctly.
- Is warm or cold air coming in from all openings?
- Does the fan run at all speeds?
Removing the housing of the heating and ventilation device
The case of the mixer of cold and warm air settles down in the middle under the panel of devices. The heat exchanger installed inside it is a kind of «mini radiator» and regulates the heating of the air. Removing this «compact system» is a very difficult job that should only be done by an experienced motorist or repairman.
1. Disconnect a wire of weight from the storage battery.
2. Remove the steering wheel, see chapter Suspension and steering.
3. Remove the top and bottom facing of a steering rack.
4. Remove the combined switch lever, see chapter Instruments and devices.
5. Remove the combined instrument panel.
6. Remove the average console.
7. Remove the floor covering on the right and left.
8. Remove the instrument panel. To do this, disconnect all contact connections and unscrew the screws.
9. Remove the electric fan motor.
10. Clamp the heating inlet and outlet hoses in the engine compartment.
11. Loosen the heating hose clamps and remove the hoses from the heat exchanger connection fittings.
12. Carefully blow out the heat exchanger with compressed air so as not to splatter the passenger compartment with the remnants of the coolant.
13. In the absence of compressed air, you can take a short clean piece of hose, attach it to the upper nozzle and blow out the rest of the coolant with your mouth.
14. Pull the housing of the heating and ventilation unit towards you and remove it.
15. Before installation, check the condition of the seal between the heater body and the front wall and replace it if necessary.
16. Install the electric fan motor, but do not fully tighten both screws.
17. Install the instrument panel. After tightening both screws securing the heating and ventilation unit housing to the instrument panel, also tighten both screws of the electric fan motor.
18. Check and, if necessary, adjust the setting of the control rods.
19. Further assembly goes in the reverse order of removal.
20. If necessary, add coolant and bleed air from the cooling system, see chapter Cooling system.
Exchanger replacement
1. Remove the casing of the heating and ventilation unit.
2. Unhook the 4 safety clips of the first installation.
3. Carefully remove the heat exchanger from the housing of the heating and ventilation unit, taking care not to damage or bend its plates.
4. When installing, pay attention to the condition of the foam strips.
5. If the safety brackets were broken during removal, the heat exchanger can be fixed in the HVAC housing with screws.
6. If necessary, add coolant and bleed air from the cooling system.
Removing the regulator of the heating and ventilation system
1. Remove facing of the panel of devices under a regulator (2 screws).
2. Loosen both now visible screws under the regulator.
3. Carefully press the regulator into the instrument panel and pull it out from below.
4. When installing the Bowden cables, take care that they are not under tension and that they are not bent or pinched.
Replacing Bowden cables for heating and ventilation control
1. Remove the HVAC controller platform.
2. Remove the safety clip on the adjustment cable support.
3. Remove the Bowden cables from the arm segment.
4. In the body of the device, turn the cables 90°and unhook them from the lever segment.
5. When installing, install a longer cable on the warm/cold air mixing controller.
6. In the housing of the heating and ventilation unit, clamp both cables with safety clips on the support.
7. Set the air distribution control to the lower left symbol «Head».
8. Set the knob for mixing cold and warm air to position «Cold».
9. Set the fan switch to position «1».
10. Adjust the position of the valves in the housing of the heating / ventilation device in accordance with the settings on the instrument panel.
11. Install the cables and tighten them.
12. The return spring is located in the mixing valve for cold and warm air.
13. Before reassembly, check the operation of the device.