
English Русский
Български
Беларускі
Український
Српски
Hrvatski
Română
Polski
Slovenský
Magyar
Bookmark Contacts Articles Sitemap
Company vehicles Peugeot Company vehicles Opel Company vehicles Skoda Company vehicles Land Rover Company vehicles Mitsubishi Company vehicles Volkswagen Company vehicles Honda
RenaultBook.ru


Duster   Fluence   Kangoo   Laguna   Logan   Megane   Sandero   Scenic   Symbol   Clio   Other
Symbol 1 (1999-2008, petrol) Symbol 2 (2008-2013, petrol)

Water pump — removal and installation (Renault Symbol 2)

  • Main
  • Symbol
  • Symbol 2 (2008-2013, petrol)
  • Power unit
  • Cooling system
  • Water pump — removal and installation
0
Contents: Removal 🠛 Installation 🠛
The coolant pump provides forced circulation of coolant through the cooling system. It is mounted at the front of the cylinder block and is driven by the crankshaft via a timing belt.
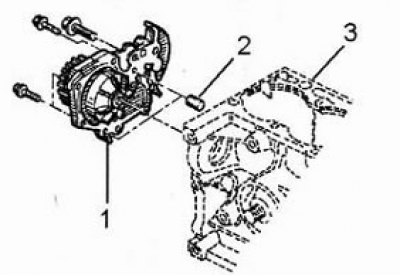
Coolant pump (k7J engine).

Coolant pump (k7J engine).
1 - Pump, 2 - Pin, 3 - Cylinder block.
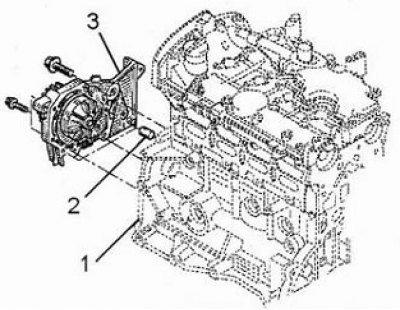

Coolant pump (k4J engine).

Coolant pump (k4J engine).
1 - Cylinder block, 2 - Pin, 3 - Pump.


The water pump cannot be repaired, so if there is increased noise or fluid leaks, it must be replaced.

Removal


  • disconnect the negative battery cable;
  • drain the cooling system by removing the lower hose from the radiator;
  • remove the timing belt and tension roller (see subsection "Cylinder head");
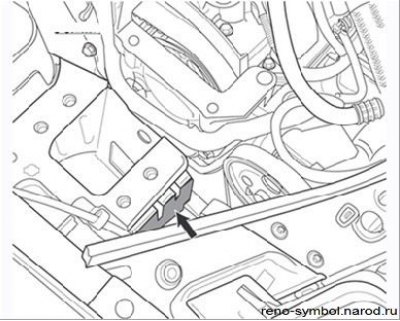
Figure 3.81. Acoustic load

Figure 3.81. Acoustic load


  • remove the acoustic load (Figure 3.81);
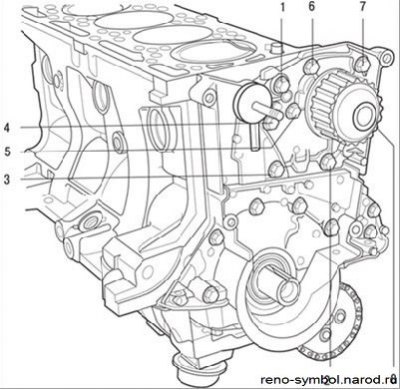
Figure 3.82. Water pump mounting bolts: 1–8 – bolt tightening sequence

Figure 3.82. Water pump mounting bolts: 1–8 – bolt tightening sequence

  • loosen and unscrew the water pump mounting bolts (Figure 3.82), remembering their installation, since they are of different lengths;
  • remove the water pump assembly from the cylinder block;
  • clean the mating surfaces of the pump and cylinder block. It is strictly forbidden to use tools with a sharp edge for this. Use Decapjoint, which dissolves gasket residues.

Apply the specified product to the surface to be cleaned, wait for about 10 minutes, then remove the product with a wooden spatula. It is recommended to perform this operation wearing protective gloves. Do not allow the cleaning product to come into contact with paintwork.

Installation
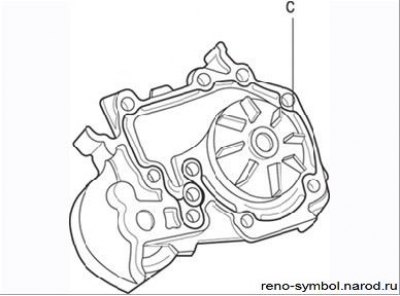


Figure 3.83. Applying sealant to the water pump mating surface: c=0.6–1.0 mm
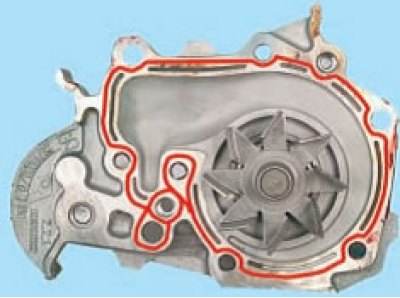
Figure 3.83. Applying sealant to the water pump mating surface: c=0.6–1.0 mm


Figure 3.83. Applying sealant to the water pump mating surface: c=0.6–1.0 mm

  • apply a 0.6-1.0 mm wide bead of Loctite 518 sealant (Figure 3.83) on the mating surface of the pump being installed;
  • install the pump on the cylinder block, put the bolts in their places and tighten them preliminarily to a torque of 8 N·m in the sequence shown in Figure 3.83, then finally tighten the M6 bolts to a torque of 11 N·m, and the M8 bolts to a torque of 22 N·m;

Note: Apply 1-2 drops of Loctite Frenetanch to bolts 1 and 4 (see Figure 3.83) water pump mounts.

  • perform the remaining operations in the reverse order of removal;
  • check for coolant leaks.
This article is available on: russian, bulgarian, belarusian, ukrainian, serbian, croatian, romanian, polish, slovak, hungarian
Article has been reviewed by editor: Kupriyanov Sergey
Share with friends:
Previous
Symbol 2: Cooling system
Next

Engine Coolant Replacement
Engine cooling system malfunctions
Engine cooling system — design description
Engine Radiator — Removal and Installation
Engine Coolant Temperature Sensor
Engine Thermostat — Removal and Installation
Other articles on other Renault models

➽ Water pump (K9K engine) Renault Duster 1 (2009-2017)
➽ Removal the water pump inlet pipe Renault Fluence 1 (2009-2020, petrol)
➽ Removal, cleaning and installation of the water pump (engines… Renault Laguna 2 (2001-2007)
➽ Replacing the water pump Renault Logan 1 (2004-2012, petrol)
➽ Removal and installation the water pump Renault Megane 1 (1995-2002)
Link to this article in different formats
Reviews and comments of visitors
No comments yet


Add two numbers 30 + 34


Symbol 2 (2008-2013, petrol) 
  • General information
  • User manual
  • Maintenance
  • Power unit
  • Engine repair
  • Cooling system
  • Fuel system
  • Exhaust system
  • Ignition system
  • Transmission
  • Clutch
  • Mechanical gearbox
  • Automatic gearbox
  • Drive shafts
  • Chassis, running gear
  • Front suspension
  • Rear suspension
  • Steering
  • Brake system
  • Body and interior
  • Exterior (external elements)
  • Interior (internal elements)
  • Doors, locks and windows
  • Heating and ventilation
  • Electrical equipment
  • Equipment and devices
  • Headlights and lighting
  • Power devices
  • Electrical circuits
Symbol 1 (1999-2008, petrol) 
  • General information
  • User manual
  • Car care
  • Maintenance
  • Power unit
  • Engine repair
  • Cooling and lubrication system
  • Supply system
  • Exhaust system
  • Ignition system
  • Transmission
  • Clutch
  • Mechanical gearbox
  • Automatic gearbox
  • Drive shafts
  • Chassis, running gear
  • Car suspension
  • Steering
  • Brake system
  • Body and interior
  • Exterior (external elements)
  • Interior (internal elements)
  • Doors, locks and windows
  • Restoration and repair
  • Electrical equipment
  • Equipment and devices
  • Headlights and lighting
  • Power devices
  • Heating and ventilation
  • Electrical circuits
RenaultBook.ru © 2018–2026 | Mobile version | News and articles | Sitemap: EN BG BY UA RS HR RO PL SK HU | Administration | Site search | Bookmark
Duster 1 (2009-2017) | Fluence 1 (2009-2020, petrol) | Kangoo 1 (1997-2007) | Laguna 2 (2001-2007) | Logan 1 (2004-2012, petrol) | Logan 2 (2012-2020) | Megane 1 (1995-2002) | Megan 2 (2002-2009, petrol) | Sandero 1 (2007-2012, petrol) | Scenic 1 (1996-2003) | Symbol 1 (1999-2008, petrol) | Symbol 2 (2008-2013, petrol) | Renault 19 (1988-1996) | Espace I and II (1984-1996) | Espace III (1996-2002) | Clio 1 (1990-1998) |
We want your visit to be comfortable 😌 and use cookies 🍪 to do so.