



Contents: Brake light switch 🠛 Checking the brake light switch 🠛 Replacing the brake light switch 🠛 Troubleshooting 🠛
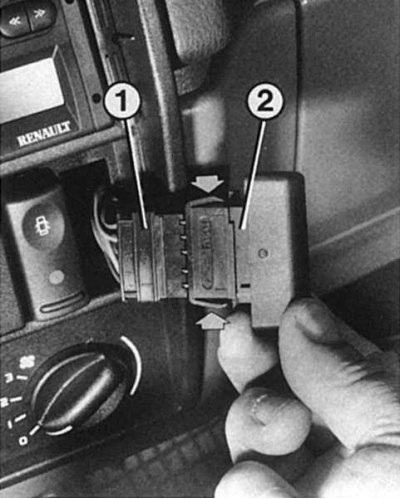
Left: If the direction indicators work properly, but the hazard warning light does not turn on, the cause is usually a faulty hazard warning light switch. If you press the switch hard several times, it usually starts working normally. If this does not happen, remove the switch (2) by squeezing its locking tabs and pulling it out of the groove, check the contacts of the pin connection (1).
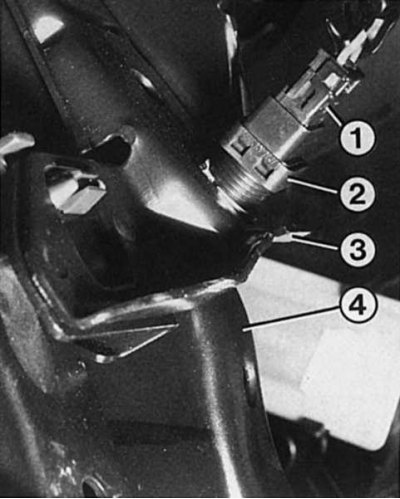
Right: When installing the brake light switch (2), it must be pressed against the pedal support (3) so that the switch pin also presses on the switch when the pedal (4) is released. For perfect operation, the pin block (1) must be connected correctly.
 |
 |
Brake lights should be checked as frequently as possible in the interests of safety.
- The garage wall behind your car should give off a red glow when you press the brake pedal.
- When driving, check using the rear view camera to see if the light from your brake lights is reflected in the headlight reflectors or on the paintwork of the car behind you.
Brake light switch
When you press your foot on the brake pedal, the spring in the brake light switch (it is fixed in the brake pedal suspension bracket) presses the control pin. At the same time, the contacts in the switch and the electrical circuit to the brake lights are closed. If the brake pedal is released, the pedal neck presses the control pin back to its original position and the brake light goes out.
Checking the brake light switch
If both brake lights do not come on, check as follows to see if the brake light switch is the cause.
1. Disconnect the wire ends.
2. Close the ends of the wires with a paper clip or a piece of wire.
3. If the brake lights are on, then the brake light switch is faulty.
Replacing the brake light switch
1. Disconnect the switch wire ends.
2. Turn the switch 90° and remove it from the mount.
3. When installing, insert the switch into the holder and make sure that the switch neck fits snugly against the brake pedal.
4. Turn the switch 90° counterclockwise.
5. After installing the new switch, connect the wires and check its operation.
6. When you press the brake pedal with your foot, the switch is adjusted automatically.
7. To check: the brake light switch must be installed so that when you press the brake pedal with your foot, the brake light does not come on until after 5 mm of pedal travel. Under any conditions, after 20 mm of pedal travel, the brake light must already be on. This distance is measured starting from the center of the brake pedal.
Troubleshooting
malfunction | Its reason | Troubleshooting |
| A. One of the brake lights is not on. | 1. The incandescent light bulb has burned out. 2. No ground contact. Do the other bulbs in this light come on? If not: 3. The wiring is faulty. | Replace. Check the ground connection. Check the wires. |
| B. Both brake lights are not on. | 1. The fuse is defective. 2. The brake light switch is faulty. 3. See A 1 and 3. | Replace. Check and replace if necessary. |
| C. The brake lights are on constantly. | 1. See B 2. 2. The brake light switch wires have direct contact. | Check the wires. |
Text of the original source on this website: www.renaultbook.ru