



Contents: Removal the door 🠛 Installing a door 🠛 Removal the door lock 🠛 Removal the lock cylinder 🠛 Removal the outside door handle 🠛 Removal the front door glass 🠛 Removal the rear door glass 🠛 Removal the triangular glass (window) 🠛 Removal the rear window lifting…🠛
To remove the door, the electrical contact connection in sectors A and B must be routed out separately. After loosening the TORX bolts (T40) in the upper and lower parts of the door fastening (1), the door can be lifted. However, the door stop must first be disassembled by unscrewing the TORX bolt (2) in body sectors A and B. Before installing the door, lubricate the hinge fastenings.
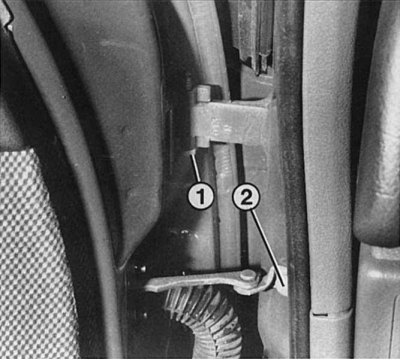
Removal the door
1. Remove the door stops by loosening the TORX screw in the body.
2. Also remove the lower side paneling of the channel.
3. Depending on the door being removed, disconnect the multi-pin connection between the A-pillar and B-pillar.
Installing a door
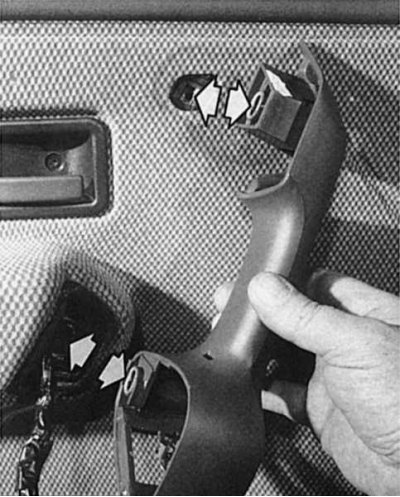
To disassemble the inner door handle, you need to unscrew the two screws indicated by the arrows. When installing the door trim, make sure that all parts are installed without distortions. Then snap the trim fastener into place.
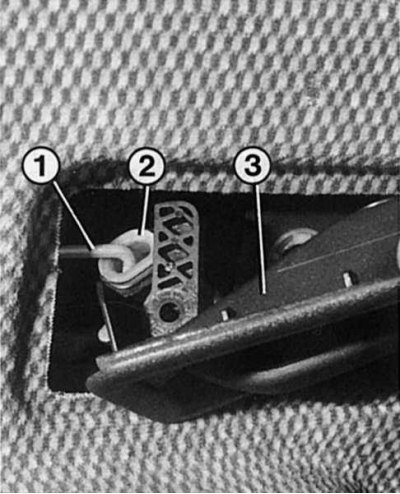
When removing the inner opening handles (3), turn the fastening (2) 90° without applying force from the transmitting rod (1) to the door lock.
Since the doors are already centered in the body and the hinges are welded to the body, you will mainly have to adjust the lock core.
1. Loosen the lock core slightly.
2. Close the door and press it to a position where the rear edge of the door does not touch other parts of the body.
3. Pull the outside door handle and leave the door slightly raised.
4. In this position, tighten the lock core.
5. Check the door fit and adjust if necessary.
Recommendation: if the door is installed too deeply, the contact with the door seal increases, but closing the door becomes much more difficult. As a result, the door makes a loud bang when closing. The less pressure on the seal, the easier the door closes.
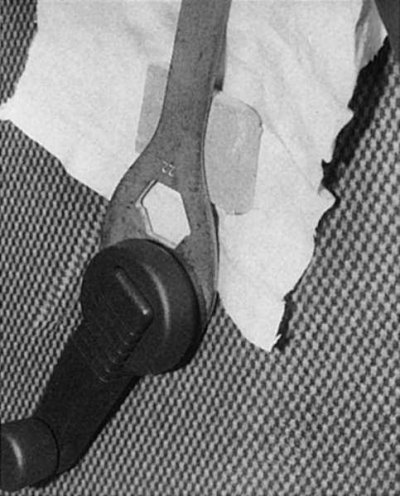
The picture shows how to press the window lifter handle off the axle without a special tool, using a flat wrench and a wooden stop. Be sure to put a rag underneath, as the textile structure of the door trim surface is very sensitive to impacts and pressure.
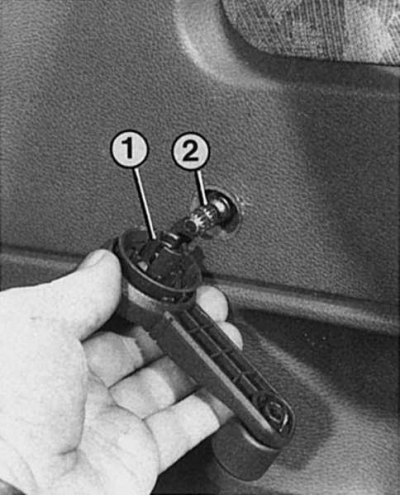
The clamping action of the teeth of the handle (1) holds the window lifter handle on the gear axis (2). When the glass is fully raised, the window lifter handle is set at an angle of 45° from the vertical axis forward.
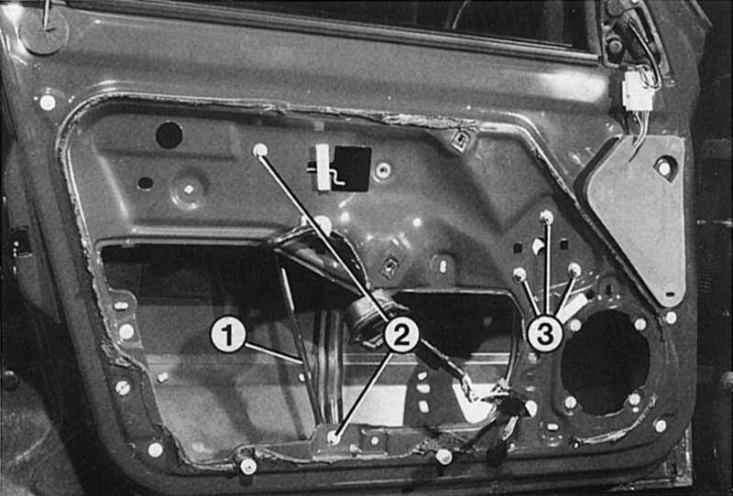
1 - lifting rail; 2 - window lifter mount; 3 - nuts for fastening the window lifter handle mechanism (for electric and manual windows identical).
After removing the door trim, all components inside it become accessible.
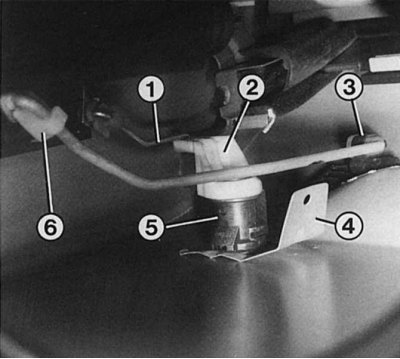
When looking inside the door, you can see the following elements: 1 - pushing rod of the lock cylinder to the door; 2 - lever segment of the lock cylinder; 3 - clamp retainer of the outer door handle bracket; 4 - safety bracket of the lock cylinder; 5 - lock cylinder; 6 - clamping fastener of the push rod to the door lock.
1. Raise the glass until it stops. Mark the position of the window lift handle.
2. Remove the window lifter handle from the axle. To do this, use two screwdrivers or a flat-head wrench inserted between the disk in the window lifter handle and the trim on the wooden stop to press the handle off the gear axle. To protect the trim between the tools and the trim, place a rag under the wooden stop.
3. At the rear edge of the side shelf at the bottom of the door, remove the screw (T20).
4. Remove the speakers from the doors. To do this, turn the speaker covers counterclockwise. Then unscrew the 4 screws and remove the speaker. Do not forget to disconnect the contact connection.
5. In the speaker panel, unscrew the 4 screws (T20) that become visible after removing it.
6. Carefully lift the shelf so that the lower part of the two support rings hangs down and remove it.
7. Using a flat-head screwdriver, carefully remove the door handle cover.
8. Remove the window lift control buttons from the top of the inside of the door and disconnect them from the wires.
9. Remove the wire harness holders from the mounting bracket in the door armrest.
10. Carefully remove the foam pads from the door, which will need to be put back in place during assembly.
11. Loosen the 2 mounting screws (T30).
12. Remove the inside door handle. If necessary, remove the window regulator wire from the wiring harness.
13. Remove the cover from the door latch (tORX T30 screw).
14. Turn the lock 90° and unhook it from the rod.
15. The inner door trim is additionally secured with safety clips and adhesives that retain their elasticity on the door for a long time. Therefore, pull the trim at the lower edge of the door body and use a sharp knife to separate the adhesive stretchers that have stretched out.
16. Carefully separate the door trim from the metal in this way and release it from the mounting clamps.
17. If the fasteners around the entire perimeter have been removed, pull the trim upwards from the glass seal and through the lock retainer handle.
18. When installing, ensure that the top edge of the trim is positioned correctly so that the fastening clamps are properly secured.
19. If the fixation is poor, remove the old sealing layer and apply a new one to the door surface if necessary.
20. When reassembling, which is carried out in the reverse order of removal, check that all protruding parts on the fasteners, as well as both opposite clamp fasteners, are precisely aligned with each other.
Note: Recommendation: to separate the remains of the adhesive material, it is best to use a plastic knife so as not to damage the paint coating. After separating the remains of the adhesive material, make sure that the areas covered with this material no longer touch each other, otherwise they will immediately stick to each other and make it difficult to remove the lining.
Do not touch the glued areas, as this will negatively affect the strength of the connection during subsequent assembly.
Removal the door lock
1. Remove the door trim
2. On the narrow side of the door, unscrew the 3 TORX screws securing the door lock.
3. Disconnect the clip segments from the door lock transfer rods and the outer and inner door release handles.
4. Remove the door lock, if a central lock is installed, together with the servomotor from the door body.
5. Disconnect the connector.
6. Unscrew one screw and remove (if there is a central lock) servomotor from the door lock.
7. Before installation, before putting the trim on the doors, check the operation of the device.
Removal the lock cylinder
Remove the door trim as described.
1. Unhook the lock cylinder push rod retainer clip.
2. Pull the lock cylinder retainer aside.
3. Remove the lock cylinder from the door.
4. Before installation, clean the door cylinder socket and do not forget to install the sealing gasket.
Removal the outside door handle
1. Remove the door trim.
2. Disconnect the handle rods from the door lock. Unscrew the door handle mounting screw.
3. Remove the handle with rods from the outside.
4. During installation, before installing the door trim, check the operation of the handle.
Removal the front door glass
1. Remove the door trim.
2. Lower the glass and remove the sealing rubbers from the door shaft.
3. Lower the glass so that its frame is accessible.
4. Remove the glass from the frame in the door frame. To do this, press out both pins of the retainer clamp and remove the clamp from the side of the glass frame pin.
5. Lower the glass clip completely.
6. Raise the glass and wedge it with a suitable wedge.
7. Tilt the glass towards the door hinge and pull it out at an angle upwards towards the lock from the door shaft.
8. After installing the glass, before putting on the trim, check the operation of the window lift mechanism. The glass should not get stuck and should rise easily along the entire length of the stroke.
Removal the rear door glass
1. Remove the door trim.
2. Lower the glass and remove the sealing rubbers from the door shaft.
3. Lower the glass so that its frame is accessible.
4. Remove the glass bus (2 screws).
5. Lower the glass all the way.
6. Remove the rear door guide (at the top of the triangular window and at the bottom of the door body there is a screw).
7. Press the glass upwards and remove it, tilting it inwards and forwards, from the glass shaft.
8. If the glass needs to be replaced, knock the tire off the glass using careful blows from a wooden block. Mark its exact position beforehand.
9. When installing a new glass, use new rubber strips lubricated with lubricating soap and put the tire on the glass. Do not knock on the glass tire holder when doing this.
10. When installing the lifting rail, press the glass against the rear guide. Then tighten both screws.
11. After installing the glass, before putting on the trim, check the operation of the mechanism. The glass should not get stuck anywhere and should rise easily along the entire length of the stroke. If necessary, move the glass on the lifting rail.
Removal the triangular glass (window)
1. Remove the drop-down glass as described.
2. Remove the rear glass guide (one screw at the top and one screw at the bottom).
3. Move the glass to the side, tilt it and remove it from the door frame.
Removal the rear window lifting device
Removal of the front lifting device is described in the section Electric windows; and this description fits without any restrictions to ordinary window lifters.
1. Remove the door trim.
2. Lower the glass to access the clip.
3. Disconnect the lifting rail from the window regulator (2 screws).
4. Push the glass upward and secure it with adhesive tape in the window socket.
5. Unscrew the 2 screws securing the window lifter shaft.
6. Unscrew the screw at the bottom, in the door body.
7. Tilt the lower part of the window lift mechanism in the door body back and pull it out of the cutout in the door body. At the same time, make sure that the upper part does not remain hanging on the door lock rod and lever system.
8. When installing the glass lifting rail, press it against the guide rail.