
English Русский
Български
Беларускі
Український
Српски
Hrvatski
Română
Polski
Slovenský
Magyar
Bookmark Contacts Articles Sitemap
Company vehicles Peugeot Company vehicles Opel Company vehicles Skoda Company vehicles Land Rover Company vehicles Mitsubishi Company vehicles Volkswagen Company vehicles Honda
RenaultBook.ru


Duster   Fluence   Kangoo   Laguna   Logan   Megane   Sandero   Scenic   Symbol   Clio   Other
Clio 1 (1990-1998)

Valve clearances — adjustment (Renault Clio 1)

  • Main
  • Clio
  • Clio 1 (1990-1998)
  • Power unit
  • Petrol engines 1.2 l (D)
  • Valve clearances — adjustment
0
Note: This action is not part of the maintenance procedures. This should only be done if valve mechanism noise is detected, or if there is a suspicion that power is being lost due to incorrect valve clearances. A new valve cover gasket may be required.


1. Remove the intake manifold as described in Section 4C.

2. Unscrew the bolts and remove the valve cover and gasket.

3. To make the engine easier to turn over, remove the spark plugs as described in Section 1.

4. Draw the position of the valves on a piece of paper, numbering them from the flywheel and labeling the inlet and outlet according to the cylinders (those. 1I, 1E, 2I, 2E, 3E, 3I, 4E, 4I). The intake valves are located on the intake manifold side and the exhaust valves are located on the exhaust manifold side. After adjusting the clearance of the corresponding valve, cross it out on paper.

5. Turn the crankshaft clockwise until piston No. 1 is in the TDC position as described in Chapter 3. Do not lock the crankshaft in this position. Continue turning the crankshaft until the first of the valve clearance adjustment marks (semicircular marks) on the camshaft sprocket will not align with the mark on the engine mount bracket/upper drive belt cover, or valve cover where applicable (if necessary, temporarily install the valve cover) (see illustration).
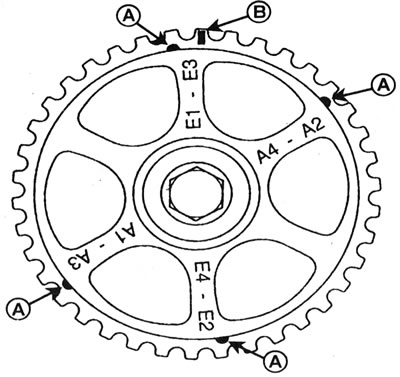
4.5. The first of the valve clearance adjustment marks (A), designated «E1-E3» on the camshaft…

4.5. The first of the valve clearance adjustment marks (A), designated "E1-E3" on the camshaft sprocket, must be aligned with the mark (B) on the valve cover (temporarily install the lid).


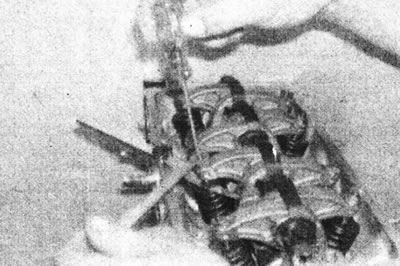
6. Insert the feeler gauge of the correct thickness (see Specifications) between the exhaust valve stem of cylinder No. 1 and the end of the rocker arm. If adjustment is necessary, loosen the lock nut on the rocker arm and turn the adjustment screw with a small screwdriver (see illustrations).
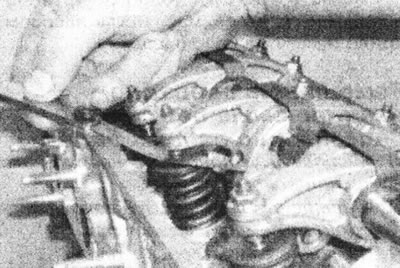
4.6a. Check the valve clearances using a feeler gauge...
4.6a. Check the valve clearances using a feeler gauge...


4.6b....and adjust it if necessary using a socket wrench and screwdriver.

4.6b....and adjust it if necessary using a socket wrench and screwdriver.


While holding the adjustment screw, tighten the lock nut (it is recommended to use a torque wrench to avoid distorting the screw threads) and recheck the adjustment, then repeat the adjustment procedure on the exhaust valve of cylinder #3. Note that the clearances for the intake and exhaust valves are different.


7. Rotate the crankshaft clockwise until the second valve clearance adjustment mark on the camshaft sprocket aligns with the mark on the top of the timing belt cover or valve cover (see illustration 4.5). Adjust the intake valve clearances for cylinders #1 and #3. Continue adjusting the valve clearances in the following sequence.

Clearance adjustment mark (the crankshaft rotates clockwise from the TDC mark on the camshaft sprocket)Adjustable valves
FirstGraduation sessions #1 and #3
SecondInlet #1 and #3
ThirdGraduation sessions #2 and #4
FourthInlet #2 and #4

8. Remove the socket or wrench from the crankshaft pulley bolt.

9. Install the spark plugs as described in Section 1.

(Text published on the website: renaultbook.ru)

10. Install the valve cover using a new gasket and tighten the mounting bolts in a spiral pattern (working from the center outward) in this in Specifications in order.

11. Install the intake manifold as described in Section 4C.
This article is available on: russian, bulgarian, belarusian, ukrainian, serbian, croatian, romanian, polish, slovak, hungarian
Article has been reviewed by editor: Fedoseev Denis
Share with friends:
Previous
Clio 1: Petrol engines 1.2 l (D)
Next

Top dead center (TDC) for piston #1 — location
Compression Test — description
General description of the 1149 cc engine (D series)
1149cc Engine Specifications (D Series)
Crankshaft pulley — removal and installation
Timing Belt Covers — removal and installation
Toothed drive belt — removal, inspection, installation and adjustment
Timing Belt and Sprocket Tensioner Mechanism — removal, inspection…
Front camshaft oil seal — replacement
Other articles on other Renault models

➽ Valve clearances — adjustment Renault Espace I and II (1984-1996)
➽ Checking clearances in the valve drive mechanism of H4J and M4R… Renault Fluence 1 (2009-2020, petrol)
➽ Adjusting clearances in the valve drive mechanism Renault Kangoo 1 (1997-2007)
➽ Adjusting valve clearances Renault Logan 1 (2004-2012, petrol)
➽ Checking and adjusting valve clearances Renault Megane 1 (1995-2002)
Link to this article in different formats
Reviews and comments of visitors
No comments yet


Add two numbers 11 + 27


Clio 1 (1990-1998) 
  • General information
  • Maintenance
  • Troubleshooting
  • Power unit
  • Petrol engines 1.1 l (C)
  • Petrol engines 1.2 l (D)
  • Petrol engines 1.2/1.4 l (E)
  • Petrol engines 1.8 l (F)
  • Diesel engines
  • Overhaul of engines
  • Cooling and heating
  • Fuel system (carburetor)
  • Central fuel injection
  • Distributed fuel injection
  • Fuel system (diesel)
  • Starting and charging system
  • Ignition system (transistor)
  • Ignition system (electronic)
  • Pre-heating of diesel engines
  • Transmission
  • Clutch
  • Manual gearbox
  • Automatic gearbox
  • Drive shafts
  • Chassis, running gear
  • Brake system
  • Car suspension
  • Steering system
  • Body and interior
  • Exterior (external elements)
  • Doors, locks and windows
  • Electrical equipment
  • Equipment and devices
  • Electrical circuits
RenaultBook.ru © 2018–2026 | Mobile version | News and articles | Sitemap: EN BG BY UA RS HR RO PL SK HU | Administration | Site search | Bookmark
Duster 1 (2009-2017) | Fluence 1 (2009-2020, petrol) | Kangoo 1 (1997-2007) | Laguna 2 (2001-2007) | Logan 1 (2004-2012, petrol) | Logan 2 (2012-2020) | Megane 1 (1995-2002) | Megan 2 (2002-2009, petrol) | Sandero 1 (2007-2012, petrol) | Scenic 1 (1996-2003) | Symbol 1 (1999-2008, petrol) | Symbol 2 (2008-2013, petrol) | Renault 19 (1988-1996) | Espace I and II (1984-1996) | Espace III (1996-2002) | Clio 1 (1990-1998) |
We want your visit to be comfortable 😌 and use cookies 🍪 to do so.