
English Русский
Български
Беларускі
Український
Српски
Hrvatski
Română
Polski
Slovenský
Magyar
Bookmark Contacts Articles Sitemap
Company vehicles Peugeot Company vehicles Opel Company vehicles Skoda Company vehicles Land Rover Company vehicles Mitsubishi Company vehicles Volkswagen Company vehicles Honda
RenaultBook.ru


Duster   Fluence   Kangoo   Laguna   Logan   Megane   Sandero   Scenic   Symbol   Clio   Other
Clio 1 (1990-1998)

Fuel injectors — inspection, removal and installation (Renault Clio 1)

  • Main
  • Clio
  • Clio 1 (1990-1998)
  • Power unit
  • Fuel system (diesel)
  • Fuel injectors — inspection, removal and installation
0
Contents: Examination 🠛 Removal 🠛 Installation 🠛
Warning: Handle fuel injectors with extreme caution. Never place your hands or any other body parts under the nozzle jet, as the high operating pressure may cause the fuel jet to penetrate the skin, resulting in fatal injuries. It is strongly recommended that all work involving pressure testing of injectors be performed by a fuel injection system specialist or dealer.


Examination


1. Injectors wear out with long-term use, and it is reasonable to expect that they will need repair or replacement after 100,000 km. A precise check of the serviceability, overhaul and calibration of the injectors must be entrusted to a specialist. A defective injector, which may be the cause of detonation or smoking, can be identified without disassembling as follows.

2. Start the engine, set it to fast idle mode. Gradually loosen the coupling on each injector one at a time. Once the coupling on the faulty injector is loosened, the detonation or smoking should stop.

Removal


3. Carefully clean the area around the injectors and injector tube connecting nuts.

4. Disconnect the outlet pipes from the injectors (see illustration).
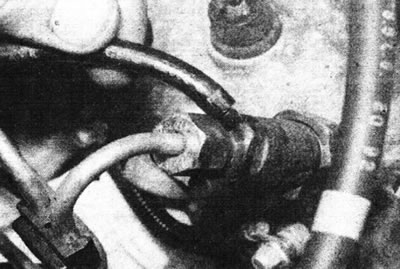
16.4. Disconnect the outlet tubes from the top beer nozzles.

16.4. Disconnect the outlet tubes from the top beer nozzles.


5. Unscrew the connecting nuts securing the injector tubes to the high-pressure fuel pump. Cover open couplings to prevent dirt from entering.

6. Unscrew the nuts and disconnect the tubes from the injectors (see illustration).
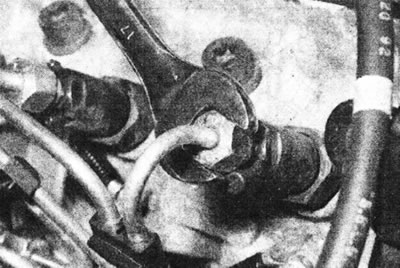
16.6. Disconnect the fuel lines from the injectors.

16.6. Disconnect the fuel lines from the injectors.


If necessary, the tubes can be removed completely. Note the location of the brackets attached to the tubes. Cover the ends of the nozzles to prevent dirt from entering.

7. Unscrew the injectors using a deep socket or open-end wrench (27 mm) and remove them from the cylinder head (see illustrations).
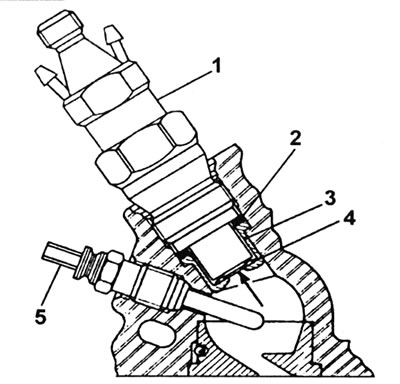
16.7a. Fuel injector in section: 1 - Fuel injector; 2 - Copper washer; 3 - Bushing; 4 - Sealing…

16.7a. Fuel injector in section: 1 - Fuel injector; 2 - Copper washer; 3 - Bushing; 4 - Sealing fireproof washer; 5 - Glow plug.
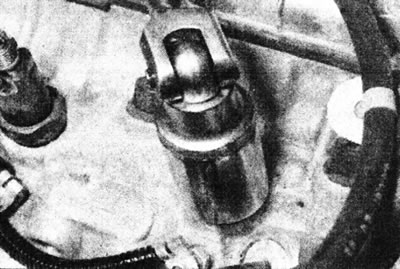


16.7b. Unscrew the injectors...
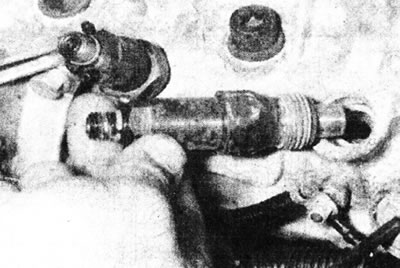
16.7b. Unscrew the injectors...


16.7 sec....and remove them from the cylinder head.

16.7 sec....and remove them from the cylinder head.


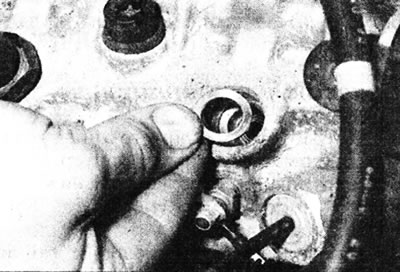
8. Remove the copper washers and fire washers from the cylinder head. Also remove the bushings if they are loose (see illustrations).
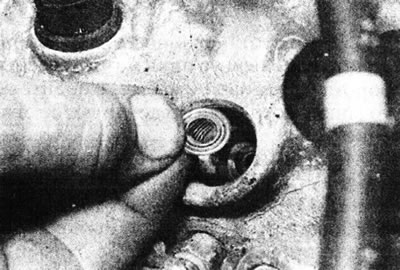
16.8a. Remove the copper washers...
16.8a. Remove the copper washers...


16.8b....and sealing fireproof washers.

16.8b....and sealing fireproof washers.


Installation


9. Purchase new copper and fire washers. Also replace the bushings if they are damaged.

10. Try not to drop the nozzles. Also, do not clamp them in a bench vise.

11. Begin installation by inserting the bushings (if deleted) into the cylinder head. Install new fire washers into the cylinder head. Please note that these washers must be installed with the convex side down (to the cylinder head) (see illustration).

[Original of this article on the website: www.RenaultBook.ru]
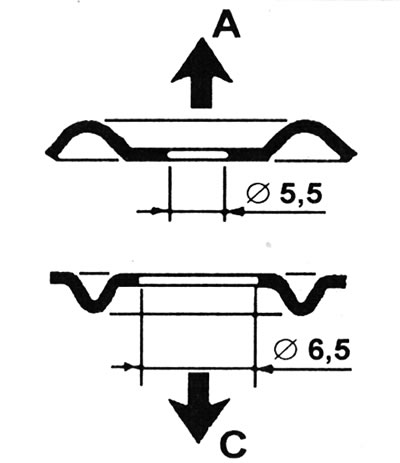
16.11. Orientation of the fireproof washer during installation: A - Early modification washer -…

16.11. Orientation of the fireproof washer during installation: A - Early modification washer - convex side up; C - Late modification washer - convex side down.


12. Install new copper washers into the cylinder head.

13. Insert the injectors and tighten them to the specified tightening torque Specifications.

14. Install the injector tubes and tighten the connecting nuts securely. Place the clamps on the tubes as marked before removal.

15. Connect the drain pipes.

16. Start the engine. If this fails, bleed the fuel system, see Chapter 7.
This article is available on: russian, bulgarian, belarusian, ukrainian, serbian, croatian, romanian, polish, slovak, hungarian
Article has been reviewed by editor: Fedoseev Denis
Share with friends:
Previous
Clio 1: Fuel system (diesel)
Next

Injection timing — checking and adjustment
Injection timing — testing and adjustment methods
Fuel pump — removal and installation
Fuel Shut-Off Valve — description, removal, and installation
Cold Start Injection Timing Correction Device — checking, removing…
Collectors — removal and installation
Idle speed and deceleration frequency — checking and adjustment
General description and precautions of the exhaust gas aftertreatment…
Emission Control Components — inspection and replacement
Other articles on other Renault models

➽ Fuel distribution ramp / injectors Renault Duster 1 (2009-2017)
➽ Removal and installation of fuel rail and injectors Renault Fluence 1 (2009-2020, petrol)
➽ Removal and installation of the fuel distribution rail and… Renault Laguna 2 (2001-2007)
➽ Diagnostics and cleaning of fuel injectors Renault Logan 2 (2012-2020)
➽ Removal and installation of the fuel distribution rail and… Renault Megan 2 (2002-2009, petrol)
Link to this article in different formats
Reviews and comments of visitors
No comments yet


Add two numbers 39 + 50


Clio 1 (1990-1998) 
  • General information
  • Maintenance
  • Troubleshooting
  • Power unit
  • Petrol engines 1.1 l (C)
  • Petrol engines 1.2 l (D)
  • Petrol engines 1.2/1.4 l (E)
  • Petrol engines 1.8 l (F)
  • Diesel engines
  • Overhaul of engines
  • Cooling and heating
  • Fuel system (carburetor)
  • Central fuel injection
  • Distributed fuel injection
  • Fuel system (diesel)
  • Starting and charging system
  • Ignition system (transistor)
  • Ignition system (electronic)
  • Pre-heating of diesel engines
  • Transmission
  • Clutch
  • Manual gearbox
  • Automatic gearbox
  • Drive shafts
  • Chassis, running gear
  • Brake system
  • Car suspension
  • Steering system
  • Body and interior
  • Exterior (external elements)
  • Doors, locks and windows
  • Electrical equipment
  • Equipment and devices
  • Electrical circuits
RenaultBook.ru © 2018–2026 | Mobile version | News and articles | Sitemap: EN BG BY UA RS HR RO PL SK HU | Administration | Site search | Bookmark
Duster 1 (2009-2017) | Fluence 1 (2009-2020, petrol) | Kangoo 1 (1997-2007) | Laguna 2 (2001-2007) | Logan 1 (2004-2012, petrol) | Logan 2 (2012-2020) | Megane 1 (1995-2002) | Megan 2 (2002-2009, petrol) | Sandero 1 (2007-2012, petrol) | Scenic 1 (1996-2003) | Symbol 1 (1999-2008, petrol) | Symbol 2 (2008-2013, petrol) | Renault 19 (1988-1996) | Espace I and II (1984-1996) | Espace III (1996-2002) | Clio 1 (1990-1998) |
We want your visit to be comfortable 😌 and use cookies 🍪 to do so.