
English Русский
Български
Беларускі
Український
Српски
Hrvatski
Română
Polski
Slovenský
Magyar
Bookmark Contacts Articles Sitemap
Company vehicles Peugeot Company vehicles Opel Company vehicles Skoda Company vehicles Land Rover Company vehicles Mitsubishi Company vehicles Volkswagen Company vehicles Honda
RenaultBook.ru


Duster   Fluence   Kangoo   Laguna   Logan   Megane   Sandero   Scenic   Symbol   Clio   Other
Clio 1 (1990-1998)

Every 20,000 km — check high-tension wires, distributor cap and rotor (Renault Clio 1)

  • Main
  • Clio
  • Clio 1 (1990-1998)
  • General information
  • Maintenance
  • Every 20,000 km — check high-tension wires, distributor cap and rotor
0
1. Check the high-voltage wiring whenever new spark plugs are installed.

2. Before removing the wires, make sure that they are numbered accordingly so as not to get confused during installation (see illustrations).
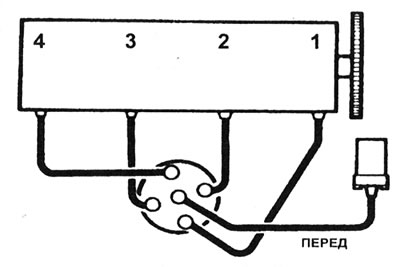
23.2a High voltage wire connection diagram - C-series motor.
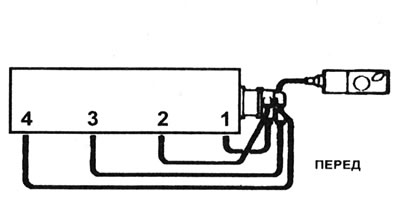
23.2a High voltage wire connection diagram - C-series motor.


23.2b High Voltage Wire Wiring Diagram - All Other Motors.

23.2b High Voltage Wire Wiring Diagram - All Other Motors.


Disconnect one wire from the spark plug, grasping the tip and not the wire, otherwise you may break the wire connection.

3. Check the inside of the tip for corrosion in the form of white powder. Use a small screwdriver to remove the plaque. Make sure the tip is firmly seated on the spark plug. If necessary, use pliers to gently crimp the metal connector of the tip.

4. Using a clean cloth, wipe off any dirt and grease from the wires. Check them for burnt areas, cracks and other damage. Do not bend the wire, otherwise the conductor inside it may break.


5. Disconnect the other end of the wire from the distributor cap. Pull only by the tip. Check the tip for signs of corrosion. If you have an ohmmeter, check the continuity of the wire by connecting the meter to the ends of the wire. Finally, install the wire back in place.

6. Check the remaining wires in the same way.

7. If new high tension wires are required, purchase a set that is appropriate for your vehicle model and engine.

8. Remove the distributor cap, wipe it, and carefully inspect it inside and out for cracks, burnt lines, and worn contacts. Also inspect the distributor runner. Replace defective components. It is recommended that the distributor cap and rotor be replaced whenever new high voltage wires are installed. When installing a new cover, remove the high voltage wires from the old cover and install them on the new one in the same places.

9. Even if the ignition system is in excellent condition, some engines may be difficult to start due to moisture in the air shunting the ignition components. Holts Wet Start is an effective moisture remover. Holts Damp Start is used to seal the cap to prevent moisture from entering the ignition system, and in extreme cases, Holts Cold Start can help start the engine with a weak spark.
This article is available on: russian, bulgarian, belarusian, ukrainian, serbian, croatian, romanian, polish, slovak, hungarian
Article has been reviewed by editor: Fedoseev Denis
Share with friends:
Previous
Clio 1: Maintenance
Next

Every 20,000 km — Replace the air filter element
Every 10,000 km or 6 months — check the heating and air conditioning…
Every 10,000 km or 6 months — check the tightness of the wheel bolts
Every 10,000 km or 6 months — check the drive shaft boot
Every 10,000 km or 6 months — check steering and suspension components
Every 20,000 km — test drive
Every 58,000 km — check the air temperature control system
Every 58,000 km — Replace the fuel filter
Every 58,000 km — Replace transmission fluid and filter
Every 58,000 km — Check the rear brake shoe and drum
Other articles on other Renault models

➽ Checking high voltage wires Renault Logan 1 (2004-2012, petrol)
➽ Checking high voltage wires of K7J and K7M engines Renault Sandero 1 (2007-2012, petrol)
➽ High Voltage Wires — Checking Renault Scenic 1 (1996-2003)
➽ High voltage wires Renault 19 (1988-1996)
➽ Compression Stroke End Pressure — Check Renault Duster 1 (2009-2017)
Link to this article in different formats
Reviews and comments of visitors
No comments yet


Add two numbers 39 + 40


Clio 1 (1990-1998) 
  • General information
  • Maintenance
  • Troubleshooting
  • Power unit
  • Petrol engines 1.1 l (C)
  • Petrol engines 1.2 l (D)
  • Petrol engines 1.2/1.4 l (E)
  • Petrol engines 1.8 l (F)
  • Diesel engines
  • Overhaul of engines
  • Cooling and heating
  • Fuel system (carburetor)
  • Central fuel injection
  • Distributed fuel injection
  • Fuel system (diesel)
  • Starting and charging system
  • Ignition system (transistor)
  • Ignition system (electronic)
  • Pre-heating of diesel engines
  • Transmission
  • Clutch
  • Manual gearbox
  • Automatic gearbox
  • Drive shafts
  • Chassis, running gear
  • Brake system
  • Car suspension
  • Steering system
  • Body and interior
  • Exterior (external elements)
  • Doors, locks and windows
  • Electrical equipment
  • Equipment and devices
  • Electrical circuits
RenaultBook.ru © 2018–2026 | Mobile version | News and articles | Sitemap: EN BG BY UA RS HR RO PL SK HU | Administration | Site search | Bookmark
Duster 1 (2009-2017) | Fluence 1 (2009-2020, petrol) | Kangoo 1 (1997-2007) | Laguna 2 (2001-2007) | Logan 1 (2004-2012, petrol) | Logan 2 (2012-2020) | Megane 1 (1995-2002) | Megan 2 (2002-2009, petrol) | Sandero 1 (2007-2012, petrol) | Scenic 1 (1996-2003) | Symbol 1 (1999-2008, petrol) | Symbol 2 (2008-2013, petrol) | Renault 19 (1988-1996) | Espace I and II (1984-1996) | Espace III (1996-2002) | Clio 1 (1990-1998) |
We want your visit to be comfortable 😌 and use cookies 🍪 to do so.