



Attention! To perform the work, you need the T.Av. 1331 mandrel for installing the boot bearing.
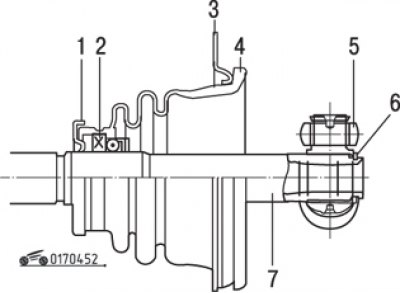
Fig. 4.52. Constant velocity joint type GL 69 ("tripod"): 1 – mudguard ring; 2 – support ring; 3 – holder; 4 – corrugated cover; 5 - three-spined; 6 – retaining ring; 7 – drive shaft
When working, refer to Fig. 4.52.
Work order:
- remove the drive shaft;
- remove the snap ring securing the joint to the shaft;
- mark the position of the joint on the shaft;
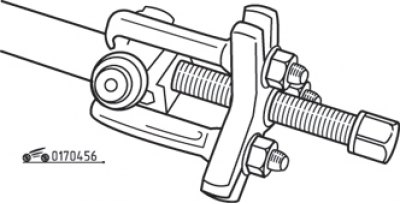
Fig. 4.56. Removing the joint from the drive shaft
- press the joint off the shaft using a puller (Fig. 4.56). Do not rest the puller jaws against the rollers, as they may become deformed;
- remove the bellows together with the bearing and mudguard ring in the same way as the hinge;
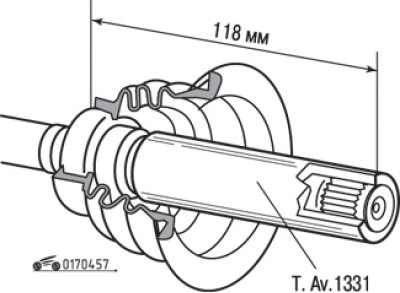
Fig. 4.57. Position of the GL 69 joint cover on the drive shaft (the arrow shows the groove on the shaft for installing the puller)
- for precise positioning on the shaft, the bearing of the new cover must be pressed onto it until the dimension L=(118±0.2) mm is obtained between the rear end of the bearing and the end of the shaft (Fig. 4.57). This dimension is obtained using the T.Av. 1331 mandrel, when its end is flush with the end of the shaft;
Note: To avoid deformation of sealed bearings and consequently grease leakage, do not press the bearing in with a hammer, use a press so that the applied force can be gradually increased.
- to press in, hold the shaft by the groove with a puller and install it on the shaft according to the marks made;
- after pressing, check the smooth movement of the hinge in all planes;
- secure the joint with a retaining ring by installing it in the groove of the shaft;
- fill the hinge housing and the cavity of the cover equally with grease from the tube supplied with the cover.