
English Русский
Български
Беларускі
Український
Српски
Hrvatski
Română
Polski
Slovenský
Magyar
Bookmark Contacts Articles Sitemap
Company vehicles Peugeot Company vehicles Opel Company vehicles Skoda Company vehicles Land Rover Company vehicles Mitsubishi Company vehicles Volkswagen Company vehicles Honda
RenaultBook.ru


Duster   Fluence   Kangoo   Laguna   Logan   Megane   Sandero   Scenic   Symbol   Clio   Other
Symbol 1 (1999-2008, petrol) Symbol 2 (2008-2013, petrol)

Installing the piston group into the cylinder block (Renault Symbol 1)

  • Main
  • Symbol
  • Symbol 1 (1999-2008, petrol)
  • Power unit
  • Engine repair
  • Installing the piston group into the cylinder block
0
It is assumed that the crankshaft is installed in the cylinder block before starting work.

Work order:
  • clean the surface of the connecting rod bearings with a lint-free cloth. If new bearings are being installed, wash them with kerosene and wipe dry;
  • place the liners in the connecting rod caps according to the marks made earlier;
  • place the liners in the lower heads of the connecting rods according to the marks made earlier;
  • lubricate the engine cylinder bore, pistons and piston rings with clean engine oil. Lay each piston-connecting rod assembly in order on a work surface. Place short lengths of plastic hose over the bolt threads or wrap them with electrical tape to protect the engine cylinder bore during assembly;
  • install the rings so that the locks are offset by 120° relative to each other, then compress the piston of the first cylinder in the mandrel for installation in the cylinder block;
  • the "V" mark on the piston bottom should be directed towards the flywheel;
  • install the crankshaft so that the connecting rod journal of the first cylinder is at BDC;
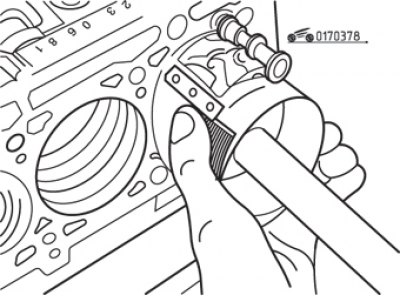
Fig. 3.78. Moving the piston into the cylinder with a wooden rod

Fig. 3.78. Moving the piston into the cylinder with a wooden rod


  • carefully insert the piston into the cylinder, using a wooden rod to help and directing the lower head of the connecting rod onto the crankshaft journal (Fig. 3.78);
  • to measure the connecting rod bearing clearances, use the Plastigage kit as described above for the main bearings. Once the clearances have been checked, decide whether to use the old bearings or install new ones. The latter will entail appropriate regrinding of the crank journals;
  • check the crankshaft bearing clearances and, after making any necessary adjustments, remove any remaining Plastigage from the journals and bearings;
  • lubricate the journals and installed bearings generously with clean engine oil. Install the covers in order.
  • Tighten the cover bolts to the specified torque, turning the crankshaft each time to ensure it rotates freely before moving on to the next cover.

Finally, install the oil pump, oil pan and cylinder head as described above.

Original publication on the portal (renaultbook)
This article is available on: russian, bulgarian, belarusian, ukrainian, serbian, croatian, romanian, polish, slovak, hungarian
Article has been reviewed by editor: Podkrepilov Maxim
Share with friends:
Previous
Symbol 1: Engine repair
 

Checking the cylinder block
Cleaning the cylinder block
Removal, inspection and installation of the crankshaft
Removal, disassembly and assembly of the connecting rod and piston…
Removal and installation the oil pump
 
Other articles on other Renault models

➽ Installing main bearing shells in the cylinder block bed Renault Megan 2 (2002-2009, petrol)
➽ Checking the mating surface of the K4M engine cylinder block Renault Fluence 1 (2009-2020, petrol)
➽ Disassembly, inspection and assembly of the cylinder block… Renault Laguna 2 (2001-2007)
➽ Setting the piston of the first cylinder to the TDC position of… Renault Logan 1 (2004-2012, petrol)
➽ Setting the piston of the first cylinder to the TDC position of… Renault Sandero 1 (2007-2012, petrol)
Link to this article in different formats
Reviews and comments of visitors
No comments yet


Add two numbers 46 + 43


Symbol 2 (2008-2013, petrol) 
  • General information
  • User manual
  • Maintenance
  • Power unit
  • Engine repair
  • Cooling system
  • Fuel system
  • Exhaust system
  • Ignition system
  • Transmission
  • Clutch
  • Mechanical gearbox
  • Automatic gearbox
  • Drive shafts
  • Chassis, running gear
  • Front suspension
  • Rear suspension
  • Steering
  • Brake system
  • Body and interior
  • Exterior (external elements)
  • Interior (internal elements)
  • Doors, locks and windows
  • Heating and ventilation
  • Electrical equipment
  • Equipment and devices
  • Headlights and lighting
  • Power devices
  • Electrical circuits
Symbol 1 (1999-2008, petrol) 
  • General information
  • User manual
  • Car care
  • Maintenance
  • Power unit
  • Engine repair
  • Cooling and lubrication system
  • Supply system
  • Exhaust system
  • Ignition system
  • Transmission
  • Clutch
  • Mechanical gearbox
  • Automatic gearbox
  • Drive shafts
  • Chassis, running gear
  • Car suspension
  • Steering
  • Brake system
  • Body and interior
  • Exterior (external elements)
  • Interior (internal elements)
  • Doors, locks and windows
  • Restoration and repair
  • Electrical equipment
  • Equipment and devices
  • Headlights and lighting
  • Power devices
  • Heating and ventilation
  • Electrical circuits
RenaultBook.ru © 2018–2026 | Mobile version | News and articles | Sitemap: EN BG BY UA RS HR RO PL SK HU | Administration | Site search | Bookmark
Duster 1 (2009-2017) | Fluence 1 (2009-2020, petrol) | Kangoo 1 (1997-2007) | Laguna 2 (2001-2007) | Logan 1 (2004-2012, petrol) | Logan 2 (2012-2020) | Megane 1 (1995-2002) | Megan 2 (2002-2009, petrol) | Sandero 1 (2007-2012, petrol) | Scenic 1 (1996-2003) | Symbol 1 (1999-2008, petrol) | Symbol 2 (2008-2013, petrol) | Renault 19 (1988-1996) | Espace I and II (1984-1996) | Espace III (1996-2002) | Clio 1 (1990-1998) |
We want your visit to be comfortable 😌 and use cookies 🍪 to do so.