English Русский
Български
Беларускі
Український
Српски
Hrvatski
Română
Polski
Slovenský
Magyar
Bookmark Contacts Articles Sitemap
Company vehicles Peugeot Company vehicles Opel Company vehicles Skoda Company vehicles Land Rover Company vehicles Mitsubishi Company vehicles Volkswagen Company vehicles Honda
RenaultBook.ru


Duster   Fluence   Kangoo   Laguna   Logan   Megane   Sandero   Scenic   Symbol   Clio   Other
Symbol 1 (1999-2008, petrol) Symbol 2 (2008-2013, petrol)

Removal and installation the tailgate (Renault Symbol 1)

  • Main
  • Symbol
  • Symbol 1 (1999-2008, petrol)
  • Body and interior
  • Doors, locks and windows
  • Removal and installation the tailgate
0
Removal procedure:
  • disconnect the negative battery cable;
  • open the tailgate;

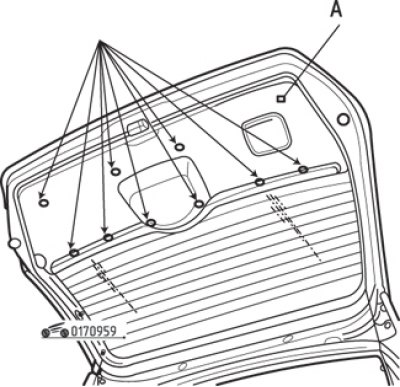
Fig. 9.59. Removing the rear door trim: A – fastening screw; arrows - upholstery holders

Fig. 9.59. Removing the rear door trim: A – fastening screw; arrows - upholstery holders

  • unscrew the fastening screw on the right side of the door trim, detach the plastic trim holders using a fork-type puller (Fig. 9.59);
  • remove the top panel from the tailgate (see section "Electrical equipment", subsection "Removal and installation the upper brake light");
  • disconnect the wiring from the rear window heating element, windscreen wiper motor and central locking servo motor (if it is provided);
  • disconnect the high brake light and windshield washer hose;
  • remove the wiring harness from the tailgate box and the hose supplying fluid to the windshield washer nozzle. To facilitate subsequent installation, tie a piece of string to the wiring harness and leave it in the door cavity;
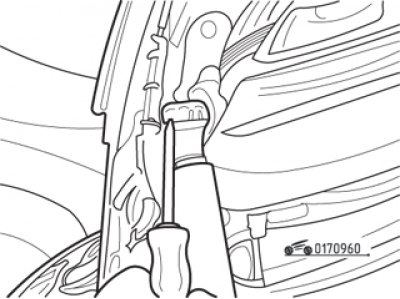
Fig. 9.60. Removing the tailgate support pillar stopper

Fig. 9.60. Removing the tailgate support pillar stopper


  • ask an assistant to hold the door. Disconnect the support posts from the door by pressing out the stoppers with a screwdriver (Fig. 9.60);
  • if the old door is to be installed, mark the position of the mounting nuts on the door;
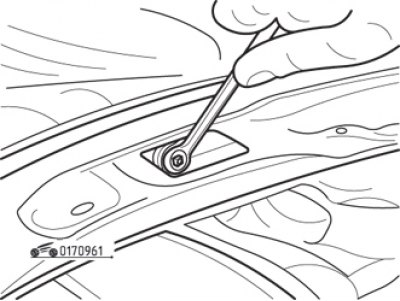
Fig. 9.61. Unscrew the two nuts securing the tailgate

Fig. 9.61. Unscrew the two nuts securing the tailgate

  • unscrew the two nuts under the top door panel (Fig. 9.61) and, together with an assistant, carefully remove the door from the car.

Installation procedure:
  • install the door by tightening the fastening nuts according to the marks made, without tightening them until the gaps in the door opening are aligned;
  • if you need to align the door along the bottom edge, adjust the position of the lock latch on the lower body panel. The position of the lock is changed by the oval holes for the screws that secure it.

[You can find the original at this link www.RenaultBook.ru]

Perform the remaining operations in the reverse order of removal.
This article is available on: russian, bulgarian, belarusian, ukrainian, serbian, croatian, romanian, polish, slovak, hungarian
Article has been reviewed by editor: Podkrepilov Maxim
Share with friends:
Previous
Symbol 1: Doors, locks and windows
Next

Removal and installation the outer rear door handle
Removal and installation the outer front door handle
Removal and installation the rear door lock
Removal and installation the front door lock
Removal and installation the rear door trim
Removal and installation the tailgate lock
Removal and installation front door window lifters
Removal and installation rear door window lifters
Removal and installation front door drop-down windows
Removal and installation rear door drop-down windows
Other articles on other Renault models

➽ Tailgate — Removal and Installation Renault Duster 1 (2009-2017)
➽ Tailgate and trunk lid Renault Fluence 1 (2009-2020, petrol)
➽ Tailgate Renault Kangoo 1 (1997-2007)
➽ Unlocking and locking the side doors and tailgate Renault Laguna 2 (2001-2007)
➽ Removal and installation the tailgate Renault Megane 1 (1995-2002)
Link to this article in different formats
Reviews and comments of visitors
No comments yet


Add two numbers 45 + 24


Symbol 2 (2008-2013, petrol) 
  • General information
  • User manual
  • Maintenance
  • Power unit
  • Engine repair
  • Cooling system
  • Fuel system
  • Exhaust system
  • Ignition system
  • Transmission
  • Clutch
  • Mechanical gearbox
  • Automatic gearbox
  • Drive shafts
  • Chassis, running gear
  • Front suspension
  • Rear suspension
  • Steering
  • Brake system
  • Body and interior
  • Exterior (external elements)
  • Interior (internal elements)
  • Doors, locks and windows
  • Heating and ventilation
  • Electrical equipment
  • Equipment and devices
  • Headlights and lighting
  • Power devices
  • Electrical circuits
Symbol 1 (1999-2008, petrol) 
  • General information
  • User manual
  • Car care
  • Maintenance
  • Power unit
  • Engine repair
  • Cooling and lubrication system
  • Supply system
  • Exhaust system
  • Ignition system
  • Transmission
  • Clutch
  • Mechanical gearbox
  • Automatic gearbox
  • Drive shafts
  • Chassis, running gear
  • Car suspension
  • Steering
  • Brake system
  • Body and interior
  • Exterior (external elements)
  • Interior (internal elements)
  • Doors, locks and windows
  • Restoration and repair
  • Electrical equipment
  • Equipment and devices
  • Headlights and lighting
  • Power devices
  • Heating and ventilation
  • Electrical circuits
RenaultBook.ru © 2018–2026 | Mobile version | News and articles | Sitemap: EN BG BY UA RS HR RO PL SK HU | Administration | Site search | Bookmark
Duster 1 (2009-2017) | Fluence 1 (2009-2020, petrol) | Kangoo 1 (1997-2007) | Laguna 2 (2001-2007) | Logan 1 (2004-2012, petrol) | Logan 2 (2012-2020) | Megane 1 (1995-2002) | Megan 2 (2002-2009, petrol) | Sandero 1 (2007-2012, petrol) | Scenic 1 (1996-2003) | Symbol 1 (1999-2008, petrol) | Symbol 2 (2008-2013, petrol) | Renault 19 (1988-1996) | Espace I and II (1984-1996) | Espace III (1996-2002) | Clio 1 (1990-1998) |
We want your visit to be comfortable 😌 and use cookies 🍪 to do so.