
English Русский
Български
Беларускі
Український
Српски
Hrvatski
Română
Polski
Slovenský
Magyar
Bookmark Contacts Articles Sitemap
Company vehicles Peugeot Company vehicles Opel Company vehicles Skoda Company vehicles Land Rover Company vehicles Mitsubishi Company vehicles Volkswagen Company vehicles Honda
RenaultBook.ru


Duster   Fluence   Kangoo   Laguna   Logan   Megane   Sandero   Scenic   Symbol   Clio   Other
Duster 1 (2009-2017)

Tailgate — Removal and Installation (Renault Duster 1)

  • Main
  • Duster
  • Duster 1 (2009-2017)
  • Body and interior
  • Exterior (external elements)
  • Tailgate — Removal and Installation
0
Contents: Removal without loops 🠛 Installation without hinges 🠛 Removal with loops 🠛 Installation with hinges 🠛 Disassembly 🠛 Assembly 🠛 Adjustment 🠛

Removal without loops


Remove the rear door trim.

Disconnect the connectors:
  • rear window wiper motor,
  • high brake light,
  • trunk door lock,
  • rear window heating element,
  • license plate lights.

Remove:
  • tailgate wiring harness,
  • rear window washer tube,
  • gas-filled tailgate struts.
  • bolts (1) securing the tailgate on both sides,
  • tailgate (the operation is performed by two people with an assistant).
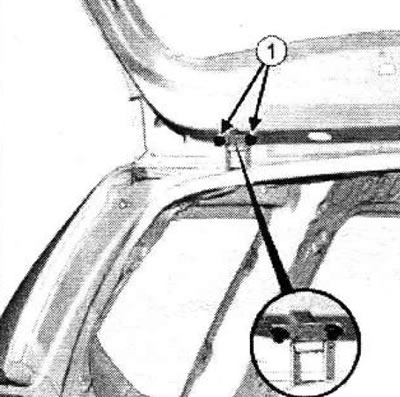
tailgate (the operation is performed by two people with an assistant).

Installation without hinges


Installation is carried out in the reverse order of removal.

Adjust the clearances and protrusions of the tailgate

Tighten the tailgate mounting bolts to the specified torque (21 Nm).

Removal with loops


Remove:
  • roof lining (partially),
  • rear door trim.


Disconnect the connectors:
  • rear window wiper motor,
  • high brake light,
  • trunk door lock,
  • rear window heating element,
  • license plate lights.

Remove:
  • tailgate wiring harness,
  • rear window washer tube,
  • gas-filled tailgate struts.
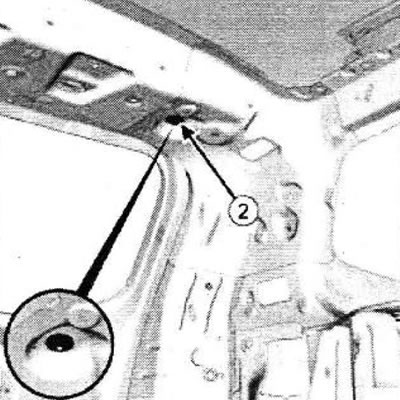
  • nuts (2) for fastening the rear door hinge on both sides,
  • tailgate (the operation is performed by two people with an assistant).

tailgate (the operation is performed by two people with an assistant).


Installation with hinges


Installation is carried out in the reverse order of removal.

Adjust the tailgate clearances.

Tighten the rear door hinge mounting bolt to the specified torque (21 Nm).

The following operations are performed when replacing the tailgate.

Note: The tailgate can be disassembled without removing it from the vehicle.


Disassembly


Remove:
  • manufacturer's logo,
  • logo,
  • tailgate trim,
  • license plate lights,
  • rear window wiper lever,
  • rear window wiper blade,
  • rear window washer nozzle.

Remove:
  • rear window wiper motor,
  • tailgate lock,
  • tailgate lock cylinder,
  • high brake light.
  • rear window,
  • door travel limiters when closing.

Assembly


It is done in reverse order.

Adjustment


Tightening torques
Tailgate mounting bolts21 Nm
Hinge fastenings21 Nm

Observe the adjustment sequence (1), (2), (3) and (4).
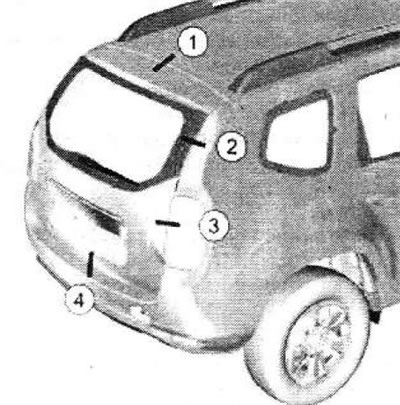
Observe the adjustment sequence (1), (2), (3) and (4).


The position of the tailgate can be adjusted in three ways:
  • tailgate mounting bolts,
  • as well as the nuts securing the tailgate hinges,
  • using the rear panel lock retainer amplifier.

Symbols A, B, C, D show how adjustments can be made.
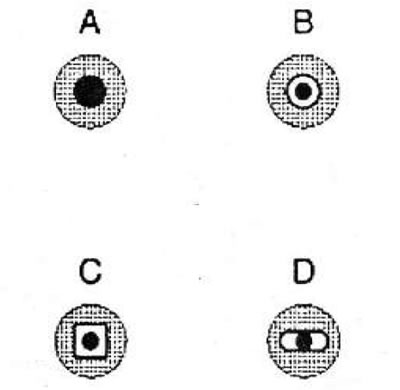
Symbols A, B, C, D show how adjustments can be made.


The black dot in the center indicates the bolt body.


The grey part of the symbol represents the adjustable element.

The white part of the symbol indicates the adjustment zone.

Adjusting the tailgate mounting bolts


Loosen the tailgate mounting bolts (1) on both sides of the vehicle.
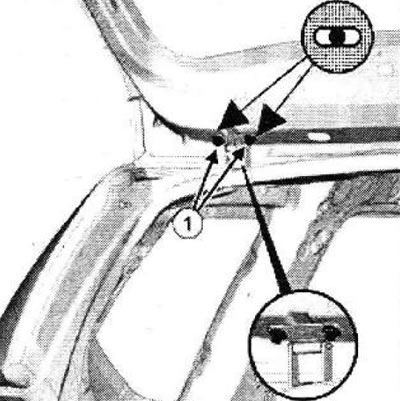
Loosen the tailgate mounting bolts (1) on both sides of the vehicle.


Adjust the tailgate clearances.

Tighten the tailgate mounting bolts to the specified torque (21 Nm).

Adjustment using hinge mounting nuts


Remove part of the roof lining.

Loosen the nuts (2) securing the hinges on both sides of the vehicle.
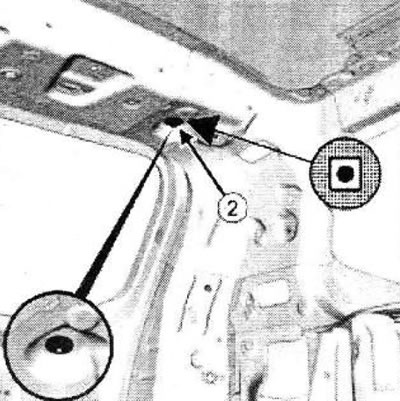
Loosen the nuts (2) securing the hinges on both sides of the vehicle.


Adjust the tailgate clearances.

Tighten the hinges to the required torque (21 Nm).

Install the roof lining.

Adjustment with the rear panel lock retainer amplifier


Remove the rear panel trim lock retainer.
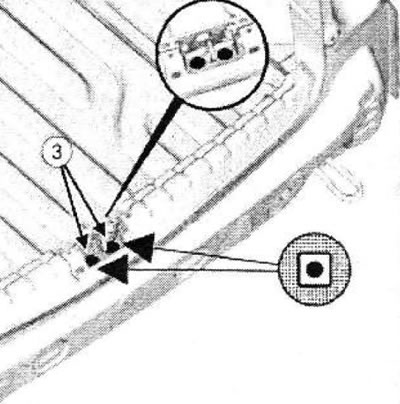
Remove the rear panel trim lock retainer.


Loosen the bolts securing the lock retainer (3) of the rear panel. Adjust the clearances of the rear door. Install the lock retainer of the rear panel trim.
This article is available on: russian, bulgarian, belarusian, ukrainian, serbian, croatian, romanian, polish, slovak, hungarian
Article has been reviewed by editor: Fedoseev Denis
Share with friends:
Previous
Duster 1: Exterior (external elements)
Next

Hood — removal, installation and adjustment
Side door frame seal
Fuel filler cap manhole cover
Rear side door
Front side door
Outer part of the rear opening element
Hood lock drive cable
Hood lock — removal and installation
Hood release cable
Hood stop — removal and installation
Other articles on other Renault models

➽ Tailgate and trunk lid Renault Fluence 1 (2009-2020, petrol)
➽ Tailgate Renault Kangoo 1 (1997-2007)
➽ Unlocking and locking the side doors and tailgate Renault Laguna 2 (2001-2007)
➽ Removal and installation the tailgate Renault Megane 1 (1995-2002)
➽ Replacing the tailgate stops Renault Sandero 1 (2007-2012, petrol)
Link to this article in different formats
Reviews and comments of visitors
No comments yet


Add two numbers 38 + 38


Duster 1 (2009-2017) 
  • User manual
  • Governing bodies
  • Car driving
  • Devices for comfort
  • Car care
  • Practical Tips
  • Power unit
  • Petrol engine (K4M)
  • Diesel engine (K9K)
  • Power system (K4M)
  • Power system (K9K)
  • Fuel system
  • Petrol injection system (K4M)
  • Diesel injection system (K9K)
  • Starting and ignition system
  • Cooling system
  • Exhaust system
  • Transmission
  • Clutch
  • Manual gearbox
  • Drive shafts
  • Chassis, running gear
  • Front bearing elements
  • Rear load-bearing elements
  • Steering
  • Control devices
  • Body and interior
  • Exterior (external elements)
  • Interior (internal elements)
  • Interior trim
  • Interior heating
  • Air conditioning
  • Electrical equipment
  • Equipment and devices
  • Headlights and lighting
  • Governing bodies
  • Wipers/washers
  • Audio system
  • Electrical circuits
RenaultBook.ru © 2018–2026 | Mobile version | News and articles | Sitemap: EN BG BY UA RS HR RO PL SK HU | Administration | Site search | Bookmark
Duster 1 (2009-2017) | Fluence 1 (2009-2020, petrol) | Kangoo 1 (1997-2007) | Laguna 2 (2001-2007) | Logan 1 (2004-2012, petrol) | Logan 2 (2012-2020) | Megane 1 (1995-2002) | Megan 2 (2002-2009, petrol) | Sandero 1 (2007-2012, petrol) | Scenic 1 (1996-2003) | Symbol 1 (1999-2008, petrol) | Symbol 2 (2008-2013, petrol) | Renault 19 (1988-1996) | Espace I and II (1984-1996) | Espace III (1996-2002) | Clio 1 (1990-1998) |
We want your visit to be comfortable 😌 and use cookies 🍪 to do so.